Kustom20
-
Posts
165 -
Joined
-
Last visited
-
Feedback
50%
3 Followers


Kustom20's Achievements
")


-
 Hi Guys, You have every right to express your feedback and make comments, unfortunately we can't control things that are out of our hands from non-conforming product to freight delays or the unfortunate manufacturing quality issue and needing to fab the parts again. We always send our customers tracking details for each and every order - during the end of the year we always get busy with end of year events and also start of the year gets busy as we need the time off for our holidays. We express to our customers that there could be delays due to influx in orders and always maintain contact, having a small team here does also provide a challenge, whether it be personal or family issues, mental health or the unfortunate passing of friends and family members. SAU has helped me personally through so much more than any of you guys can imagine. And I thank you for this and we will do our very best on any current orders
 -
Hi mate I’m in need of some custom work please
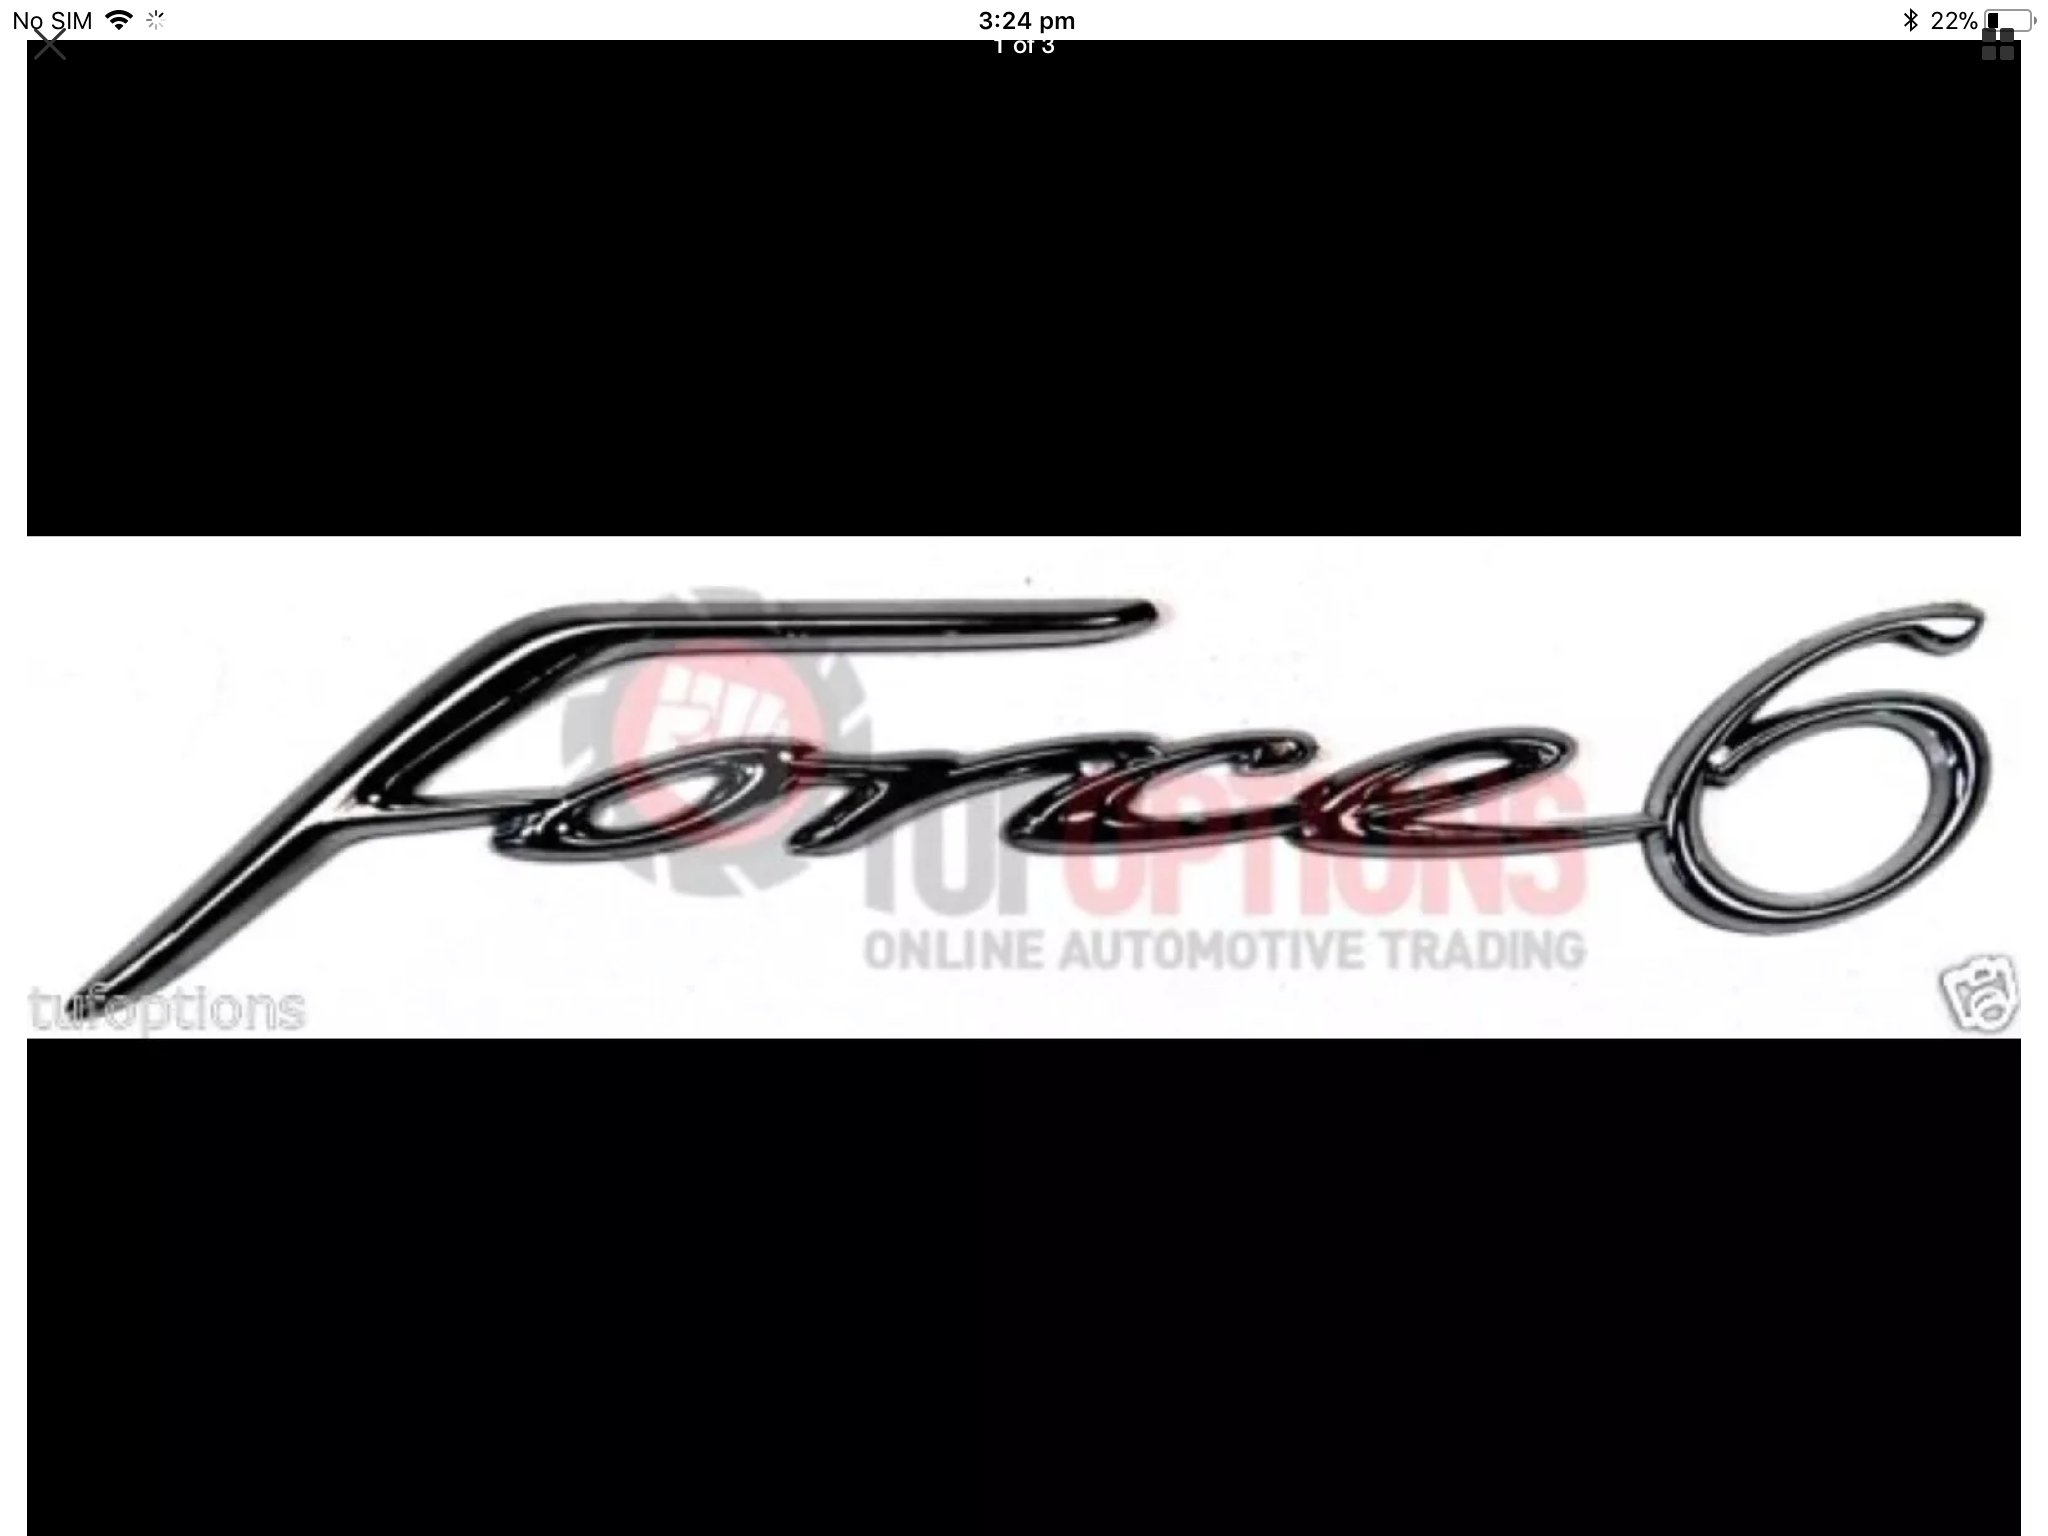
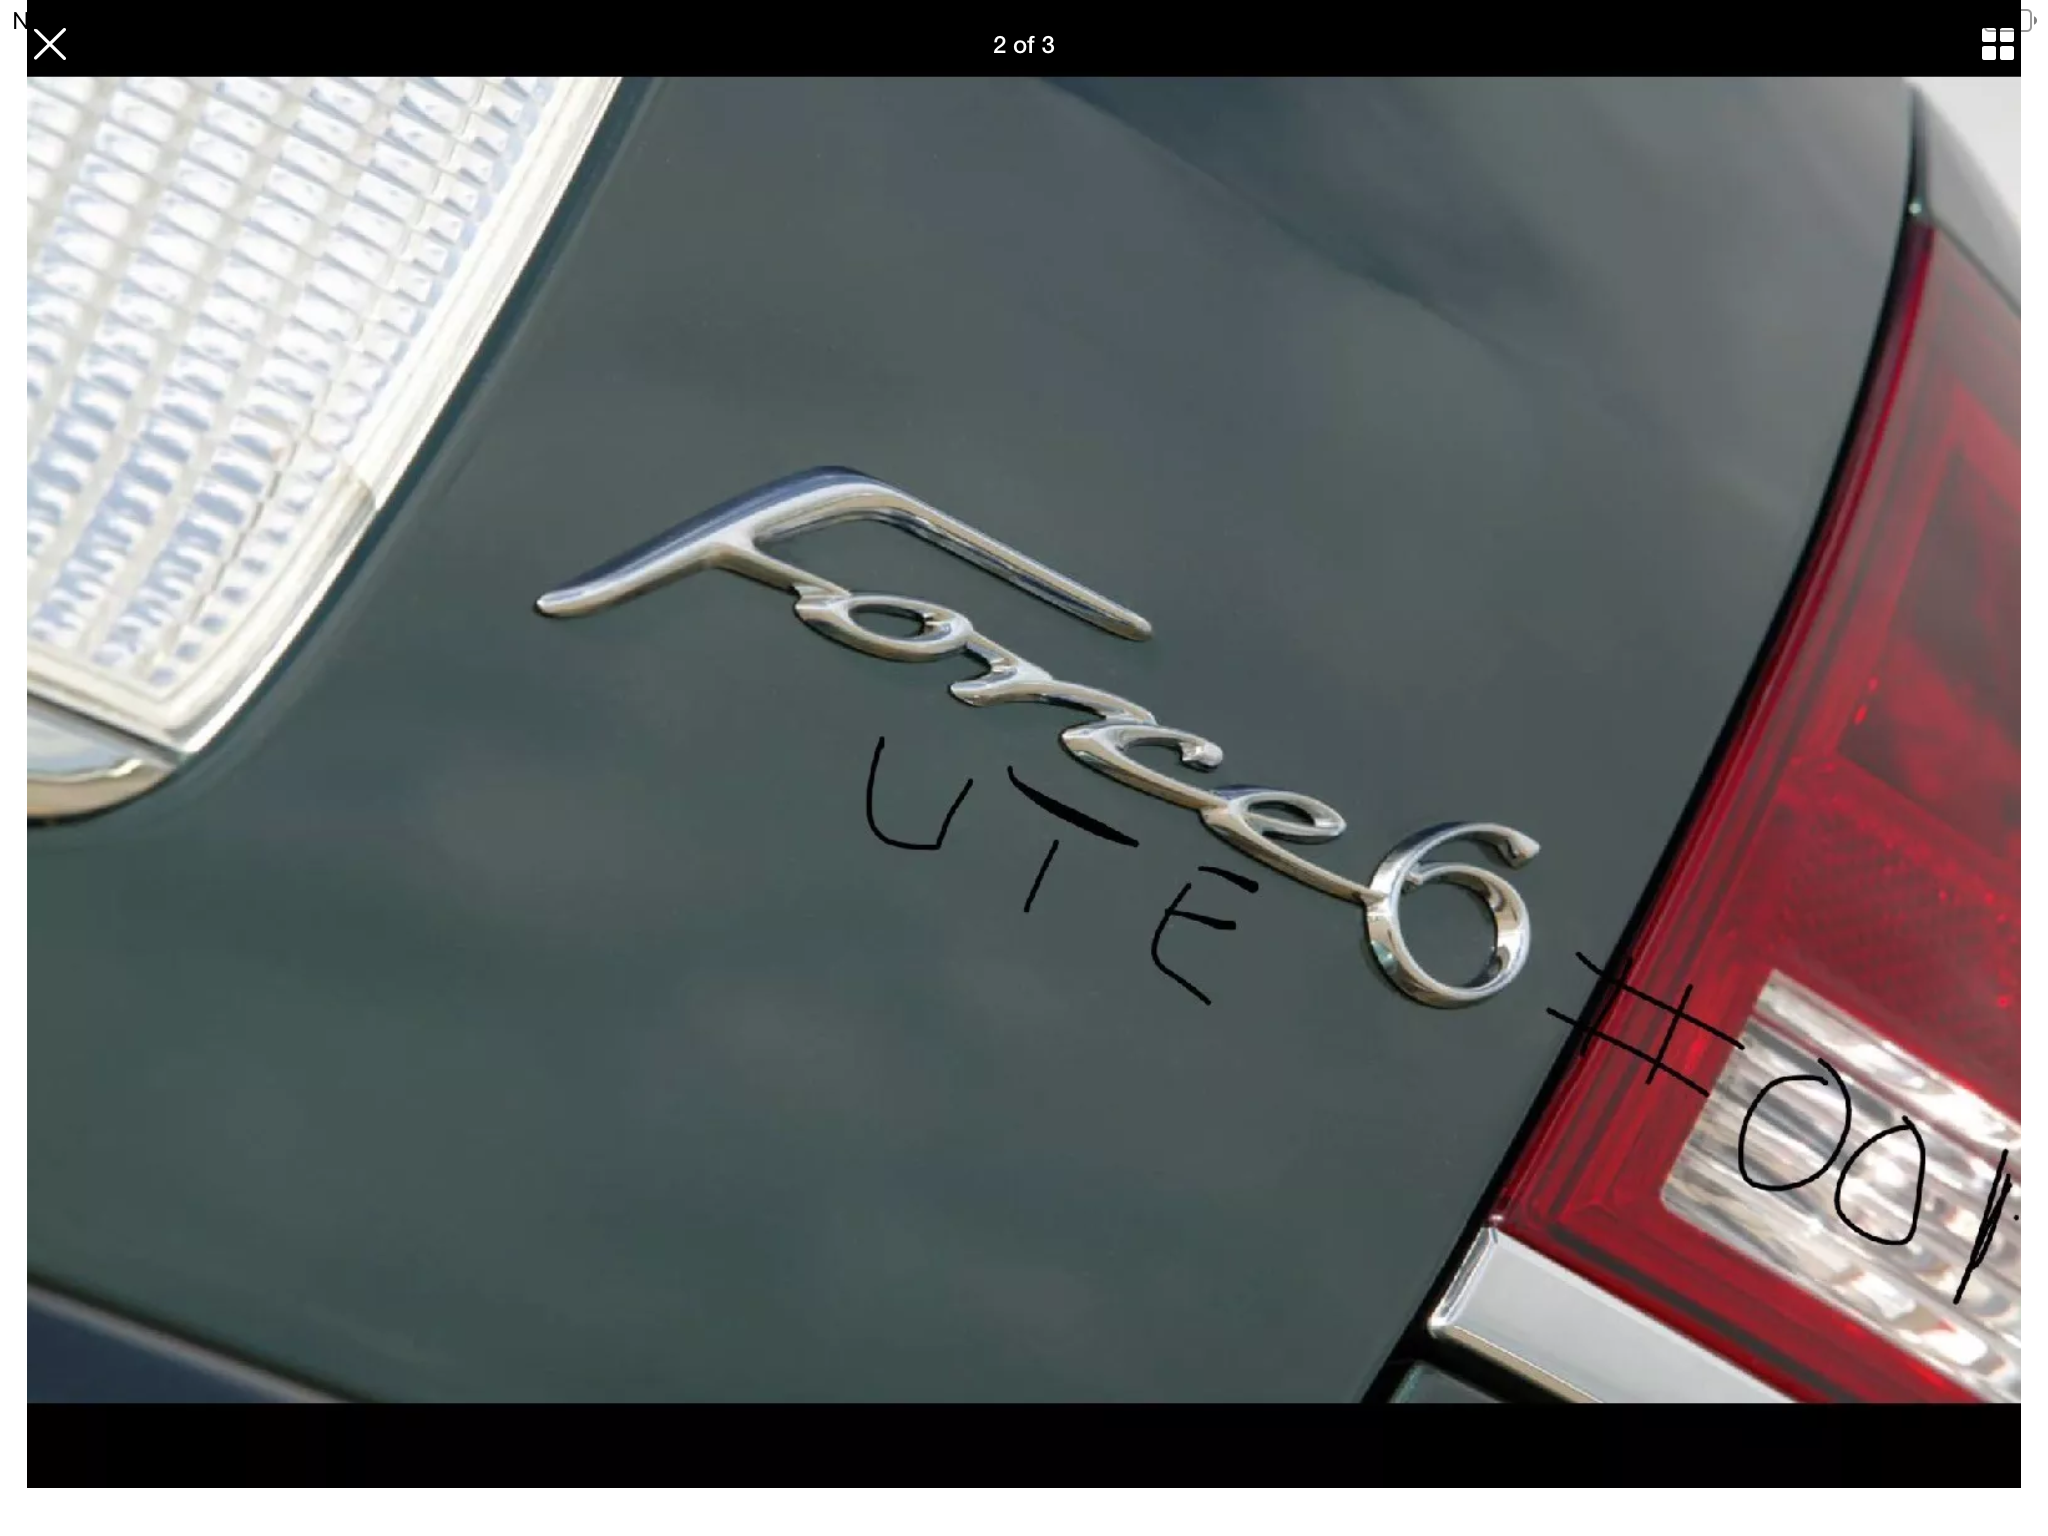
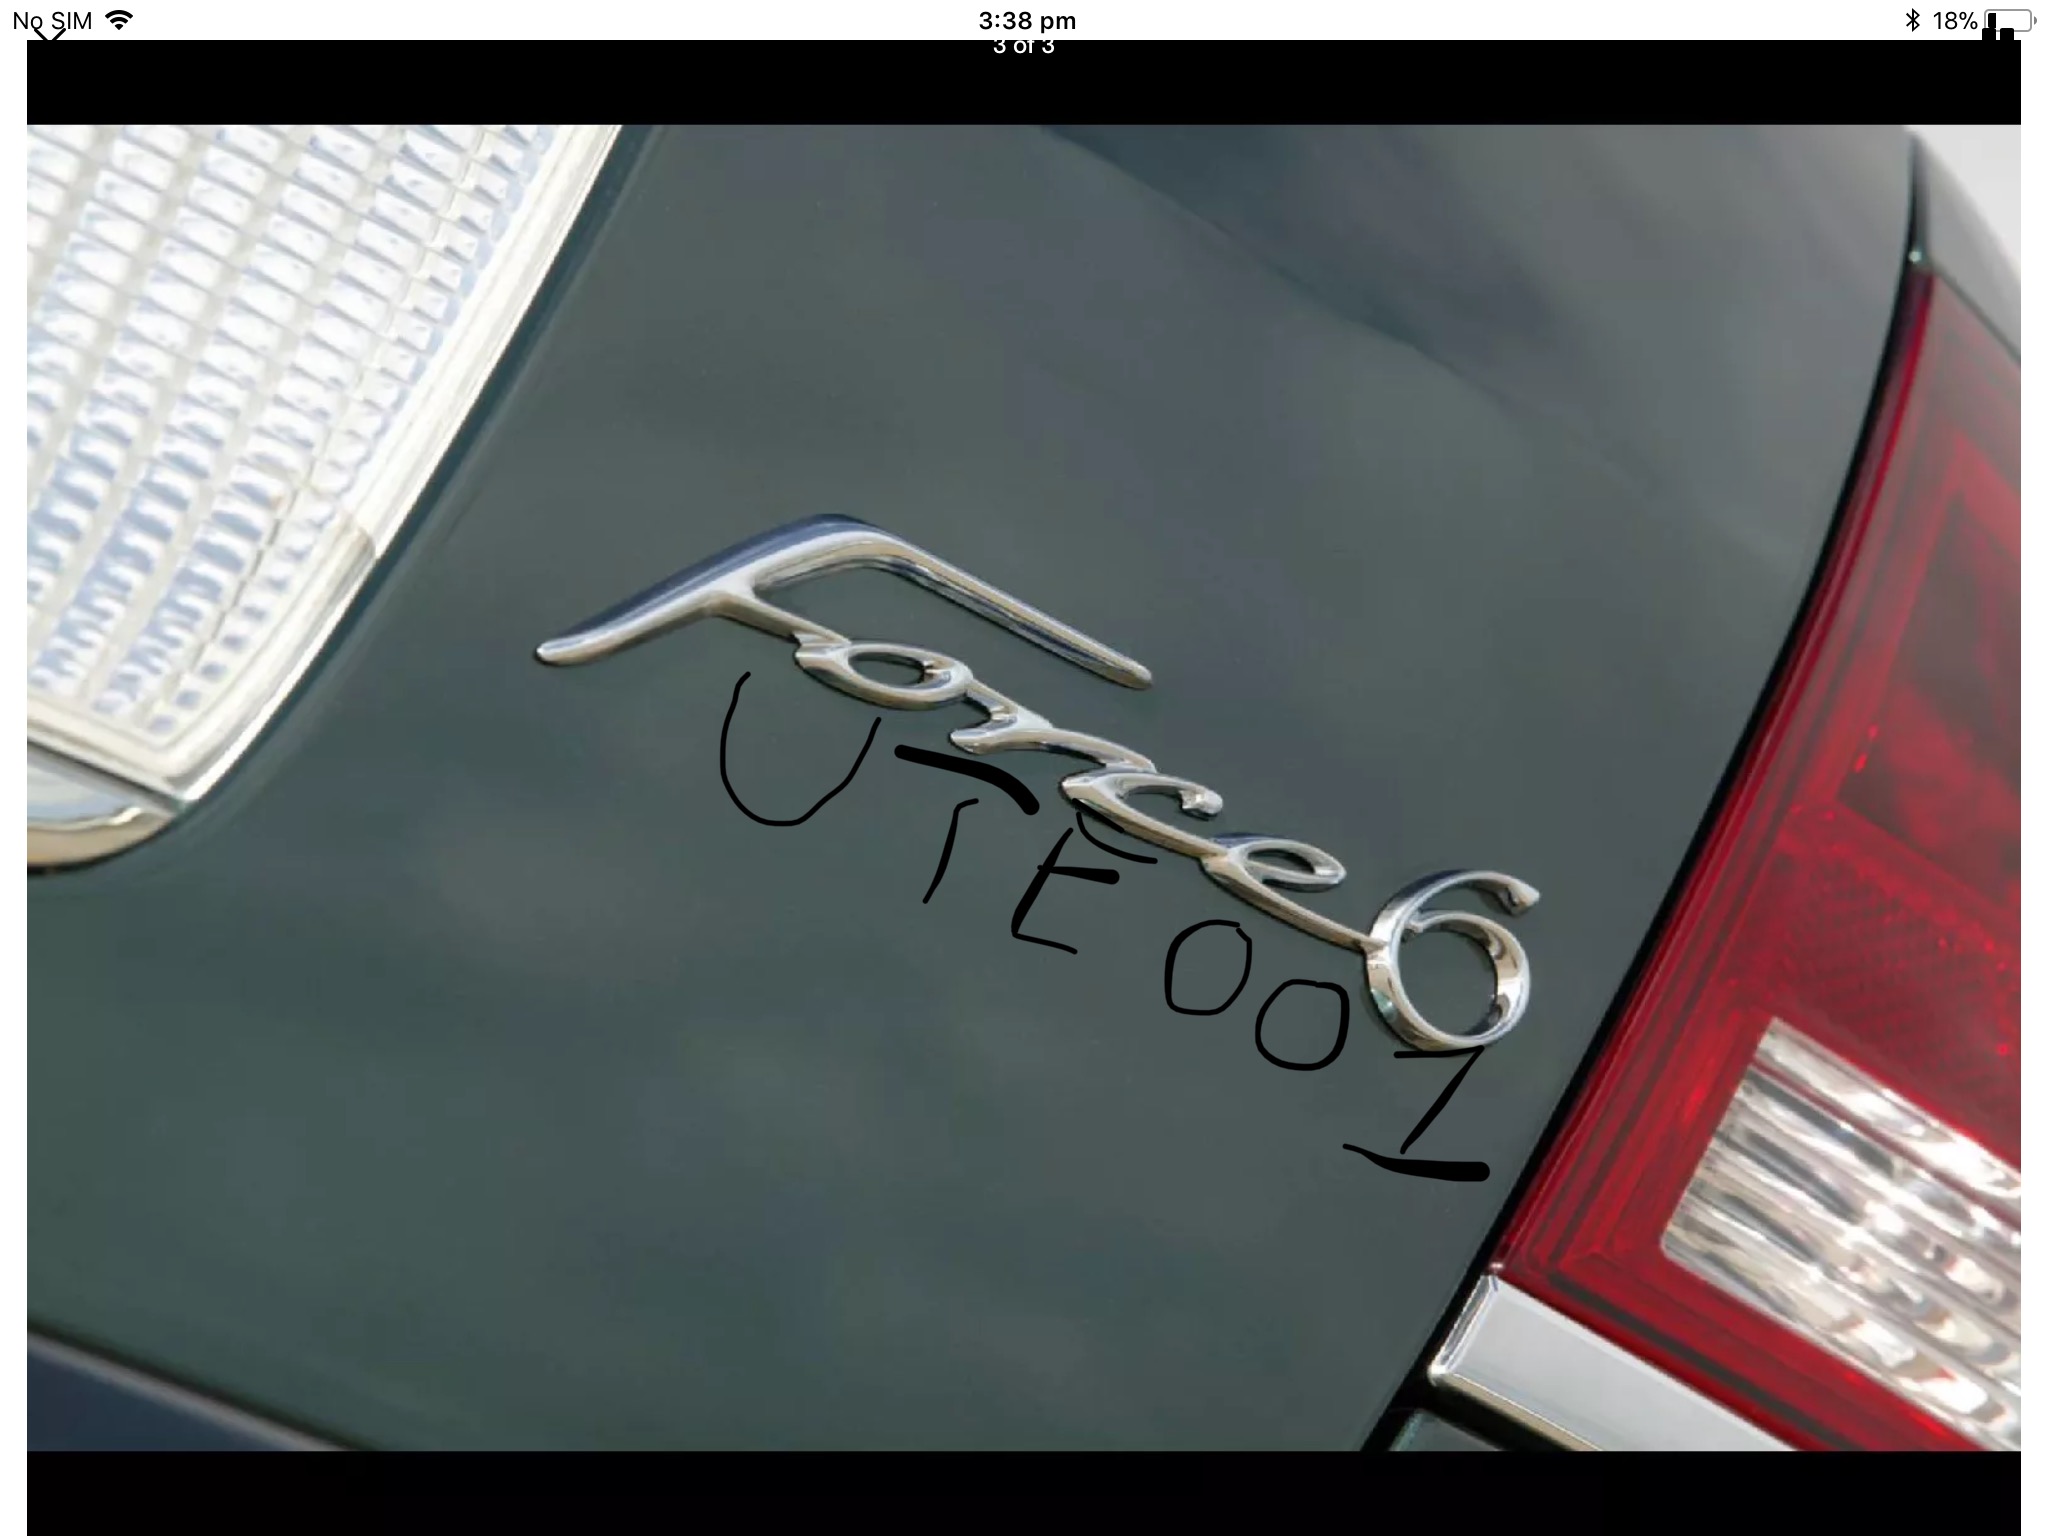
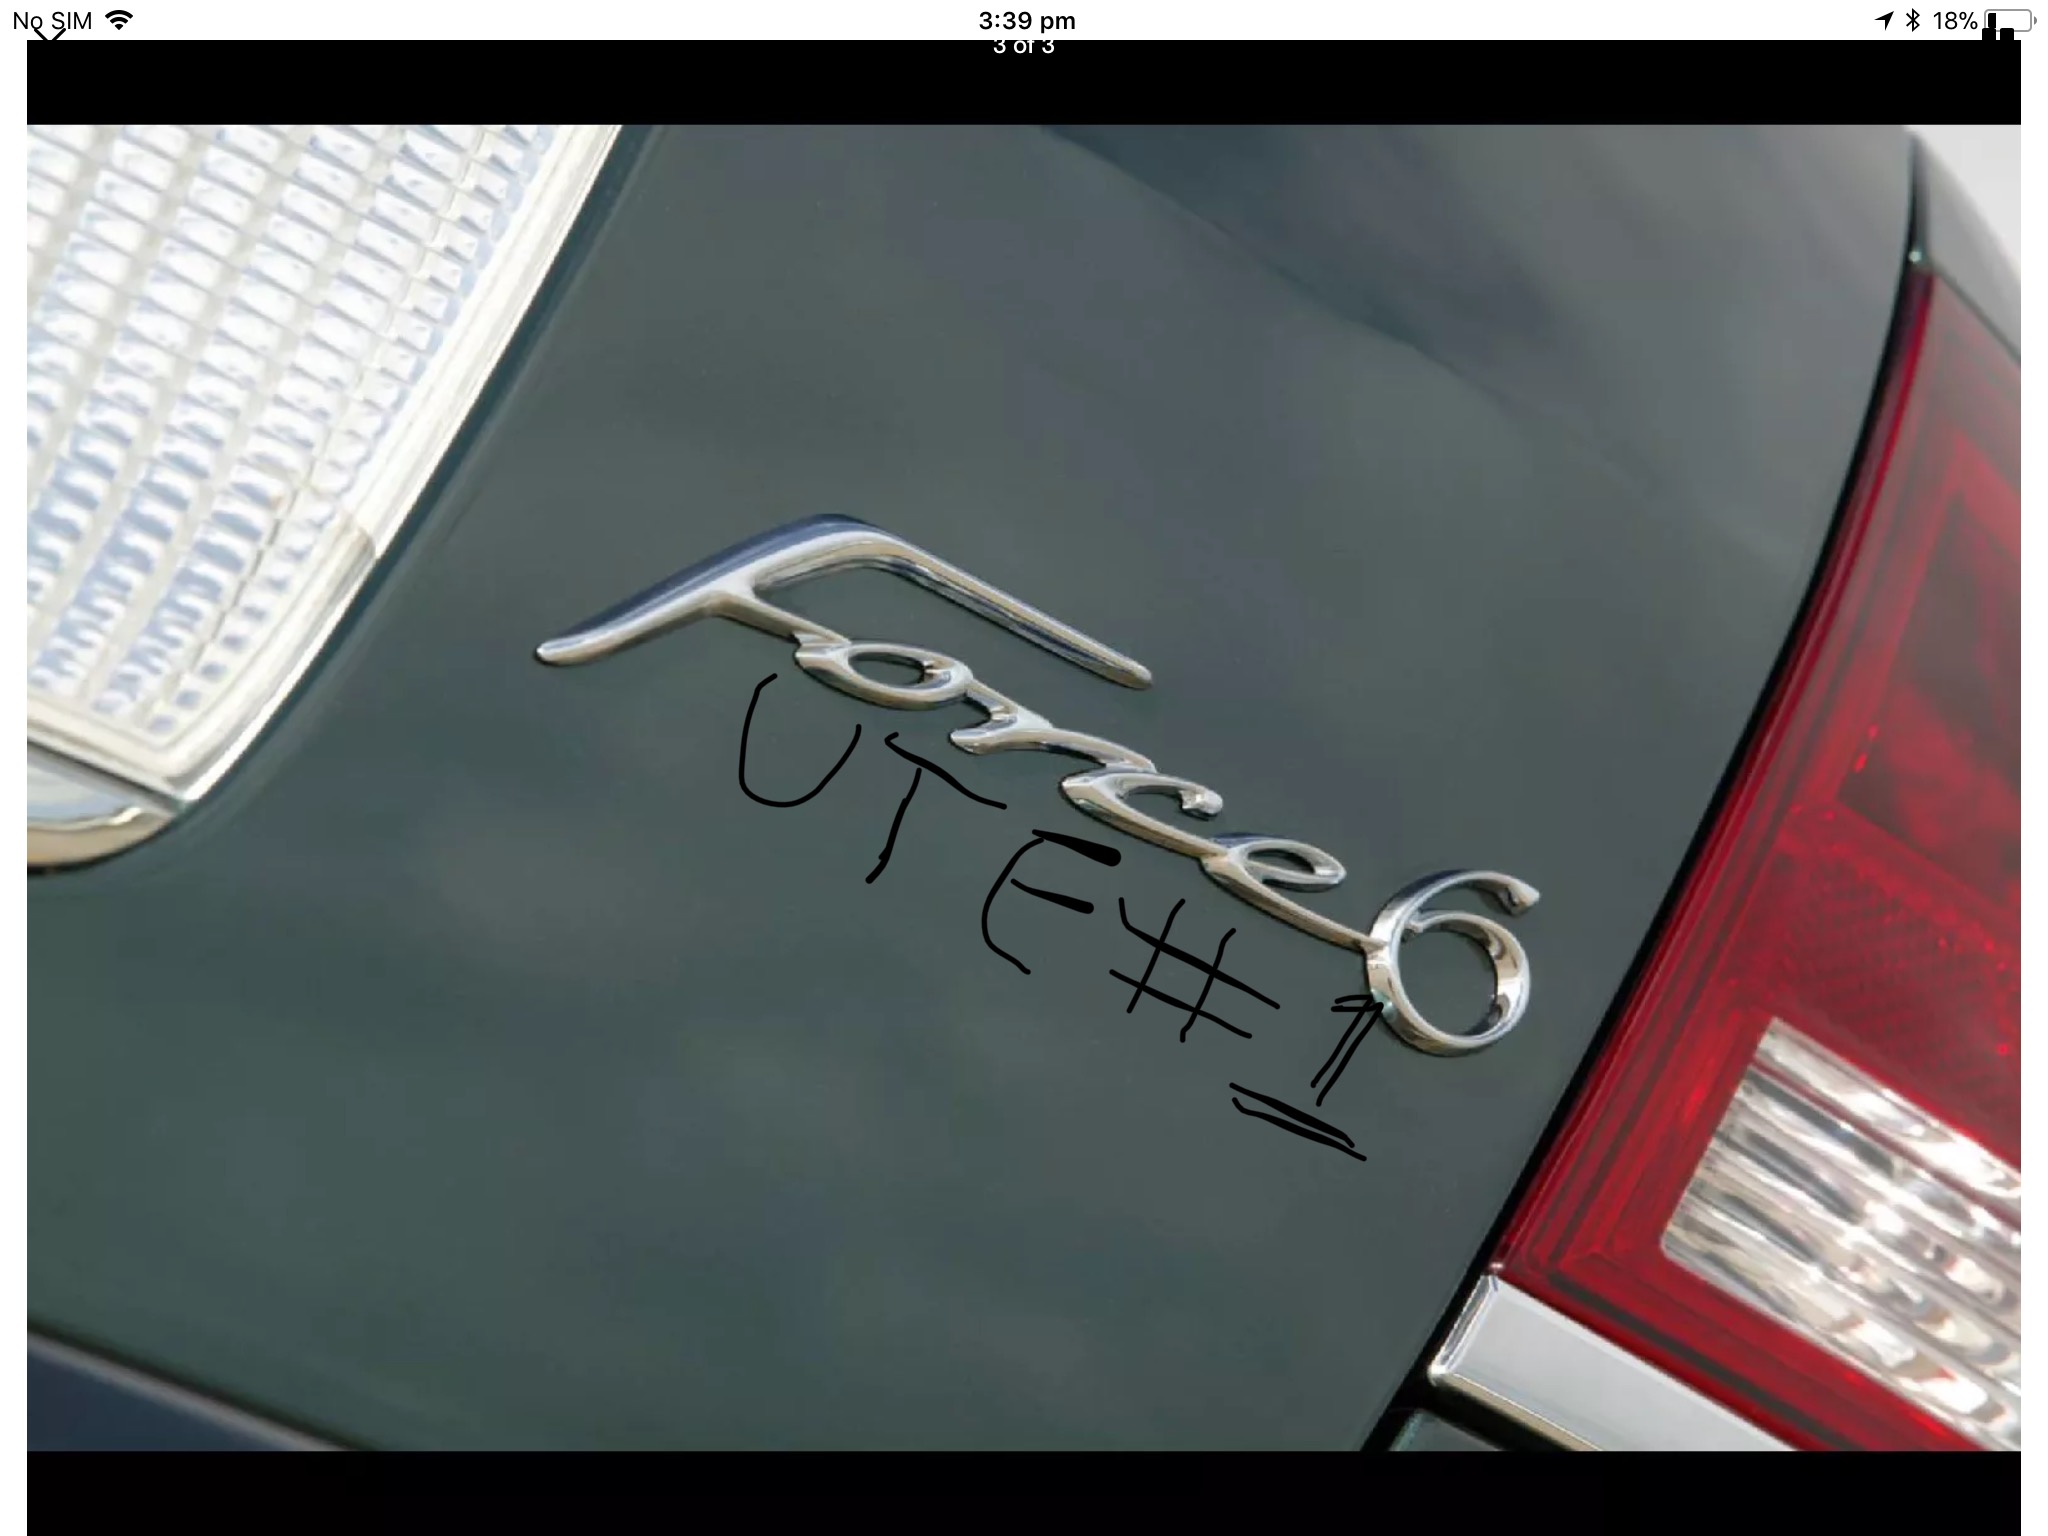
I want a badge made up for my xr6t Ute please
it’s a bit of a design I’ll explain and send pics of what I would like
it’s force6 Ute #1
now how I’d like it is
force6 with Ute underneath the force6
like the pictured force6 build badge instead of number just put Ute if you can make the number 001 work in it but if you can’t no bother
and set out like the one I have badly sketched on hahahaha
or even just force6 with Ute underneath it might look a bit cleaner
I’d like it to be about about 2.5” to 3” long and 1” to 1.5” thick if that is possible but size is upto you to make it work can go .5” either way
if you can do this I’d be much appreciative and will buy it straight away once it’s done I have money and won’t stuff you around with asking to pay when my centerlink goes through in a fortnight’s time hahahha
so please get back to me ASAP
my names Travis
email. [email protected]
mobile no. 0487261444
might be easier to keep in contact as I don’t get on sau that often

-
Hi Sam, thanks for contacting us mate. I will get our sales to touch base with you by email tomorrow, its 11:53pm here now. Those 45 degree days have gone thankfully. Bit warm getting 57 degree's in the workshop.
-
Hi all, Just thought to post some recent parts we done on this thread, the blue and red items were finished late last year and the purple gold ones are being sent out to Luxembourg today. Been super busy of late and finally getting over the mad rush through end of year and start of the new year. We delivered some excellent show pieces for some of the recent summernats vehicles. Obviously we mainly post the Skyline stuff here, so wont post those on here. Also a big thanks to SAU for having a great platform for everything Skyline related. We also have some upcoming new parts for some Skyline's - the design is drafted for R32 but of course we can fab these for all models. I wont say much more but after the parts are complete will get some images up for you all. See below some custom Billet GTT R34 Grille and Boot badges - always good to do something different even if its only color change. Custom RB26 Engine ornament plate - as you can see Stagea - this item was CNC Machined 6060 T5 - the customer wanted machine finished silver in the lower parts. And finished with our special candy and crystal inlays. Topping it off with the Sinister black mirror finish anodizing. Again thanks to all for your support, we have some exciting things already for the start of the new year. Cheers, Kustom 20
-
Hey guys anyone know a supplier who stocks RB25 Stainless Steel EX MAN Flanges? Thanks
-
PM sent
-
Hi Peeps, just thought to post this up, even if it comes in handy one day for someone with the same fault. As we know SAU is a great community for anything Skyline related I wont go into full detail, just a basic overview - I recently completed mods to my R33 and got the vehicle tuned. After a long 2 1/2 years in prep and paint and taking the vehicle off the road. I had to remove all mods for RWC - the last 2 days I removed exhaust side and Intake side basically everything to change back to stock. After fitting everything up and double checking to ensure I had covered all bases, checked earth connections, sensor plugs. Was time to fit the stock ECU and turn the key. On the initial first cranking it did not start within 5 or so seconds, tried again, nothing at all. Was safe to assume something isn't working. After I turned the key to the off position I noticed a relay located next to the ECU kept clicking. ECCS relay - I thought it may have had something to do with the AFM wiring so I double checked it, only because one mod is the upgraded AFM - then tested the AFM wiring with Multi meter seems to have correct readings. And when I unplugged the AFM the ECCS relay stopped clicking. Also because I had changed to a S1 inlet manifold - I thought to also swap out the TPS with my S2 item. I then turned the key to on but not start and the ECCS was still clicking when the key was turned off. At this stage, I ran a quick ECU fault code diagnostic check - results were code 55 - no faults recorded. I installed the Apexi PFC back into the vehicle and got Co-Pilot running to set the TPS to the correct setting. And also check the sensor readings - everything seemed to be correct, except the TPS which was on 9. Last thing was to open the Stock ECU housing - seen as it was sitting for 7 years to inspect inside for potential corrosion. And there it was as clear as day. Capacitor corroded. Also ran a quick test with the multimeter and found the number 2 was showing zero reading and all others were in the 460 to 470 range. Even though number 1 shows a reading but also corrosion I would be replacing this as well. After finding this - i uploaded a base map back into the Apexi and car fired up straight away. Its kind of constipated going from 360kw back to stock If it helps just one person in the future then its all well worth the very small effort.
-
Thanks Mick, I did send through the costing on the CAS cover mate. Let me know if you received that message. And no probs on the front grille badge. Let me PM through the pricing again
-
Hi SAU, Just updating the thread with some new ones, this RB26 Engine Ornament is going all the way to California. Customer has ordered it in a mill finish with mirror polished upper surface - and will color inlay himself. I will post up some pics of his ride when its all done and fitted. Another brilliant finish on these GTT Badge Set - Customer ordered the full set for Grille Boot and Front Fenders/Guards CNC Machined Billet Black base on the grille badge giving it that OEM appearance sitting the badge out from the grille. And providing contrast to the badge. Also the Chamfer work inside the letters is appealing like the GTR Style OEM. Anodized Sinister Mirror Black with Blood Red anodizing inside the letter T Mirror Polished upper edges and outer contours. Sealed with a special blend of our own oxidation sealing agent. This helps to protect against the elements Finished off with that deep crystal inlay providing depth to the color. Pretty cool with the addition of the crystal inlay - in the 2nd 3rd 4th images you can see with and without the clear crystal in the letter T - both look great.
-
Yeah was mainly to catch up with some SAU members. I will be going just as spectator this time mate. Always good to meet people with same interests
-
DRIFT X Calder Park - December 2nd 3rd Hey lads, Just wondering if anyone here is heading to the VDC Drift X at Calder Park Melbourne December 2nd 3rd.
-
300Kw Unopened 25 Club...
Kustom20 replied to joeyjoejoejuniorshabadoo's topic in Forced Induction Performance
Hi Guys, Final tuning completed yesterday - 2 visits and all done. mods: GTX3582R Turbo, Apexi ECU, TOG Modified High Mount Manifold Schedule 10, FMIC, Plenum, Genuine Z32 AFM cold side, Splitfire Coilpacks, 650cc Top Feed Injectors, AEM rising rate FPR, Top Speed 345lph in tank pump, Greddy FV BOV, 3 Inch to Cat, HF Cat, Twin System to rear, Turbosmart 45mm Hypergate, 50mm wastegate inlet and outlet, 4 inch intake POD, Throttle body going in the bin and back to stock, fuel: BP Ultimate 98 power: 360kw 482hp - 22psi high - little laggy down low as expected - as long as I drive to suit should be quite fun. oil: Nulon 10w 40 Synthetic useage: Daily Driver - Might Hill Climb and Possibly Vic Time Attack if I can get in. Just for fun lifespan: I have owned the vehicle for 12 years never any engine failures just a water pump - Lifespan for 360kw so far 24 hours without running failure: Water pump - as for Dyno failures clutch slip on the last power run - as mentioned 12 years on the same clutch not bad at all. comments: With the clutch slip the Dyno results would have shown different - its all good though should be putting about 600nm down. If I could change anything maybe go with the A/R 0.63 on the rear. -
Finally all came together. What a day it was today - 2 Dyno Tune after a long wait sonce the first time. A few modifications and everything went like clock work. Check the link if you want to see the Dyno Results.
-
Hi Peeps, Just thought to update this thread, been a long while since posting on it with some updated progress. As you all would know we get so consumed with work and other things and becomes a battle to work on our own projects. Anyway will do my best to explain what progress has been done since last time. The last post was pretty much the vehicle first coats of high fill - and as you all would be too well aware lots of sanding and prep in between all the other, just to get the vehicle ready for paint work. Hah then when we get to the final stages and we get the odd cut through while sanding, yep more paint and finally ready for its clean down prep ready to put in the booth. I can't believe I just pushed 18+ months into a few sentences. Wow the long days nights and weekends As you get further through the images you will see some changes were made, rather than just choosing a color scheme and running with it because in our heads we think it will look great and in actual fact could look quite silly on a vehicle. Also I didnt want to just hope it looked good - so a lot of testing and painting sample cards and panels just to get the desired effect I was looking for. And when we go custom 3 layers and 3 layer effects standard basic procedures are pretty much out the window. The challenge was on thats for sure, after doing a lot in the past and working with candy pearls flakes and that over the years, the confidence was there but we all still second guess our process, constantly making sure we have everything covered even down to that last little piece of tape we apply during prep, up to the cleaning and making sure we minimize static as much as possible. Well time to put up some images and show some progress. I will explain as I go 1. Early days masking off and hitting it with primer high fill to get ready for the blocking sanding to ensure any little imperfections are gone. The joys of having a reasonable straight vehicle meant no serious body work. Mainly just the door handle area's had slight low spots, from memory one small stone chip dent on the passenger door when a guy cutting grass shot a friggin rock at me, Just trying to keep the body lines and edges throughout the sanding was probably the most important. As long as you stay away from all edges and just work them very slowly. Was a challenge but enjoyable 2. Bonnet had 2 very small low spots back left drivers side and front right passenger side right on the body line of the bonnet There were a lot more images in between this but I guess you guys would get a bit bored seeing all the images in primer and stages in between sanding, more sanding running through the grits - the initial sanding with with orbital all dry sanding, and using the softback interface in certain area's. After the initial orbital work. I made the decision to wet sand. Originally I wasnt going to - but it got the better of me and done it all with 800grit - not too fine so we dont get any de-lamination. Basically 400 grit all over and then 800 grit all over. Now ready for some color So it all comes down to this, all that long hard work and prep - like they say blood sweat and tears. And a little bit of $$ - some like blue and some like pink we cant keep everyone happy. But as long as its what you want and like that all that matters. 3. All inner panels and jams were painted first obviously. As you can see we prep everything like we are painting all the parts we dont see when the vehicle is back together. Taping is quite enjoyable because we know its so close to being time to paint. Using the various methods of hard and soft edge so we dont get visible paint lines in area's we dont need. Time to hang some panels at this stage - basically all this was complete and baked off at 60degree's then straight into hanging the panels so we can remove all tape that we need to then tape it all off again. 4. So by this time is when it starts to get pretty exciting - all that hard work is finally coming down to this. In this first image I have layed down the QM1 white base coat and then hit the vehicle with its 2 final coats of white silver pearl. Now ready for taping off and its about 12:30am The reason I hung the front and rear bar like I have was to get that even blend of the pearl. You cant see in this image but directly beside me is the rear boot spoiler which is also coated at the same time. Basically perfect even coats with no double coats like we can get away with using basecoat or clear. If you double up on candy and pearl it will stand out, so some area would appear to have 3 coats etc etc. Tight overlap of 75% from bottom to top and all the way over and down. like painting a box and not following the body lines/shape. Full length from front to back along the sides. Look at that pearl on the white - just makes it stand out as you guys know white is white but when we add something special it can look pretty good. Ok so now its about 3:00am and I was getting fairly well spent at this time, 8:00am start and yeah all day - 3 or so hours to tape off. But I actually sat back and reset myself and said you know what this part needs to be as good as you can get it, dont rush and just enjoy it. Only happens once. And that helped get these stripes the best I could given that I was by myself - Anyway before the spraying I had previously made my own templates for the boot back boot front, roof back roof front and same for the bonnet. Helped a lot doing a trial run before booth time. But the problem for the roof was my intention was to poke up through the sunroof and tape them off. But I couldnt disturb the clean car because we try to minimize dust and crap. So I made the choice to tape from the sides and ends. Not too bad at all. You will also see slight green fine line tape - thats how everything was initially taped to get the stripe edges perfect. Then simply tape everything else off. Silver Basecoat which is the stripe edge lines. And yep had to run another fine line all the way across the vehicle after the silver was painted. Before apply the DNA Black basecoat which will become the main base for the stripes. Now in between here were some images not taken, wow was I in for a surprise. By this stage its about 4:00am and I layed down the blue flakes. If I had to do it again I would coat the complete vehicle with intercoat before applying the flake stripes. Just to protect that pearl and I would definitely double mask off next time. So I could minimize and chance of flakes getting in places and working there way out. So you could probably guess - when unmasking all this ready for the clear coats. The flake on the masking was falling off everywhere. Took maybe 2 1/2 more hours to unmask, clean and blow away flakes and then mask it all back up for clear coats. 6:30am - time to go home and reset - have a coffee and rest. Back in at 8:15am - masked off and ready for the clear coats. As you guys may know we have a certain window time frame from first to last coats to get the clear down and seal all the hard work we have done. 24 hours. On the first coats I wanted to make sure to cover the blue flake area's first just to seal any stray flakes that want to blow off. So I gave the stripe area 1 coat first - then let it flash off and proceeded to coat the entire car with the first medium wet coat. Also just so you guys know I hit the stripes with 2 extra coats just to get some clear setting for when I flow coat it all out. And the entire vehicle was 4 full coats and 1 medium wet. This allowed enough room for perfect smooth stripe line edge and mirror finish across the flakes. Ensuring we have enough to cut and stay away from the pearls. 5. Thought to share this image, as you can see being that the 375 flake a reasonable coarse. We tend to get a lot more orange peel - and also along the paint edge stripe lines 6. So your probably thinking or not - anyway I'll tell you a day before painting I was having doubts about the stripe choice - so I made changes and not painting a sample to see what it looked like added to the unknown. Just visually thinking what it would look like. Originally I was going with 8inch stripe with 2 inch black - so from Blue flake straight to black - which made the stripes 10 inches wide and a 2 inch centre line - so yeah changed it up moments before taping off. Again whats with the imperial measurement - I was inspired by a Mustang and took a liking to the stripes on this thing. Here is the original sample cards or test panels I painted - just to see with white pin lines and blue straight to black . It was playing on me a bit and made the decision to go full blue flake with that silver edge line. I was happy that I made that choice. 7. Just a few pics after it came back out of the booth and some slight assembly. From left to right on the back of the vehicle. A little bit of extra detail in the Garnish. Turned out pretty good for half hour of taping off. 8. Ok so some people probably wouldnt post this stuff up, being that we all thrive for perfection. As we know it either paint too dry and have massive ornage peel or find that balance of getting it to settle in better. After 5 coats of clear all was going great and that last final coat I slowed down even more and managed to get a hanger across the back quarter panel. Just thought to share these on the cut back. Using this method helps to get it all sanded down even - cutting the run out without cutting into the surrounding paint and making further work or sanding ripples into the clear. Build it to the top of the run keeping it tight, feather out all edges initial sanding with 400 grit jut to take the top off and get that smooth level then 800 grit - just working it as if you were flat block sanding anything and working it all even until it all gone. Gone flat smooth and happy with that 9. At this stage the vehicle sat for about 2 weeks and then it was time to start flow coating. 800 grit from start to finish. All wet sanding and staying right away from edges. we can afford a cut through into the pearl, and cutting back the stripe edge lines and the flakes was also a bit of a challenge. Just hoping not to hit color or flakes. Sanded the entire car first then worked the front and rear bar last, on the first prep of the front and rear bar felt like it took longer that the damn car iteslf. So many angles to work and not many areas for flat block - soft back sponge worked in some area but others were all mostly by hand and very careful. After sanding the rear bar and cleaned down - got that nice even coat of water just to see how the clear will settle down in the booth. And its like a mirror. Looks pretty good Another shot with the water across the rear bar. Further down I also took this same image after the DNA Diamond Clear was put down. 10. Finally all sanded back flow coating time ready and the thought of having to tape and clean it all down - Hmmm yeah I did mention that taping off is enjoyable but the thought of it was not so much. In the booth though its quite different because we are so damn close to sealing and finishing it all off for its final assembly. Anyway guys here are the last images of booth time and laying down that DNA Diamond Clear - high solid. You will remember the initial clear coats were an MS Clear First Clear coats going down - medium wet and first coat. Here is that image I mentioned earlier after the DNA Clear - not bad at all. Settled down nicely So yeah thats pretty much where the project or respray is at - had the windows fitted Monday last week. Overall very happy with the job - 3 full coats of DNA Diamond Clear so plenty more room to cut and polish. Managed to get it to lay down nice and flat minimal orange in certain area. Detailed the black and silver before the DNA Clear. A couple of bits of dust settled which need a denibbing and polish Been cleaning parts down and fitting them back in. Slight issue with the electric windows - driver side goes up and down. Cant put passeneger side up or down from the drivers side, I can put the passenger window up from the passenger side but it wont go down from the passenger side. I jumped the wire to get it to go down. Now when I tested with multimeter - the up is getting full volts but the down is only getting 8 or so volts. Last minute changes yesterday and late last night to an engine component - back down for the final second tuning this coming Wednesday. Removed and installed the new Hypergate - so yeah removing the manifold welding the new flange and fitting it all back last night. Flying trip to VPW yesterday to collect it and price was better than anywhere I have seen for the genuine TS WG45 This coming Wednesday finally back at the Dyno - I will be filming the dyno runs and when the final tuning is complete - cross fingers touch wood it is all finalized on Wednesday with no hiccups - I'll upload the run and give you guys the link. Also after the Dyno I will be detailing the wheels. And finish installing the front bar, just keeping it off until Dyno is done. So I can trailer it with no issues on hitting the front bar. Hope you liked the images and the long post wasnt too boring for you guys. I will be sure to get some full final images after its all back together. P.S engine bay Radiator Support is going a different color And road trip is not too far away for those up in NSW / Sydney that I am visiting on the way to Gold Coats and Hervey Bay. Much deserved break needed. Cheers
-
No Longer Available