


nouveau_poor
-
Posts
66 -
Joined
-
Last visited
-
Feedback
0%
Content Type
Profiles
Forums
Events
Gallery
Media Demo
Store
Posts posted by nouveau_poor
-
-
On 3/12/2022 at 2:02 AM, joshuaho96 said:
Also, don't forget to torque those cam gears to spec and use blue loctite because otherwise this can happen and you'll bend a bunch of valves and maybe destroy your head too: https://www.youtube.com/watch?v=kI7GFPYDtOo&t=625s
Dang, wonder how that works out with the tuner. Do they fund a new engine or a different way to make it square?
-
That's wild. Good that you caught them. And here I am in the states barely locking my doors in the small town I'm living in now. A bad habit I'll have to work on fixing
-
 1
1
-
-
On 3/6/2022 at 10:48 PM, joshuaho96 said:
Something I've wondered for a while now is just how much of the improvement with these drop-in cams can actually be attributed to the lift/duration changes when they seem to be making non-trivial changes to cam timing as well.
I think I've read in another thread that one of the best "simple" changes to the engine one can do is to tune some adjustable cam gears and that even on factory camshafts a gear tune can give additional power.
Maybe there is a compare and contrast thread out there for the same engine setup. One with factory gears/cams, one with adjusted gears/factory cams, one with one with adjusted gears/aftermarket drop in cams.
-
Yeah, more searching around was enough to spook me away from them even if the full details about their relationship isn't completely clear. The discount is huge but maybe the above is the reason why, now that I think about it. Not keen on risking an ill fitting cam, or worse a snapped one.
Will check out the Kelfords. Any strong opinions on similar spec HKS cams? Seem to be close in pricepoint and I've been very pleased with the other parts they produce. -
Finished reading around a bit. So with the official announcement was in 2019, anyone know when Tomei JP stopped supplying cams to Tomei USA from Japan or if Tomei USA has always made their own cams? Definitely going to dig further
-
Thanks for the feedback both. Reason I ask is that they seem to be a popular modest cam to pair with Garrett -5 turbos, where I'm shooting for the 450-500hp range. An opportunity came up where I could get them BNIB off somebody going a different direction with their build for about 1/3 the normal retail price. Really has me eying them. I'll read through the TomeiUSA forum post that was provided
-
Hey all,
Was looking to get some cams for my R32 GTR and noticed that the popular Tomei Poncam Type B's seem to have two different versions between the USA and Japan.
From Tomei USA's site, for part TA301A-NS05C, the duration is 262 with 9.15mm lift. On the Japanese sites like Nengun or RHDJapan the duration is 260 with 9.15mm lift. Is there different versions between USA and JP spec? I don't think it's a typo since the different US suppliers I check have the same information. Both parts are part number 143005. RHDJapan has them for comparable prices to US suppliers, but Nengun lists them for almost 40,000 yen (400$) more, adding more to my confusion. I wouldn't think that a difference of 2 in duration would make all that much difference but am more concerned about possible differences in materials or manufacturing process. Can anyone shed any light on this? Thank you

-
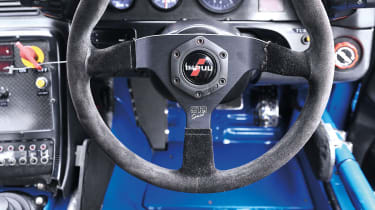
This might be an obscure piece of trivia, but does anyone know the significance or meaning behind the number 913 on the Impul Momo steering wheel series (Special, Expert, etc.)? The same model that was used on Calsonic race cars at the time such as the Calsonic R32 GTR. I cannot for the life of me find the answer on google or the forum.
-
The issue in the end was that the speedometer itself, the one with the mileage counter, that was fitted was meant for a late model cluster, rather than the early model needed for my 1990. Essentially, the cable from the ECU that connects to the speedo had nothing to connect to or read, hence no speed reading and resulting in the HICAS light. The continuity from the ECU to the speedo plug came back fine, no wire degradation. From what I remember, I think the actual speed sensor wire was green and yellow if that helps.
Early model speedos have this extra wiring bit:
-
Front end could use some work, the grilles of previous renders looked better in my opinion. Looks fantastic from the inside and side view. The rear I have mixed feelings about, the lights themselves are neat but the black bar they are on looks a bit out of place. I might be nit-picking, but the rear badge also appears very large but it might be my imagination. Maybe it'll grow on me.
-
Americans will pay unholy amounts for an R34. Whether the over inflation is from Fast and Furious, Need for Speed, or something else, there is no question that the buyers have quite a lot of disposable income. These cars are status symbols at this point. Those who bought theirs before the prices went moonshot really are lucky.
-
7 hours ago, GTSBoy said:
And this is something that you cannot do for yourself? After all, it only needs doing if the car has been working the turbo a bit hard in the last couple of minutes before stopping. It hardly needs to be run to cool down on about 95% of stops.
fair enough sure, but why get rid of the timer if he's already got it? The other post sounded like the timer itself would cause an issue.
-
3 hours ago, KiwiRS4T said:
Immediately just lose the turbo timer so it doesn't give you problems one day. For the rest just try to track down a good tuner and post up the results!
Why get rid of the turbo timer? I thought they were a good thing for turbo engines to let them sit for a bit after driving before shutting off the engine.
-
Not exactly parts, but I have a muffler towel signed by the Impul grid girls last year and a shirt signed by Kazuyoshi Hoshino at Tokyo Auto Salon. Other than that it'd be my small collection of old Nismo interior bits.
-
1
-
-
-
Price reduction $400
-
Hi all, first sale post here.
I have a Power FC and Commander that I'm looking to sell. I'm in the United States and can ship anywhere domestically for free, but can also ship internationally at buyers expense. It's an L-Jetro for use with AFMs. Was functioning great when pulled from the car. Feel free to ask questions!
Asking for $500 USD
I'll leave the post up for as long as it's available. It's also on eBay if you prefer that. See pictures below.
-
Can confirm Americans will sell their kidney for anything with the numbers 3 and 4 in the model number. Even more if you have a Paul Walker sticker/reference on it
-
 4
4
-
-
It won't be a daily driver, more a weekend/pleasure car but it seems like the consensus is that light pulleys will cause some form of drop, so it'd be wise to just leave them be if the OEM pulleys can keep on chugging.
-
Sorry for the crap quality but this is the the best angle I could get on them. Similar to the photo up top, the belt ribbing area seems to have gotten some of what appears to be surface rust over the last 30 years, like how Duncan was describing the anodizing coming off his Greddy's I presume. If it's as easy as just giving them a good clean while they're off then I might as well do that and save a few bucks. If not, well that's why I'm looking at potential replacements.
-
Thanks for the insights. So it seems that if I fit standard size pulleys then I won't have the voltage or PS side effects.
Is the wear on the OEM pulleys anything worth concern or is there a way to gauge when one should replace them? I might just replace them with the aluminum and be done with it.
Is there a part number for the greddy standard pulley kit? There seems to only be 1 size that is sold currently.
Edit: Dug around and back in the day greddy made an 'oversized' kit which has since been discontinued.
https://www.nengun.com/greddy/pulley-kit-oversized
This leads me to assume the one currently available is the standard size
-
Hey all,
I've been taking a look at new accessory pulleys (water, PS, alternator) as part of something I might want to refresh as part of my R32 GTR engine build. I'm shooting for around 450-500 wheel hp for a street car and am planning on replacing the factory harmonic balancer with one from Fluidampr if that is relevant to my question.
I've noticed that my accessory pulleys seem to have a little bit of surface wear (surface rust?) on the ribbing where the pulleys contact the belts. No issues or abnormalities with the pulley or vehicle performance but I figured if I'm going to have them removed as part of the engine build, why not replace them while they're easy to access.
Does anyone have experience with Greddy or KTS "lightweight" pulley kits? I'm not really expecting any performance improvement but rather just replacing for durability. I've heard that they are larger than factory and underdriven pulleys can cause unwanted side effects like low alternator voltage or reduced cooling at low rpm. Has anyone experienced this?
https://www.rhdjapan.com/trust-greddy-pulley-kit-bnr32.html
https://www.rhdjapan.com/kts-sc-pulley-pulley-system-3-pc-set-bnr32.html
They are the same price, possibly cheaper where I am, as OEM pulleys, but I wouldn't want to chance dead batteries or a hotter engine in traffic. Should I bother replacing my pulleys at all if the wear is normal?
This isn't my pulley, but shows what I mean when I say "wear"
-
10 minutes ago, MoMnDadGTR said:
that diagram is the one you want it is the same as the one in bnr32 manual. I had this exact leak I replaced the line didn't fix it, through a new clamp on from princess auto and fixed. its the water line for the turbos. I replaced line after line on my 93 gtr before I said fak it and replaced all the coolant and vacuum lines car never ran better. I would replace the hose and the clips I got all my stuff from terra firma and kudo. If you haven't already done it, while you have the coolant dropped on the car I would replace the 2 small coolants sensors one for the gauge and one for the engine while you have the coolant out, as well as the thermostat while you got it apart just make sure you install it right. sometimes a plugged up coolant system causes these leaks. my radiator was completely plugged up as well from 30 years of what ever.....hope this helps mate.
Thanks, this was the route I was going to go when I replace the radiator with a Koyo. Wanting to do the radiator, hoses, belts, pulleys, and probably fan in one go.
-
Think I got it sorted out today. Getting the hose off was testing my patience as it was bloated in the center, so getting the spring clips past the little nozzle "nub" area was damn near impossible. Resorted to cutting it off with a razor. Found the source of the leak, there is a tiny split on the rear of the hose that wasn't visible when still on, and matched the location of where the drips were coming from. See below.
Went to the auto shop and got a length of hose for a few dollars and new screw type clamps. The old spring clamps still seemed strong and ok but why not get new hardware if I'm already at the store.
Learn from my mistakes if you end up reading this thread and have the same issue. I dont know if there is a way to avoid this short of draining all your coolant beforehand, but there will be coolant in this hose and the tubes it connects to. So when you slip it off (but you'll actually cut it off) the coolant will start leaking out. I have a sizable puddle of the stuff on the garage floor that I still have to clean up. Paper towels might help to soak up a bit but if you can get a container of some sort to squeeze in that narrow space to catch it until it stops, that'd be best.
Secondly, if you don't get the molded Nissan hose for 25-30ish dollars and get plain hose like I did, do not cut the plain hose to the same length as the original hose. I did that the first time and even with the slight bend/curvature due to the hose coming off the roll, it's not the same as the OEM. What this will result in, is that there will be a rather sharp bend causing the center portion of the new hose to bow out, as though it were being pinched, once it's on since the two nozzles the hose joins are rather close together as in the photos. I was afraid that this bowing was decreasing the inner diameter of that area and could lead to higher pressure so I took it off. Adding insult to injury, even after trying lubricant, the only way I could get it off was to cut it off again since the work space is so small. What you'll want to do is cut the hose to a bit shorter than the original. By doing so it'll allow both sides to connect but still allow room for the hose to "push" further along the nozzle so the sharp bend/kink doesn't occur, with plenty of room behind the nozzle nubs to clamp down on.
Will be getting an alignment done in the next day or so for some suspension work I did recently and I'll have them top off the coolant I lost and bleed the system, as I'm pretty sure that there is some air in there after removing the hose. Happy Easter


How to remove rust?
in Cosmetic, Styling & Respray
Posted
I've seen people with success using Simple Green cleaner and a light abrasive like steel wool or scotch brite pad