Search the Community
Showing results for tags 'DIY'.
Found 15 results
-
Hey guys, I need some direction. I'm planning to install a 7" double din HU in my R32 GTS-t. I measured it myself, and it doesn't seem like it would fit. I know its possible, I just don't have the creative mind when it comes to this kind of stuff. Has anyone else did this? If yes, can you briefly explain how you did it and if you wouldn't mind, putting up some pics so I can see how it looks?
-
M35 passenger side rocker cover gasket DIY i hold no responsibility for any person hurt or cars damaged while using this DIY tutorial. tools needed: 1/4 socket set (10mm, 12mm, extensions and knuckle) 10mm spanner magnet (so you dont lose bolts) flat head screwdriver super RTV silicone (you dont have to use this) degreaser or brake cleaner rags scraper rocker cover gasket 1. remove engine cover, then remove intake pipe both sides, stuff rags inside the intercooler pipe so not to lose bolts. undo surrounding plugs and place out of the way (if you can) 2. then get the 12mm socket and undo the plenum bolts, and behind the plenum use a 10mm spanner to remove a small bracket. once undone you should be able to pull the plenum aside and get to the rocker cover bolts. 3. once you can see the rocker cover clearly, remove the coil packs (make sure to mark the plugs so u know which goes where) now get the 10mm socket with extension and start to remove the rocker bolts, use the magnet to catch the bolts, you will encounter 3 that can be hard to get to (the back left corner under the hose and the next 2 towards the front of the car, make sure you dont drop them) the bolt is under this hose 4. now use a flat head at the front of the rocker cover and gently pry it upwards until the seal brakes, then remove the rocker cover, and put some rags over the exposed engine. 5. then get a rag with some degreaser or brake cleaner and clean the sealing area on the engine (mine had some grey silicone on the front which had to be scraped off), then degrease the rocker cover and clean the edge (i used the corner of a rag and ran around the inside of the seal point) 6. once the rocker cover is clean, fit the rocker cover gasket inside the rocker cover and use some silicone in the corners to help it stay in place, wait a minute or two so the silicone hold better. then put the rocker cover back on the engine (you will need to lift the hose at the back to make it easyer) once it is in place and you have checked that it hasnt falling out of place. you can then put the bolts back in place being careful not to drop them (magnet helps) and tighten. then reverse steps 2 and 1. ok im pretty sure thats everything you need to know about doing the rocker cover, just remember to remove the plenum i tryed to do it without removing it, it didnt work.
-
 Hi All, I was bored on the weekend (actually let's say feeling productive), and I recently acquired this cheap amp for $20 and needed to mount it somewhere out of the way. Instead of mounting it under the seat like some, I decided to make use of the space between the fuel pump access point and the HICAS crap. Note: This only applies to R33 Coupes. I reused the stock fuse block bolt holes, one thing to notice, there's a tab on the rear side of the block that needs to be trimmed/snapped off in order to allow the plate to sit flush. Other than that, the photos should speak a thousand words. Final note, I've previously found that mounting the amp there, next to all the power lines, etc. 'may' cause some noise, but when I replaced it with better RCAs the noise went away. In the past, I've used 2x Z like alloy brackets I made using a flat piece of alloy. Too much drilling involved, this method requires you to only drill 1 or 2 holes. I went for 2x because of that odd looking bracket I found.
 -
Guys, Im fitting a Towbar to my M35 Stagea. I will put up more information as I progress if I'm sucessful. I have the tow bar here ready to fit that was low cost for a V35 Sedan from the USA. It is not intended to pull large loads, just a garden trailer. First problem i require a litle help with is getting the rear bumper bar cover off. I have got most of the clips and screws out or so i believe. There seems to be some clips hiden away inside as shown in the picture and I can't figure them out. Is there any information out there on how to remove the rear bar? I had a quick search but did't find anything really useful. Thanks
-
So here's my ugly yellow thing: And that's how she rolled off the boat from japan, resplendent with stone chips, grandpa-grill and stupid sleepy eyelid thingies. Now the interior. Where to begin. There was no less than 3 different sized TV screens, 2 independant CD stacks, 3 head units (yes, three), 2 amps, 2 subs, 2 different alarm systems and more dodgy wiring than a Telstra telephone exchange. Just about everyhting had a remote too, and they had all been attached to the key ring. The entire key ring with all the alarms and remotes was so big that it couldn't fit inside the elbow-box on the centre console. The import guy couldn't stop pissing himself laughing as he handed the keys over. My favourite part was probably this though: This photo was taken halfway through my exorcism of the wiring-demons. Note the innocent-looking little box near the top of the tangle? This ingenius device was labeled "MAXIMUM PARTY LIGHTS". When activated, it flashed the headlights, brake lights, indicators, high beams, reverse lights - EVERYTHING - all in time to whatever music you had playing. Sometimes there are just no words. There were also 2 little black boxes jammed under the centre console. Their sole purpose was to play ridiculous little tunes. One box played an irritating song if you left the door open with the headlights on. The other box played a completely different (but equally irritating) song if you left the keys in the ignition. Here's the thing though: they didn't disable the factory Nissan "bing bing bing" sound. If you left the keys in the ignition with the door open AND the headlights on, what resulted was the most god-awful cacophony I've ever heard. Surely one stupid music box was enough? What the hell made them think they needed 2?! I removed everything that wasn't factory, put it in a BIG carboard box and put it on my bathroom scales. 29 kilo all told. 46 kilo if you included the subs. That's equivelant to like, a small girlfriend. I threw it all on ebay and was able to offset the rego cost of the car, so pretty happy about that. Aside from the atrocities committed against the electrical system, the car was otherwise unmolested. There was a HID kit that looked professionally installed and a cat-back exhaust. Considering some of the lemons I've imported in the past, I think I managed to score a reasonable Dayz edition Series 2.
-
Hi All, Recently my A/C would only blow stinking hot air which was awfully uncomfortable to drive in but it's been too cold to have it off. It started off that it was sporadic but eventually got worse. After some soul searching I found out that the part is a the Air Mix/Blend actuator which controls how much fresh air vs heater air comes through the vents. Tools/Requirements: - Soldering Iron and Solder - Assorted Phillips head and flat head screw drivers - Vice to hold everything - Power supply to test the motor itself - Permanent marker to mark existing points - Sand paper Difficulty: - Low Time Required: - 1 Hour Optional: - Brand new OEM mix actuator - Used OEM working mix actuator 1) Start by testing the actuator using the diagnostics system - If you have error 26, the problem is most certainly the actuator http://www.sau.com.au/forums/topic/426605-aircon-diagnostics-r33/ 2) Locate the actuator under the drivers side dash to the left 3) Remove cap holding the actuator rod in place, mark the rod for reference and pop the rod out of it's "seat" 4) Disconnect the wiring connector from the mix actuator 5) Remove the three securing screws shown below and take the actuator out of the car *over to the bench* 6) Mark some reference points on the arm for the actuator - This will make it easier to assemble again later 7) Unscrew the actuator off its mounting bracket 8) Remove the two screws that seal the housing 9) Using a flat head screwdriver gently pry the arm off the actuator 10) Separate the two clips that hold the housing together from the side and gently open the actuator case 11) Remove all of the little gears from the housing and set them aside somewhere they won't roll away 12) Remove the circuit board and motor from the housing to reveal the last large gear with contacts on it 13) Gently bend the contacts upwards to ensure they haven't been worn out and bent over time - Give the contacts a light sand at while you're at it 14) Clean the contact surface on the circuit board - I wasn't sure what sort of grease this was so I left a thin coat on the board anyway 15) Connect a power source to the motor terminals to ensure the motor still functions - If not see the options above or look at a replacement motor (from Jaycar or other electronics stores or eBay) 16) Take your soldering iron and melt the solder on the joints of the board - Take the time to add a bit more solder where necessary 17) If all went well work your way back from step 12 and test the actuator again
-
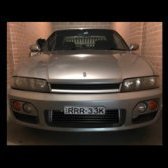
 Hey guys ill do a write up as I go as there seems to be no info on how to drop the motor etc........ my problem is I have broken the crossover pipe from the drivers side exhaust header that leads to the turbo. I will write up a DIY guide as I go and take some photo's etc.
 -
Hello guys, So i'm brand new here, one of my friends told me about this forum and i figured i'd ask a few questions; I live in Okinawa and I recently acquired my 2nd R33. This one's a 1996 RB25DET; with a few mods i've done myself. Anyways; my question is are there any good online Aussie auto parts stores? Theres very few here in Oki asides from UP Garage and shipping from the states is usually pretty shitty with the shipping costs. I live on a Military Base so they'd have to ship to APO adresses. But that being said any info would be greatly appreciated. Thanks in advance!
-
Hey guys, Long time lurker. Before you read this thread, please play this in the background. I've recently done some damage to my ol' R32 and she's a little worse for wear. After a couple years of incident-free fun with her I've dun goofed. Long story short, went into a corner too hot and smacked a gutter. Here's some pics: I'm hoping someone out there could: a) Let me know what damage I may have done here besides the obvious. b) How hard these parts are to get, what they'd cost and how difficult you think they are for an amateur to fix (I've replaced a turbo myself, any more difficult probably couldn't do). c) If there's someone you could recommend in Sydney to repair and approx cost? I know I'm an idiot (let's skip that), I also know you can't possibly know all potential damage without inspecting. With that said, I would REALLY appreciate some advice, especially from people experienced with similar damage. Any help would be great, thanks in advance. Josh.
-
DIY Painting Front Grill Hi all I painted my front grill matte black and it looks quite nice on white skylines. If you want to try it out, I hope this DIY guide helps you out! Tools needed: 12-15cm flat head screw driver Some newspaper or cardboard Dish wash liquid Sponge Paint (I used 1/3 or less can of plasti dip) Step 1: Removing the front grill You will need to remove all the pins holding the grill using a flat head screw driver. To remove the side lock pins (circled in red in the picture), insert the flat head screw driver and turn the lock pin inside clockwise to release it. This video is very helpful too. You do not need to remove the pin circled in green. Please refer to pictures for further details. Step 2: Remove Nissan badge and wash grill Even if you want to paint the badge, I still recommend removing it so you can paint the curvy parts better. Using dish washing soap and a sponge, wash the grill. If you have a bath tub, it is every better. I used warm water. Note that I put the plasti dip can inside the warm water too. This is to melt the rubber inside or make it softer so when you spray it, it is much finer and the finish is better. Dry it using a microfiber cloth. If you want, you can use hair dryer to dry hard to reach corners. Step 3: Painting Put the grill on top of some newspapers or a cardboard like I did so you do not mess your floor (I over sprayed a bit lol). When you paint, spray around 20cm from the grill and start and finish each spray out of the grill. I applied 4 times in an interval of 25 minutes. Let it dry overnight and put the badge back on. Step 4: Put the grill back Seems straight forward but I struggled 3 minutes to figure out how to put it back. You will need to take the lock pin out from the hole and attach to the grill first. Then you can slide the grill back and put back all the lock pins and you are done! Next project is restoring headlights!
- 2 replies
-
- 1
-

-
- DIY
- Plasti Dip
- (and 6 more)
-
Installing New Seats DIY on installing replica SRIII Recaro Seats on Skyline 350GT Coupe (CPV35) Tools Needed: 14mm socket wrench Flat heat screw driver Plier (Needle nose) Set of Allen Key (Optional) 0.5W or 1W 2R2 2.2 Ohm (NOT 2.2 k Ohm) Resistor (RED RED GOLD GOLD) to cancel the airbag light on dash (A pair can be bought from Jaycar for 45 cents) Wiring tape (Nitto tape) Scissors Cable ties (Optional) Hacksaw or metal cutting circular saw (Very very very optional) A few M10 x 1.25 (length depends on your seat rails) bolts and washers (Optional) A friend (Optional) Google (Optional) Stock Seats Weight (Including Rails etc.): Drivers Side 26.75Kg Passenger Side 23.45Kg Recaro Replica Seats Weight (Including Rails etc.): Drivers Side 18.30Kg Passenger Side 17.90Kg 1. Removing the stock seats (If you know what you are doing, it takes no more than 10 minutes): Remove the rail/screw covers by pulling them up. The rail cover for the rear bolts needs to be pressed in the centre and then slide it out. Shaking it a bit might help remove them. 2. Use a 14mm socket and remove all 4 bolts. 3. Tilt the seat back to remove the harness under it. 4. Carefully remove the seat. For the driver side, moving up the steering wheel will give you more room to remove the seat. This can be done by yourself but having a friend will help. Folding the seat will also help removing it but luckily the coupe’s door is large so there will be no problem. The passenger seat is much easier to remove. 5. Remove the seat belt socket. Good vacuum clean inside as you can reach places where you cannot when the seat is there. You may also find some money! I found around $3 in coins lol 2. Making SRS airbag canceller (do this before installing the new seats!) When you unplug all the wiring harness for the stock seats, you will have the SRS airbag error light flashing on your dash board. This is because you unplugged the airbag sensor. You may need to do step no. 4 even if your new seats have airbags. If they don’t then follow the following instructions: Resistor Package Using a plier, bend both ends of the resistor so it becomes thicker Insert (the side does not matter) it into the airbag wiring Make sure it is firmly in place and touching the terminals inside of it 4. Run the airbag diagnostics/resetting. To reset the light simply turn the ignition to the on position, (you don’t need to start it). All the lights should stay on for their diagnostic check. As soon as the airbag light goes off, before it starts flashing, immediately turn the car off. Repeat this 3 or 4 times (turning to on then off) and the light should go away. 5. Wrap the resistor with wiring tape 6. You may want to organise the wires under the seats with some cable ties 3. Installing New Seats: This will vary depending on what kind of seat and rails you get, but most of the part should be fairly similar. I got my seats from China (brought them with me as check-in luggage on the airplane lol). I had to dissemble the back part and seat part so I could pack it within accepted luggage size. The main problem that you may have is with the seat rails… The seller in China did not have the rails for the CPV35, so I got for the 350Z as the measurements are the same. However, I needed to do some modifications to use these rails. I had to cut the rails “cross bars” as there are a small “bump” on the floor on both sides. Took 4 hours to cut them using a hacksaw (wish I had a circular saw lol). Flip the seats and install the seat brackets that move back and forth. You will need to press the place I circulated and move it back and forth to put the screws. For mine I used a 6mm Allen Key. 2. Install the seat rails (if you purchased one specifically for the CPV35, then you may not need modification). 3. Install the seat belt socket on the side of the seat rail. You may need a new bolt and washer to secure it in place. 4. Put the seat into position and tighten the bolts (stock bolts). PS.: You will note that the driver side floor for the rails is not even. The left side is higher than the right. What I did was to buy a longer bolt and a few washers/bolt spacers to fill the gap on the right side as my rails were for the 350Z. The seat position ended up being a bit higher than stock ;( I bought a second hand seat rail for the CPV35 from Japan so hopefully it will be on a similar height as the stock. I am waiting my aunt to send it to me so this solution is temporary. It took me quite me around 12-15 hours across 3 days to finish this project. If I do it now, with the correct direct bolt on parts, I think I can finish it in less than 3 hours. I noticed that the quality of the seat is not as good as the stock, in terms of back strength. When I accelerate, I can feel my back tilting back a bit (like you can do in an office chair for eg) but lateral hold is quite good. The seating position is a bit too high too. But considering the price of them, I cannot complain at all! It was $100 per seat and $50 each rail. I had to buy another rail for the driver’s side from Japan but it was still around $85. I got 4 point racing seat belts too but could not install it (didn't bother trying too hard). I consider this mod purely for looks rather than performance because the stock seats were not as heavy as I expected and the back support is only fair. I hope this helps you if you would like to install new seats!
-
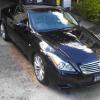
 So red has always been my fav color and I always wanted a red V35, but there are hardly any on the market. My previous 250GT was written off by a jerk teenager rear-ending me, so I got this 03 from a mate with a ridiculous low price (and it has many faults so I spent some cash fixing it up too). When I thought of doing a red roof, my missus was like "why don't you just go with the whole car?!" then I was like hell yeah why not! Roof Bonnet Panels We have no garages so I can only do it on the drive way... 1-2 hours a day after work and dinner. Doors. Almost there! Rear. Logo to cover cut-off marks and imperfections Different color scales coz I ran out of vinyls and was being a cheapass... Same principle. Last step And it's done! All work by myself... PMs are welcome if you would like to know more about details/techniques. Plenty of videos on youtube but it does feel different when you are on it yourself. All vinyls from Avery Denison, got them from a very good supplier in North Rocks - pm for details (or I can post it here if this does not go against forum rules), $55 per meter (1.5m wide). So I spent less than $800 for the whole car (and I wasted quite some in the beginning), compared to those vinyl shops this is a massive saving (and feels heaps more accomplished)!
 -
Welp, when driving the car home last weekend not long after i left New Plymouth i started to notice the blower fan was blowing a rather unpleasant smell. It got so bad that i had to stop and get an air freshener (it was hot so i had the fan on high). The other day i purchased a new cabin filter, on the premise that it was probably stuffed. After reading plenty of LHD US G35 DIY guides for the filter i decided to rip into it today. I have written this as i had some trouble finding a step by step DIY guide for RHD Skylines as they are slightly different. Step one is to remove the little panel under the glovebox. Just grab it at the front edge and pull down. It is held in by two hooks towards the front of the car, it needs to be gently pulled towards the rear of the car to release it. Once that is off, open the glovebox grab the top edge and pull up towards the roof of the car. You should feel it pop out of the clips at the bottom edge. You then need to wiggle and twist to get the side pegs out of their slots. I found it was easiest to push the LH side of the glovebox towards the windscreen and then pull the RH side out towards the rear. There is also the little retractable cord that needs to be removed. I gently wiggled and pulled and it came free. Once that is out, i also removed the little side panel in order to see the panel clips for the next step. This just pulls off. Ok, so now you have the covering panel In order to remove this, there are two screws in the lower corners, and four along the top edge. Interestingly, there was a sticker that indicated that the filter was last replaced in December 2014 at 52356KM (which it cant have been as the car is at 141000 now). Anyway, with that panel removed, you are greeted by the blower fan and filter housing. The covering panel is right in the middle and comes free quite easily. A clip on the LH side and then the panel is moved to the left to release it from its slots. Once removed, this is what greeted me. A black filter that was certainly not correctly fitted. Removed, it was clear why i had bad smells and bad airflow And compared to the new filter This is the new filter, Slap the foam on the sides as per the instructions with the filter (they go on the two sides. The front is where "UP" is written). Gently slot it into the housing. It will go up on rails and sit at the top of the housing. It should sit flat, other than the front. The front will be lifted and supported by the front cover which has raised ridges to hold it. Stick it all back together, which is reverse of disassembly, and away you go. My fan now blows more air, is quieter, and best of all, actually smells fresh and clean. Mine also had the side effect of no longer having a misplaced filter blocking one of the vent flaps.
-
Hi everyone! Ive been considering painting the silver/unpainted parts of my wheels in black (the spokes are black but the wheels themselves are silver). I have read the DIY tutorials and think ill give it a go myself. Can anyone recommend primer&paint brands/types that they've used or that worked well? Thanks!
-
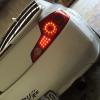
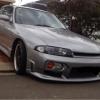
*** GROUP BUY OPPORTUNITY *** I am now the official distributor for Zleds in Australia. What that means is I'm able to offer significant discounts to the DIY kits for the R32 rear LED conversion kit. I am setting up a group buy to reduce shipping price on the consumer end as they are from the United States. These lights retail for more than $600 USD or about $835 AUD, this group buy will see the price cut in half at 400$ AUD with shipping included. The minimum buy is 5 sets. The lights can be customised how ever you would like for additional cost. (Depending on how creative you get between 30-95$ for what you come up with.) I can also get these boards made for the R33, R34 and R35. However the templates for the R33 and R34 have a 2-3 week lead time to be developed. The R35 already has a template if you would like them send me a pm to discuss pricing. I am also able to install the boards for you for an additional $150 with supply of the lights to be fitted. Awaken your GTR with quality Zleds rear led conversion kits. I have had these installed on my own GTR below for over a year and a half with no issues what so ever. The lights also can be set to pulse on braking or changed to be the "NISMO" style ring LEDs if you prefer. What you come up with is limited only by your imagination. I have included the YouTube link below as well to see the lights in action. (Many of the NSW guys have seen them already and can attest to the build quality) 'Nismo' styled lights Conversion 1 style If you would like to order please send me a message or you can email me at ricardowilliamsATright2drive DOT com DOT au Before any of the boards are purchased I will need to meet the minimum buy. For R32 boards it's 5 orders, the R33 and R34 are 7 as they will need to be made for the larger halos in the R34 lights and larger turn signal in the R33 light. Pricing for the R33 conversion is 490 and the R34 is 525. These prices only reflect GROUP BUY pricing. Please note that these are also base price minus the sequential brake upgrade. I have attached a few photos to view of them on my own car, Please send enquiries to my email - ricardowilliamsATright2drive DOT com DOT au You can also visit www.zledslights.com to view the current lights available and styles of others already done. Alternatively you can send me a message on facebook.