Search the Community
Showing results for tags 'body kit'.
Found 18 results
-
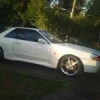
Hey all. Restoring a plastic Altia body kit ive got and spraying it white to match my car, and had a few questions So I have been pulling the mesh grills off, ready for spray painting, and was going to re-coat the grills in Black. The grills are metal, not plastic, as some spots the coating has lifted and i can see theyre metal. It seems the coating on them is some sort of thick rubberised coating with a smooth finish. It’s definitely much thicker than powder coat and has a different texture. Has anyone stripped this sort of part back and re-coated it? What did you use to strip it back and what coating did you go with afterwards? I was going to try and blast it, but not sure if that’s the best option for this kind of coating Also on the black plastic “SKYLINE” section at the bottom, it’s obviously just raw black plastic, unpainted. Unfortunately there is a small scuff on it, what can i do to get that looking nice and remove the scuff? I also have a dent in the rear bar, seems heat has deformed it, i didnt want to just sand it back as the dent may be too deep and cause the plastic to be too thin in that area, how can I shape it back ready to light sand and maybe a little high fill? Lastly, on the rear bar are some “grill” checkered plastic feature bits that are unpainted, and have faded to grey. Whats the best way to restore them to a nice black? thanks heaps in advance!
-
Guys and Gurls I am in need of R34 GTT side skirts (preferable in white) and a neo engine cover.... Located in Canberra but can look in NSW and ACT area have cash waiting. thanks guys
-
Does anyone know what happened to Cyber Motorsport, Danny and Ben?
-
Hey guys and gals, just wondering if the N1 style bonnets that you see every now and then on the R34 Masa Motorsports kits, are they a Skyline bonnet modified or is there someone producing these awesome things?
-
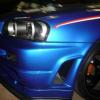
Fiberglass Bumper Repair I have found lots of good info on this website and I am posting this to give something back to the community. I have not seen any tutorials on repairing a fiberglass bumpers on this site (if there are any, sorry for reposting) and since I recently did this, I thought I would post my experience. Hopefully some out there will find this information useful. Overview: Like many others out there, my Skyline has a fiberglass front bumper (which will be replaced with a genuine plastic one as soon as I can save up the money and find one). Until then I have I have a cracked, damaged, piece of $hit letting down the look of my car. So, I have decided to repair the fiberglass bumper and extend its life. I am no expert and I have never done this before so this is a guide only, but anyone with any practical skills can have a go at this. What you will need: Die grinder ($40 el-cheapo will do) Fiberglass repair kit (about $30) Body filler (about $8-10 if you don’t already have some) Sand paper (wet-n-dry about $1 per sheet) Paint ($30-50 depending on what type) Beer (could get expensive here depending on individual) Step 1: Remove the bumper If you are not confident, take lots of photos of the bumper, its mounting points and screws before you take it apart. This way you have a reference in case you forget how to put it back together again. My bumper was only held on by a couple of screws near the wheels and some behind the number plate. Other bumpers may also have screws under the front corners and various other places. Remove all the screws and slide the bumper forward. Visually check around your bumper and don’t pull too hard on it until you are sure you have all the screws removed. Step 2: Fiberglass Repair You will need a die grinder; a cheap $40 one from your local auto part supplier or hardware shop will do the trick if you don’t have one. Use a relatively flat grinding disc and grind away all the loose edges. Don’t be scared at this point, all the loose stuff needs to be gone. You will then need to grind a groove along the cracks. Also grind all dirt off the area around the back of the cracks (on the inside of the bumper) so the resin has a nice clean surface to adhere to. I also sanded out any smaller cracks in the paint using fine wet-n-dry sandpaper. I had to do some major work around one of the front vents, so I used some straps to hold everything in place. This helped to align everything and reduce movement while the resin is applied and curing. Get your Fiberglass Repair Kit out and read the instructions carefully. These kits contain the fiberglass resin, hardener, glass matting and applicators. Get the matting and cut it to size for each crack. It should overlap the crack by 10-20mm on all sides. This has to be done on the inside of the bumper, so it is not visible once the bumper is back on the car. Mix the resin and hardener as per instructions on the pack and apply it over the matting using applicator. I only mixed small amount and did 1-2 cracks at a time. If you mix up too much, the resin will harden before you finish all the repairs. I used a Paddle Pop stick to get the resin over the matting then used the brush provided in the repair kit to smooth it all out. Once the matting is wet with resin it remains in place and this part of the process is easier than I expected. Once the repairs were done from the back, I used some resin and matting to fill in any large grooves and craters from the front. Make sure you don’t put too much on and have high spots as once it has cured, it will be a lot of work to sand back. Better to be low and fill the remainder with auto body filler later. My bumper has a fairly thin and flimsy section across the bottom of the front air dam, so I took an old piece of metal and fiberglassed it as bracing across the bottom of this part. I also fiberglassed metal washers behind the screw holes; this helps to reinforce these points as they are under most stress and most likely to crack. While everything was off the car, I also added some mesh to the inside of the air intakes. I didn’t want to use screws to hold it on because they are visible from the outside, so I decided to fiberglass it on. To do this, I cut the mesh to shape, bent it and fiberglassed it on. I used the matting and pushed it through the mesh to make sure it was held on as securely as possible. Now wait for the resin to cure. Don't forget to keep yourself lubricated... Step 3: Painting Sand all the repairs until they are smooth and use auto body filler on any low spots. Then give the whole bumper a final sand so it is ready for paint. This isn’t a painting tutorial so I won’t go into the details here. I sprayed it with factory white base and clear 2 pak paint. The picture below is after two coats of white, prior to the final clear being applied. While the bumper was off, I also drilled new mounting points for the number plate because they were too low and the number plate hung over the air dam and had a gap above it. Mounting it 30mm higher made a world of difference to the look. The finished repair looks heaps better than I could have imagined. The only thing I would have done differently would be to paint the bumper before putting the mesh on. This would have saved me masking it up, but overall I have happy with the result of just one day’s work.
-
M35 Aero Selection Hey legends, Unfortunately my front bar has copped an absolute hiding and I'm in need of a new one. Is anyone selling one or know anyone/anywhere that i should be looking. I've given ebay, gumtree and a bunch of wreckers a hit but nothing like what I am looking for....NEEDING actually haha. Cheers
-
Hi all, Looking to swap my genuine Takaros body kit for DAYZ body kit or something a bit more factory looking pref in silver. Located in Melbourne
-
Group Buy - V35 Sedan & Coupe Body Kits
itsRICHARD posted a topic in VQ Series - V35, V36 & Infiniti
Hey guys, I'm organizing a group buy for whoever is interested in a new body kit for their v35s, just let me know which part you're after so I can put your name down. I got quoted $675 for shipping alone for just the front bumper, if we buy multiple amounts, we will get it a lot cheaper. I'm from South East Melbourne so if you live in Melbourne, you could come and pick it up from me to save you money from shipping The company we are buying it from is a vendor name "BAUSauto" from G35driver forum, I was told they have just about every body kit you can find Please note that some of the front bumpers don't come in poly if that's what you're after, but let me know if you want poly or not and I'll ask if they have the front bumper in poly. -itsRICHARD - 04 Sedan - Fiberglass KuRookie Front Bumper & NisRookie Side Skirts -
 Hey guys im wanting to try and get the R34 GTR body kit for my GT and im wondering you can just fit the front side and back with out having to do a full conversion with the tail lights and all that seems a bit price i will be putting a new RB25 turbo engine in once off my p's so ill have the car for a long time let me know if you guys thinks its worth doing or if it can even be done the way i wanting to do it
 -
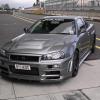
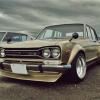
Saw this at the auctions today,what body kit do you think it is? Few more stickers would be nice !
-

Fs Gtt R 34 Bodykit /bumpers
RUS andrew posted a topic in For Sale (Car parts and other accessories)
selling uras style side skirts and back bumper (sonic silver 4 door ) 250ono facotry red rear bumer and side skirts with badges 200ono pick up atwell 0406062621 -
 Hi skyline Australia, Im looking at a wide veilside body kit for my r32 and was wondering if an yone would know anything About the kit. How its fitted, whether theres much work to fit etc.. Suggestion whether I should do it or not. Heres some picture I attached. Cheers, Martin (not sure how rear guard will be fitted, either cut through or?)
 -
 Does any one know where I can find this fender/quarter panel If anyone can tell where where to find this fender/quarter panel I will be so happy because I've been looking for months. Greatly appreciated... thnx ???
 -
 I have some parts for sale Front bar: I believe its R33 Series 2 JU style Front R33 Series 2 JU style Side Skirts R33 Rear Pods (i think also Series 2 JU Style? R34 Front Drivers Xenon Headlight http://www.ebay.com.au/itm/271019676794?ssPageName=STRK:MESELX:IT&_trksid=p3984.m1555.l2649#ht_798wt_1392 Other Parts for Sale OEM 25,000km V35 Catalytic Converters OEM V35/350z front and rear Sway bars with end links OEM V35/350z front and rear suspension, 30,000km old OEM V35/350z factory Brembo Brake pads OEM V35 Boot with SKYLINE Nissan and 350GT badges OEM V35 Right Headlight OEM v35 HID ballasts with Ignitor cables Front and Rear V35/350z Brembo 4/2 Brakes with factory brake lines, Stoptech Slotted Rotors and Stoptech Performance pads Soon 60,000km VQ35DE Engine R33 Pedders Front Struts with springs for GTST Coupe S1 R33 SMIC R33 windscreen wiper set R33 spare boot wheel R33 boost actuator R33 S2 auto speedo sensor R33 Body Kit, Front Bar, Rear Pods, Side Skirts R34 Passenger side GTST guard in silver R34 GTS (non turbo) std front and rear brakes with pads R34 GTST sway bar OEM
 -
 R32 oem plastic Type M front bar in good condition ready to prep and paint $150 pickup near eltham 0402 578 945
 -
 I have a Brand New set of Nismo ztune style side skirt and rear pod in carbon fiber for R34 GTR. I sold my car and I have no use for them anymore. JSAI are selling them for around $1000. Im asking $700 for the set. Located in Sydney. prefer local pick up, but can be posted at buyers expense. thanks.
 -
 Up for sale is a Bomex front bar and side skirts. Usual wear and tear with some little cracks and chips. $200 Apexi Power fc for GTR 32/33 latest model near new condition $600
 -
Not gonna lie - it hasn't got the best paint... aka you'll need to get it repainted. Theres only one bit of damage that isn't superficial which I've tried to photograph well - the part where the exhaust fits seems to have a bit of damage to the edges on the inside of it. It won't be noticeable once the kit is on obviously but just so your aware. Make me an offer for the whole thing or just parts Also would be willing to swap the whole kit for a genuine Altia front bar - colour doesn't matter and nothing thats damaged more then superficially Local pickup and cash preferred Penrith region I would be willing to post at your organization and expense PM or call/text 0417 020 618