Search the Community
Showing results for tags 's15'.
-
 Okay so it has 145km on the clock, 2002 model, wrx clubspec evo 5, not on revs, no finance owing, rego till feb 2014, Factory sunroof 3rd owner, i bought it from a 45 yr old truck driver in kellyville i misplaced the logbooks when moving house, but still have some receipts and the original manual, spare key, and documentations. Garaged its whole life, i hardly take it out, it just lives in my garage as seen in the photos, i work fulltime and study aswell, no expenses spared, 98 fuel only It has a mongoose alarm, because the stock brant one died (common problem) It has a lot of mods, dont really know where to start but: It has a MSR tune, 173kw 533nm torque, car is super responsive Stock turbo td04, avo silicone intake, mrt CAI, vishnu underdrive pulley ( with all new belts), uppipe, headers, full turbo back exhaust ( no drone, sounds nice), turboxs tmic, everything wrapped in heatwrap (titanium dei) Superpro solid diff bushing, polyurethane steering rack bushing, kartboy front and rear shifter bushings, shortshifter, blox 490 shift knob... Prosport Boost gauge (premium) Whiteline front and rear strut bars, whiteline 24mm rear adjustable sway bar, pedders shocks and springs all around Also has a lightweight flywheel, cant remember the specs I service it all the time, every 4000km, its done sparkplugs afew weeks ago, timingbelt,waterpump, gearboxoil, coolant, last year... It has New LED's all around, and also new headlight bulbs and foglight bulbs, the brand for the lights are OSRAM nightbreakers, cost me $200 for headlights and foglight bulbs. It has a soundsystem with a 12inch JL sub, amp, dvd JVC headunit with BLUETOOTH handsfree works fine... THeres afew more things, but if you are interested we can go from here... Also, i have different wheels on it now: 18x8 +35 with kumho 235/45/18 all around http://sphotos-h.ak.fbcdn.net/hphotos-ak-ash4/3667_10152784316750445_72221020_n.jpg http://sphotos-e.ak.fbcdn.net/hphotos-ak-ash4/310729_10152770398220445_201386087_n.jpg Only thing is, the front lip is pretty beaten up, but you can always take it off and respray or whatever, the cars pretty clean overall, Everything works... Aircon freezing cold, cruise control is used weekly But in the meantime, if you have any questions, then i can answer them... I have pictures of every mod I have done, and every service... ALso brakes are still good, slotted rotors on the front, and also i have a oil catch can, replaced all the turbo/exhaust gaskets, Can swap with: SUPRA RZ Turbo, S15, 350z, R34 GTT, R32 GTR, Rx7 FD, Mx5 SE , anything turbo/jap , Honda s2000, Ep3R, Prefer turbo though I have cash, so I can add cash ontop Car is in good condition so please only offer decent cars, also for those looking to buy this with cash, then i am abit NEGO from $15000
 -
Time to start saving some coin so my beloved S15 has to go. ~182,000kms. Want 15k as in with no RWC otherwise I'll rip the mods off to sell a more sedate stock version. Located in SE Melbourne. 2001 Pewter S15 Type S - Aus delivered Mods; --------------------------------------- Japanese silvia steering wheel Japanese electric folding mirrors Pioneer Headunit, bluetooth --------------------------------------- 3" Dump pipe 3" Exhaust (something half decent from memory, can't remember brand atm) K&N pod filter Aftermarket intercooler (not sure was on car when I bought it) Tomei Poncam Greddy boost controller Apexi PowerFC w/hand controller NPC Heavy duty organic clutch (quite light / easy to drive, lightened flywheel and new thrust bearing ~5,000kms old) ICS N1 Coilovers (~5,000kms old) Kumho KU36 tyres all round (legal tread) Work Emotion CR Kai wheels 191kw at rears tuned by Sabbadin Automotives If you're interested PM me or txt / call me on 0438 881592. Car is lower than this pic, didn't have coilovers on when this was taken. Will take a few more recent pics in the next couple of days.
-

Wtb - Adjustable Fuel Pressure Regulator Fpr For Sr20Det S14A
SKYNET posted a topic in Wanted to Buy
I after a new or used fuel pressure regulator for my sr20det s14,must be a "rising rate" adjustable regulator and a gauge would be handy too. Can pickup around Brisbane or happy to pay postage. -
Pair Of 225/45/17 Or 235/45/17 Legal Tyres At Least 60% Tread
SKYNET posted a topic in Wanted to Buy
Wanted to Buy... pair of 225/45/17 or 235/45/17 legal tyres with at least 60% tread & not too much camber wear for my Daily driven s14 Have cash or can trade a pair of 215/45/17 Achilles they have 60% plus tread but are camber worn past the tread on one side but would still be good for skidders Send a message if you have any -
Pair Of 225/45/17 Or 235/45/17 Legal Tyres At Least 60% Tread
SKYNET posted a topic in Wanted to Buy
I'm after a pair of 225/45/17 or 235/45/17 legal tyres with at least 60% tread & not too much camber wear for my Daily driven s14 Have cash or can trade a pair of 215/45/17 Achilles they have 60% plus tread but are camber worn past the tread on one side but would still be good for skidders Send a message if you have any -
 WANT TO BUY MUST BE MANUAL +TURBO, sub 125,000kms and have a rwc or can get one R33 Skyline - R34 Skyline - S15 (JDM OR AUDM) -OR- 180SX I have cash ready to spend just havent seen anything that catches my eye I am located south of Brisbane but am willing to travel a little to have a look. Please post pictures along with descriptions. looking to spend $8000-15ish can go a bit higher for perfect car but would prefer not to. Once I get this hopefully I can stick around and become a useful member of this community Thanks Matt
 -
For Sale/Swap 1995 Nissan Skyline R33, has been a excellent reliable car never had a problem! I am a business owner, during the week I am driving my work vehicle so the skyline was only driven mainly on weekends. It is pretty much standard besides a few cosmetic modifications. Engine runs like a dream and gearbox is in excellent condition does not crunch gears etc. -Rego until end of May -Adjustable Cusco Coilovers Front & Rear -Custom Respray in HSV Cherry Black (Resprayed 2 Months Ago) -3 Inch X-force Turbo Back Exhaust With High Flow Cat & Custom Drift Pipes -Series 2 Seats (Front & Back) -Alpine Headunit -Factory Sunroof -Series 2 Headlights -Series 2 Front Grill -Roof Wing & Ducktail Spoiler (Not Fitted But Will Throw In With Sale) -Apexi Turbo Timer With O2 Sensor Voltage, Battery Voltage & A/F Ratio -Heavy Duty Clutch -Excellent Tread On Tyres Front & Rear -Original Skyline Floor Mats Front & Rear Overall car is a great buy although the only thing that lets it down is a few imperfections in the paint, mainly affected area is the doors where the paint has little dots in it, other than that a great car! Call or text 0433367570 , open to swaps let me know what you have. Located in Sydenham, Victoria $6,900 ono
-
Unfortunately the time has come for me to sell my car, as having a work car and my car sitting at home is impractical. 2002 Nissan 200sx (AUS delivered model) Spec S Serviced every 2000ks since bottom end rebuild. Engine: CP forged pistons 9:1 Eagle rods ACL race bearings ARP fasteners New oil pump New water pump Greddy extended sump New gaskets all around Greddy pulley kit T28 turbo Nismo engine mount 3” dump pipe, 3” exhaust with 5” tip Hybrid intercooler Tial BOV Cooling: Koyo 53mm radiator AU thermo fans (not fitted to car) Tomei N2 oil block plate Greddy oil filter relocation kit Setrab oil cooler (custom lines) Suspension: Tein super drift coilovers White line sway bars front and rear White line front strut brace Cusco rear strut brace Driveline: S14 5 speed gearbox (no dodgy sounds or crunches) Exedy heavy duty clutch Exedy lightened fly wheel Tomei Traxx 2 way lsd 4.3 (built by dalspec) Brakes: R33 gtst callipers (front) 296mm slotted rotors ADR approved braided lines Project Mu club spec pads Stock rears with Feroddo heavy duty pads Interior: Stock s15 driver’s seat Passenger seat needs replacing as is has yellow tan leather which has seen better days (black seat covers currently fitted) Rear seat has been removed as it has the yellow tan leather from its previous owner (will be provided to new owner) Drift knob handbrake Nismo gear knob Exterior: Previous owner customer paint ’24 karrot gold’ The body kit I believe to be the c-west power aero kit Rays volk GTC’S in grey face with chrome lip are currently fitted 18x8/18x9 +35ish I think they are Federal Super Street 595 fitted front and rear Stock tail lights Bad points: front passenger seat will need replacing as it has the yellow tan leather (happy to remove the $$ value of new fake brides), there is a fire extinguisher mounted above the glove box. JDM a pillar fitted but no gauge. Yes it has seen the track, yes it was previously modified with larger turbo, larger cams etc, but some parts where removed to make it more street friendly. The only thing this car needs is a nistune, pon cams, 2871r, injectors and you have a 340hp+ car. I just don’t have the time, money or interest in the car anymore. Car has always been maintained and well looked after! Asking price $17,000 ONO - genuine offers will be considered. All inspections are welcomed. 0406 five three five 354 if your genuinely interested. Rego has another 6 months. I will post pic's up tonight.
-
Hey everyone, as the title suggests, im looking for a s15 shifter lever and block from the 6 speed gearbox. Pm please. Cheers.
-
Message me if you have a pair of adjustable rear camber arms for r34gtt in good condition I'm located in Brisbane but am happy to pay for postage GKTECH website lists these as same size too... Vehicle Compatibility: - Nissan 180sx - Nissan S13 Silvia - Nissan S14 200SX - Nissan S15 200SX - Nissan Skyline R32 GTS-T - Nissan Skyline R32 GTR - Nissan Skyline R33 GTS-T - Nissan Skyline R33 GTR - Nissan Skyline R34 GTR - Nissan C33 - Nissan C34 - Nissan C35 - Nissan A31 Cefiro
-
All serious offers will be considered...I have set's of stock r33 & s15 wheels up for grabs... Set of four stock r33 16x7+40 rims in VGC with no gutter rash There 5 stud,PCD is 114.3 & will also fit r32 r34 s14 s15 & some Commodores,Maximas,Magnas,etc Tyres are all 205-55-16 Achilles ATR which are quality street/track rubber & retail for about $100 each new Two tyres are about 90% tread,other two are about 70%. $400 or nearest offer Set of four 16x7 stock s15 wheels up for sale.PCD is 5x114.3 No gutter rash just a few scratches & scuffs on rims Tyres are all Bridgestone Turanza 215/60/16 Two have about 30% tread,two are down to wear markers so only good for skids One rim doesn't have a centre cap. $330 or nearest offer Pickups from Mt.Gravatt,Brisbane,can drop them off locally Contact me for a courier qoute if your interstate
-
 Car: 2001 Nissan Silvia S15 GT Spec S Odometer Reading: Currently 85 xxx kms Price: $25,000 ono Location: Campbelltown NSW Contact: Andrew 0412773767 Details: Selling my six-speed manual S15 to maybe start a different project. Car is very clean inside and out. Spends most of its time in the garage as it is mainly a weekend car and is kept as clean as possible. Just note that I've recently taken out the Bride seats which are up for sale and if someone wants to purchase the car with the seats then something can be worked out. Currently, it now has just the standard black S15 seats. This car is absolutely responsive and a pleasure to drive especially with all the handling gear. I've been tempted many times to go for more power but as it stands, the car is very reliable with no issues that I'm aware of. Probably the most important thing about this car is that it brings all the girls to the yard... I am negotiable on the price but keep in mind I am in NO hurry to sell. Who knows, I may end up keeping it and give it some GAAAAAAAAAAAAAATTTTTTTTTTEEEEEEEEEEEEEEEE!! Any questions just PM, SMS, or call. Engine/performance: Apexi Power FC with hand controller Z32 AFM HKS Stage 1 cams (256, 11.5mm) HKS Stage 2 valve springs HKS front pipe Tomei rocker arm stoppers Tomei turbo manifold Tomei dump pipe Trust/Greddy cat back exhaust SMB high flow cat ARC intercooler and piping ARC radiator Nismo 740CC injectors (red top) Handling: Tein Flex coilovers Tein EDFC unit Cusco front sway bar Cusco front camber arms Cusco rear camber arms JIC castor rods Whiteline rear sway bar AP Racing front calipers AP Racing slotted front rotors Braided brake lines Interior: Alpine double din head unit (IVA-W520EBT) Bride Zeta III carbon back seats (now removed but can be sold with car) Bels Racing boss kit Nardi steering wheel Yashio Factory gear knob Yashio Factory hand brake button Nismo short shift kit Defi Control Link II Defi boost gauge Defi oil pressure gauge Blitz SBC i-D Spec S boost controller Exterior: Nismo R-Tune body kit Rays wheel nuts Advan Racing RG-D 18" rims Hankook RS-3 treads Rear guards flared (not shown in pictures as this was only recently done) Other Goodies: GFB stealth plumb back bov Cusco oil catch can Cusco air deflector Nismo solid engine mounts Nismo gearbox mounts HPI engine dampener AVS 17" rims wrapped in RE555's s Photos:
 -
 Female owner. Australian delivered blacktop, not grey import. Fast becoming very rare, and arguably in the most desirable colour combination. Regrettably up for sale is a much loved and cared for 2002 s15. This car is in excellent condition low km's and straight body, always garaged and covered. This car features a full custom veilslide body kit which gives car very unique look, cat back Stainless Steel exhaust with xforce 4.5" muffler, also features Trust intake. This s15 has had no internal modifications, driveline and engine remains as it left factory, never molested or thrashed. Rest assured its relaible and dependable, never had any issues whatsoever, its a very fine example of nissans s15 legacy,but its time to find a new home, so someone else can enjoy and love this car. Buyer will not be dissapointed, call now to inspect! open to offers Mobile - 0412987655
 -
 For Sale: Pewter Grey S15 200sx | 30k Ono | 400rwkw Hey Guys! For sale is my Pride and Joy, reason for sale is moving onto another car and I don't have the room to keep this one! I also understand the price seems steep but please read the add for a thorough understanding of the car and where real money's been spent. A brief overview of the car, it's very tidy, it's always well looked after and meticulously maintained! The car was built by Maatouks and maintained by MRC. Negatives of the car include the following: - (Paint) The condition of the paint itself is in good condition but please be aware there are scratches and should be inspected, a respray isn't necessary but would be ideal to complete the build. - (Brakes) The brake setup itself is fantastic, but upon driving the car you'll notice an audible squeal, which can be annoying. The following Modifications to the car include: Running Gear: Tein Flex Z Fully adjustable Coilovers Hardrace Rear Camber Arms Hardrace Rear Toe Arms Hardrace Rear Traction Arms Hardrace Front Castor Arms Solid Mount Rear Cradle Bushings R33 GTST Rear Brake Setup - with Drum Handbrake (296mm) (T3 Rotors and PMU800 Pads) Brembo Evo X Front Brake setup with Alpha Omega Adapters (350mm) with Braided Lines (T3 Rotors and PMU800 Pads) Brake Master Cylinder BMC57 (GTR Upgrade) Rays RE30 18" 9.5 (Rear) 8.5 (Front) Wrapped in Brand New Bridgestone Potenza RE003's Rear 255/35/18 Front 235/40/18 Engine: Forged SR20DET (400rwkw) Haltech Platinum Pro AEM Electronic Boost Controller JE Pistons Nitto I Beam Rods ARP Head Studs ACL Race Bearings New Factory Oil Pump New Factory Water Pump New Factory Timing Chain Nitto 1.5mm Head Gasket Aeroflow Baffled Sump New Factory Chain Tensioner New Factory Chain Guides Supertech Valves Supertech Single Valve Springs Naprac Rockers HKS 264/272 (12.5/11.9) Cams HKS Adjustable Cam Gears Plazmaman Intake Manifold Plazmaman 72mm Throttle Body Custom intercooler piping GREDDY Intercooler Kit GFB Adjustable BOV (V Band) BPP Fuel Rail (High Feed) Bosch 1550cc Injectors With Bosch Connectors Walbro 460 E85 Fuel Pump with Direct 12v Supply through Relay 4 Port MAC VALVE Boost Solenoid E85 Braided Lines and Fittings (Black) Sard FPR with Aeroflow Fittings, Braided Lines Garret GTX3076 0.82 (V Band) Braided Turbo Lines Custom 6 Boost Manifold Twin Tial 38mm External Waste Gates (V Band) with External Screamer Pipes Split fire Coil Packs Tomei Coil Pack Cover Serviced with Liquid Moly Racetech 10W/60 and Genuine Oil Filters Custom 3" stainless Steel Exhaust System, with Cannon/Muffler Custom Oil Catch Can with Aeroflow Fittings Apexi Hi-flow Pod Filter with Custom Intake Pipe Custom Pod Filter Box Alpha Omega Rocker Cover Dress up Kit Driveline: Twin Plate OS Giken Clutch Kit PPG Dog Box 5 Speed Straight Cut Set for R33 Series 2 Gearbox Braided Clutch Line R33 Tightly Shimmed Locked Diff R33 Drive Shafts Custom Tail Shaft to Suit RB Conversion Interior: Bride Seats and Rails Turbo Smart Boost Gauge AEM Boost Controller Dial JDM A Pillar with Turbosmart Boost Gauge (30Psi) Carbon Centre Console GT Chrome Door Handles and Gear Surround Custom Harness Bar Alpha Omega Gear Knob Silvia Floor Mats Double Din Display (Bluetooth, Navigation) Exterior: Genuine Factory Aero Kit Genuine Factory Aero Bar Genuine Factory 1 Piece ADM Spec R Skirts JSAI Fibreglass Rear Pods Origin Roof Spoiler Genuine Factory GT Wing Carbon Exhaust Heat Shield Yashio Tinted LED Tail Lights Located, Sydneys Hills District I appreciate your time reading the add! Any negative comments will be ignored and appreciated if you kept them to yourself. Any enquiries, feel free to Pm me. Price is Negotiable.
 -
Hey all, Have a ADM S15 Spec R GT for sale. Regretful sale but looking to help fund my house deposit so it has to go. Located in Newcastle NSW but happy to meet serious buyers somewhere halfway if coming from out of state etc. Car is in ver very good condition besides a few minor issues which can be fixed. General: 2001 S15 Spec R GT 136xxx Km 6spd Manual 12 months NSW rego (as of 13/8/16) Engine: S15 SR20DET Brian Crower Adjustable cam gears Brian Crower 264 camshafts Brian Crower valve springs Brian Crower retainers Nismo 740cc injectors NISTune ECU S15 T28BB Turbo-one steampipe exhaust manifold Greddy Profec B Spec II electronic boost controller Earls braided turbo lines Front mount intercooler Z32 AFM Alloy 3" intake pipe Apexi pod filter GKtech 3" stainless split dump 3" stainless turboback exhaust with 1 muffler and blast pipes ABS Driveline: S15 6 speed manual gearbox Nismo lightweight flywheel Exedy heavy duty clutch ABS R200 LSD (helical) Suspension: HKS hipermax coilovers front Pedders lowered springs rear Nismo power brace Hardrace front swaybar Hardrace adjustable castor rods Hardrace swaybar brace Exterior: Complete JDM exterior (front bar/rear bar, fog lights etc) Work XT7 wheels 18x9.5+30 rear 18x8.5+38 front Spec R GT rear wing Twin 3" blast pipes Tinted windows Interior Sunroof Leather seats Greddy Profec B spec II on lower dash panel Kenwood KMM-108U head unit (bluetooth/pandora/handsfree) Rear speakers changed (i believe they are Sony Xplod 6") Bad points: Drivers side window tint need replacing, fog lights don't work (need to be wired in), aircon needs regassing. Price is $18,500 with 1 years rego as of last week. Happy for any phone calls/messages. Call Josh on 0437 133 701 Thanks
-
 http://www.gumtree.com.au/s-ad/cobbitty/cars-vans-utes/1999-nissan-silvia-s15-import-low-km-zero-accident-must-sell/1109035115 More photos here Decided to sell my baby since I want to move on from S-Chassis. This is a beautiful car to drive and stunning looks, get lots of compliments whoever I go. Modifications: Full turbo back exhaust with stainless twin tip GFB Electronic Boost Controller Blitz Front Mount Intercooler Tein Coilovers Japanese Turbo Timer Over my ownership I have replaced the Gear knob and gear boot (brand new) and put the Tail lights back to standard Car is always serviced on time by trusted mechanics, all work has been done with receipts for all work. Gearbox and Diff has been changed from last service, gearbox is in good conditions, no crunches or unusual noises. Engine runs great, ready for a tune to reach its max potential but not essential as it still drives like a normal S15. Has standard S15 wheels painted black, the paint job on these wheels isn't immaculate and there is overspray on the inside of the barrels. The tyres however are 205/65/r16 and are almost brand new. I bought the car with only a cat back exhaust and have since done this work to make it clean and functional. Always washed and waxed regularly. The boot has some paint off it from the badge being removed and the rear bar has some scratches and nicks but nothing extreme. Few marks on the bodywork and imperfections, body is the only thing that lets this car down, performance wise it is 100% and has never let me down. Overall the exterior is an 7-8/10 to be completely honest. Come have a look and see if for yourself. Car will come on stock s15 wheels with good tyres and a GFB Decepter Pro BOV uninstalled with Stock BOV as well. Have heaps of spares like standard side mount intercooler, factory boost solenoid, standard bov, bolts hoseclamps and brackets. Has a fresh 6 months rego as well. I did a revs check when I bought the car, it's clean and accident free. I looked at 8 S15's before buying this one, I drive it once a week and just don't drive it enough to keep it. No calls after 8pm please, text preferred. NO SWAPS UNLESS R32 GTR + cash your way Contact: 0433814988 - Brody
 -
Hello world! Looking to make a quick tutorial on how to change out your tail lights in the s15 for a set of aftermarket lights. I have attached a video on the process you can view, and I have written the process underneath! Please let me know if you have any questions or feedback. Steps to swapping your tail lights. You will need to first start off by finding a nice set of aftermarket tail lights you would like to install into the car. I have chosen a set of Yashio Full LED tail lights (Apart from the reverse light) There are other nice sets out there too such as the dmax type and sex spec types. I prefer the Yashio ones. Tools you will need: - Phillips head screwdriver - Flat head Screw driver - Socket set (a spanner would work too if you don't have any sockets) - Mine was an 8mm socket, but I believe my nuts are incorrect so yours might be 10mm - You may also need some side cutters for cable ties if you have any Once you have said set of tail lights and tools ready, we will start off by removing the old tail lights. If you open your boot, you will find the where the boot closes, there is a grey strip which runs from the left to the right of the rear of the boot, pictured below. You will need to gently unscrew the Phillips head screws (circled in green), and you will find they cannot be unscrewed any more, just pop them out. You will then have some clips you need to remove, I have circled the points which need to be removed in red, just pop a flat head screwdriver in the tabs and pop them out. There are 2 of these on each side. The grey peace should now lift up and out of the way! Once you have the grey piece out, you will need to remove the 4 nuts holding the old lights in. there are 2 located next to the grommet, and then 2 moving out towards the middle, one is closer than the other. I have attached another image below of roughly where the nuts are located if you are looking down on it, you will see when you are working. you will also need to unplug the white connector going to your lights, I suggest you get a small Flathead and use it to push down on the release latch on the connector if yours are old like mine they can become a pain release. The light should now slide out of its place, make sure you are holding it from the front so you do not drop it Once the light is out, simply reverse the process. If you are installing the Yashio Tail lights like me, you will have a small black box you need to stick to the inside of your boot, and there will be a little plug you need to plug into that too, coming off the lights, simply unplug it to get the cable through the boot and back through the grommet, and then plug it back in once the cables back in the boot (I am not 100% sure what this box is for, initially, I thought it was just to decrease the current and voltage so that it does not fry the lights, but cannot confirm if this is it's only use. It is quite large and would expect such a device to be much smaller. If you know what this is for I would be curious to know Please let me know) Hopefully, you followed through with the tutorial and the new lights look great! Keen to see the results so post up some photos if you followed my tutorial, or even if you just came across it and you have your own lights If you have anything you think I missed and you would like to add, please let me know, I can add it at any time
-
 Hello and welcome to another new Tutorial! This can only be done in the Jap Spec S15's, ADM ones may share bulbs, and process to remove is similar, so you can follow along too with discretion. For this tutorial, all you will need it a few Phillips head Screw Drivers and the appropriate LED's. The LED's used include T4.2 LED's, but there are 2 different sizes for the Jap Climate Control buttons and Display Panel. (Currently, am unable to confirm the size of the Display Pannel LED's, So please let me know if you know what size they are so i can update here) As i was not sure of the size for the smaller LED's, i simply used the old LED holder which was inside the unit, and removed the old bulb, and inserted the new one, and made it a bit smaller by filing and sanding it down (Do this at your own discretion. I am not responsible for any damage caused to any of your equipment if you do this wrong) Once everything is ready, we can start with the tutorial! You will need to remove the unit from the center console. To do this, start by removing the shift knob, followed by the Shift Boot. Underneath you will find some screws towards the top part, undo these and gently begin prying at the sides of the center console, and with a bit of effort it should come out. Now you should see the screws holding the console in place, there will be 4 screws similar to those that were under the shift boot. Undo these, and the unit should slide out. Remove the clips from the back making sure not to rip the cables out of the clips. Now the unit should be free. Take your unit to a work bench for the next step! You will be able to see 4 screws (for the jap spec one, ADM may be different) behind the face of the unit, there are another 2 screwed into the green PCB board, do not remove those 2. Remove the 4 screws behind the face plate. Then you will see clips holding the 2 pieces together, there should be 3 clips on one side and 2 on the other. Gently release the clips with a tool of some sort, and the 2 pieces should come apart. DO NOT PULL TOO HARD AS THERE IS A CABLE HOLDING IT TOGETHER You should now be able to see 3 white colored LED holders and 2 black ones. From here simply swap them over. (in my case, as stated above, i had to modify the black ones because i do not know the size, so please let me know if you know. Thanks!) Polarity does matter, so from here you will need to put the unit back together, and test, if some of them light up and some don't, simply pull the unit apart again, and change the orientation of the ones which do not work, by reversing the polarity, they should now light up! Install the unit back in, and admire your work!
 -
Hi guys. This is probably a very commonly covered topic, but today, i wanted to make a video to document the matter, and help those who may not know how to do this. This tutorial will show you how to swap your Coil Packs in your s15 if you find that they are failing, or causing misfire. *Background story - My car was idling fine and such, accel was fine in first 2 gears, but when in 3rd gear upwards, it would stutter and splutter, causing issues with acceleration under boost. I had a tip from some guys on the facebook group, and was told to check my ignition system. I had plans to change coils and plugs, but as i had a spare set of coils, though i would do them first. Changed coils, and did not have to touch my plugs, the issue is now gone. Please follow below for any assistance or instructions. Please see my video for full instructional and visual. For those who might not like watching videos, or tight on data, i will write the instructions below. Please follow closely. If you have a similar issue or need to change your packs, you will need to make sure you have your car turned off. Pop the bonnet, and you may see a silver plate, or a plate of sorts on top of your engine. If you don't have this, you can skip to the next step, if you have one, you will need to remove it with an alan key. Once the silver plate is removed, you will need a 10ml socket to remove the 4 bolts holding the packs in. When unplugging, please be extremely careful, as you can break the clips quite easily if you are too rough, as they are now very brittle after about 20 years of heat cycles. When the plugs are removed from the packs, you can gently pull them up, you may need some force as they have grommets holding them in. When the coils out, at this point, you can just replace it, or you can take it a step further, and change your spark plugs too. I recommend the ngk iridium plugs, they are supposed to last a long time, and are gapped perfectly if you are running a similar setup to me at 15 PSI. If you decided to swap your plugs, make sure not to over tighten them when screwing them in. Once they are in, you can follow the process to swap the coils, but backwards, when installing the new coils. After you have done all this, turn on the car and see if the issue persists, take it for a cruise, and if all is well, congratulations, you have saved a trip to the mechanic! Please feel free to leave me any feedback as it helps me make future content or tutorials! All the best, see you next time!
-
Hello all and welcome back to another tutorial. I hope you have been well, if you are reading this, we have a video detailing the process just below, and below that we have a write up for those who prefer some good reading material. Today we will be installing the Option B Blue Seats into the S15 Note: Most seats out of all S Chassy's are compatible with one another. If you have an old 180, 240, s13, s14, s15, then all the seats are interchangeable as the rails remain the same. So you can swap new seats into your old car, or if you have a nice set of aftermarket seats, and you're buying a new silvia to sell your old one, then you can slap them right into the new one. Now let's proceed with the installation. If you have aftermarket seats, then you will need to make sure you purchase S-Chassy rails, the bride rails sit well in the s15 and are a nice option. Step 1: You will need to remove the old seats from the car, this is quite straight forward. You will need a socket set, from memory i believe the size of the bolt was 12mm but i cannot remember exactly, as long as your set ranges from 8mm to 18mm you should be fine Step 2: Locate the 4 bolts on each seat. You will find that there are 2 on the floor under the front of the seat, and when you move the seat forward, there are 2 at the back you will need to remove, one will be on the floor and the other against the transmission tunnel. Step 3: I recommend unscrewing the front bolts until they are barely still in the hole, and can be removed with fingers, then sliding the seat forward to remove the rear ones and then you can reach underneath and undo the front ones. but, this is just how i did it, you find a way that suits you Step 4: Tilt the seat backwards, you may see 1 or 2 connectors under there. Most people will only have 1 connector which is used to check if your seatbelt is plugged in, you will need to unplug this to remove the seat. Now you might be special, and have 2 connectors, this is not very likely, but if you are, shoot me a PM if you're removing your seats and you have that yellow connector you have an extra step that needs to be taken Step 5: Gently remove the seat from the car, without breaking anything or scratching anything. Step 6: You might notice that your new/old whatever seats do not have the seat belt buckles on them, before you put them into the car, it would be a good time to remove the buckle off your old seat, and attach it to your new one. should be the same size bolt which is used to anchor the chair to the ground. Step 7: Gently install the replacement seat into the car and pretty much repeat steps 4 to 1 in reverse order. (Again, for those of you with the yellow plug, PM me for step 4.5) Step 8: Make sure all the bolts are nice and tight because this is what saved you from flying through the windshield at a sudden stop or crash Step 9: You're done! If you enjoyed this tutorial, you should consider checking out my other ones. I have quite a few videos focusing on aesthetics for the s15 and i plan to release a few more in the near future. Please also feel free to check out my channel for video guides and vlogs. Thanks for your time. Peace!
-
Hi there, interested in swapping my S15 with an R32, R33,R34 GTR WITH Cash differences. S15 is built for 300kw and turbo kit has 400kw potential, E85, clean and strait. Mod plated in QLD for seats and suspension 190,000 GTX3076 gen 2 50mm progate big Brembo upgrade Brand new SPARCOs Nardi VOLK with brand new AD08R 265 1000cc APEXI DJETRO +++++++++++ GOLD COAST QLD 0423972346
-
Hi all. I know this has been done before, but i am doing this again with a video to make it a bit easier for people to visualise what needs to be done! I have attached a video below of the process of installing the fog lights into your S15 weather they are factory or aftermarket the process is similar. This is a LOT easier and quicker if you have an imported S15 from japan, if you have an ADM (and possible NZD) s15, this process might be a bit longer for you, but will explain your extras in the write up and briefly in the video. Come along for the install! Written Tut! Ok so for those of you who would like some more info, or prefer a read up, here is is in a step by step fashion please drop any questions below! Step 1: You will need the following: - An S15 - A set of factory or aftermarket fog lights - You may also need some 6mm thread nuts and bolts and some washers from memory to mount the lights into the bumper - FOR IMPORTED SILVIA: - You may need an indicator stalk with the fog light switch, else you can follow the ADM/NZ optional Extras to get yours working. (if you are missing the stalk and want one, please PM me on YouTube as i am more likely to see it sooner, or you can PM me here and i will try get back to you as soon as i can with info on how to get one, or if i can source you one) - FOR ADM/NZ MODELS ONLY: - You will need a inline Fuse - Some wire (12 - 14 gauge) - A Switch which Turns you on.. ehem i mean, can be used to Turn on your Fog Lights (Honestly any switch which you would like to use will do, just keep in mind you need to mount this somewhere you can access it) Step 2 (optional): You may want to remove your front bumper for ease of access, or maybe not, i did, good luck should you choose not to Step 2.5: If you are trying to remove your bumper, i have circled the screw location in the video: - There are some near the wheel well closer to the wheel - One inside the bumper up near the light on each side -The ones at the front in between the lights - You may also have some at the bottom if you have a lip, or not Step 3: If your bumper has any mesh or covers where the fog lights go, you will need to remove them at this point. The ones from the non - Aero bar must be unscrewed from the inside, and then slid out from the inside. I assume those on the Aero Bumper are the same (if someone can confirm i will update Thanks) Step 4: Before we mount everything in place, we will test the lights to make sure they work! - If you have an imported SILVIA and are using the factory fog lights, please plug them both into the plugs which you can find around where they will sit on the bumper. If you cannot find the plugs, it is likely you have an ADM or NZ model of the S15, and you will need to do some additional work - If you are using aftermarket fog lights and you have a SILVIA with the plugs, you will need to create an adapter by buying the plug from a wrecker, or online if you can find them, or by using some spade connectors (probably the easiest option as i believe they will fit) - If you are using factory/aftermarket fog lights and you have an ADM/NZ model S15 without the plugs you will need to run wiring to the cabin yourself. Step 4.5(For ADM/NZ Models ONLY): You will need to make your own wiring for this, i am not 100% sure if your s15 comes with the relay or fuse, but no matter, we can do this without any factory wiring, follow the next few steps - You will need to create a plug which goes into your Fog Lights, weather they are factory or aftermarket, you should have 2 wires coming off each at this point. (i would use spade connectors as above but up to you) - You need to choose where you want to draw the power from at this point, You can grab it directly from the battery if you want, probably the easiest way, otherwise you will need to find a fuse you can tap into, i would use the battery but this is up to you. Find your power source. - Wire in your in-line Fuse, i recommend 30 amps, if you believe you know better please do as you like (we don't like fires here...) - Run your wire into the cabin if you are getting power from outside, there is a grommet under the driver side fender which does into driver foot well, run the positive cable into here and then wire in your switch and mount it somewhere accessible to you! - Run the negative off the switch back through the grommet and outside the cabin, into the bay, then rout it down to roughly where your fog lights will be - You will need to split your power source cable and make sure to leave some slack for each connector as you should plug them in before mounting the bumper back - Terminate the wire into either the proper connector or spade connectors (pick your poison) and then join both neg cables back together to make your life easy, and rout the neg to a bolt which connects straight to the chassy to ground the connection. Step 4.6(For SILVIA Import Model From Japan): - If you have an Indicator Stalk with the fog light switch, you do not need to follow the next part of this step - If you do not have the fog light switch on your stalk, you can either buy one and fit it, or follow step 4.5 to install the lights as you would in the ADM/NZ model, or you can do some research to find out where you can tap into the factory wiring in the cabin and just wire the switch in there (i did not go through this so cannot offer much assistance, but if you do go through this, please comment and let us know how you did it, would love to add the info to the Tutorial ) Step 5: Test your lights to see if they Turn on Step 6: If Step 5 was Successful go to step 7, if the lights did not come on, please make sure to check your wiring, or try reversing the polarity as you might have plugged positive into negative on the fog light. If this does not fix your issue, you need to make sure your wire is plugged in and perhaps try using a multi meter to test for power and ground. If you are using factory wiring make sure the fuse and relay are installed in the fuse and relay box Step 7: Unplug your lights and mount them into the bumper (factory will go straight in, just need the mentioned bolts from above) If you have aftermarket lights, you might need to make your own bracket. Step 8: Mount your bumper back onto the car and plug the lights in at the same time Step 9: Clean and final test! Step 10: Profit? Please post some pics below of how yours turned out and what you did. Keen to see outcomes. Please feel free to let me know if there is anything i missed as i would like to make this the most accurate and up to date tut there is. Thanks and good luck!
-
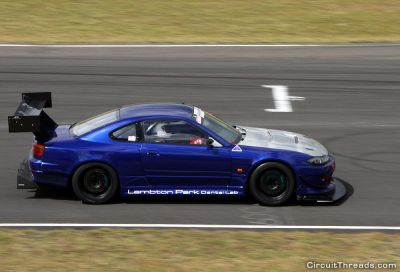
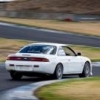
From the album: WTAC 2014
© www.circuitthreads.com
-
Hello everyone. This thread is my Diy/walkthrough of a s15 dash conversion in my r32 sedan I do really like the r32 dash but having an s15 as dream car. The s15 dash has always been the best looking dash in my opinion. Iv had some lazy spare interior parts had gotten the dash i swapped for a part which was cut n stuff for his a31. But long story short. Iv taken the factory one out and chucked in the s15 one in to get an idea.. i havent checked what mount fits or not yet. Ill be cutting my door cards so the door can close also doing my sounds while i have time cause some drivetrain things are broken lol Will keep an update, Now that iv made the thread. Ill try be more indept as i go along also. Cheers.
-
Hi guys, just got a quick question regarding the SR20. Does anyone know if an S15 SR20DET 5 Speed Transmission, will bolt straight onto an S13 SR20DET Redtop? Im looking to do this with relatively little fabrication and custom stuff, but if its needed then i will do it. Thank you very much.