Jump to content
SAU Community

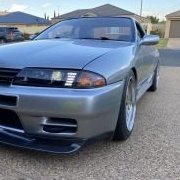
Shoota's R33 GT-R RB30/26


Recommended Posts

Ok so my diff guy has gone missing...  I'm trying to get my stuff back so I can start re-assembling things.  I'm hoping he's just gone away for the Chrissy break (and have no issues with that being the case!) but I really wanted to get stuck into it while there are a few days off here and there over the Chrissy/New Years break even though I'm working through.

My GKTech camber arms turned up yesterday so I can whack them in once the new upper control arm bushes arrive.

While all the front suspension is apart to remove the front diff I'll give everything a really good clean up under the front wheel arches to get rid of some of the 24 years of built up crud!  One day I'd love to do a full resto job on the car but I want to get it up and running and enjoy it for a while first.  The body is in great condition, it's just the bolt ons (bumpers, side skirts, boot spoiler, etc) that are in need of some love.  I've never played with bolt ons so should be fun..... oo > 00

I've spent a few hours modifying the front bumper to accomodate the 100mm intercooler.  I've had to hack off a good inch here and there to get it all to fit.  I found the front reo to be really out of whack too.  The bumper has always been on crooked so I was determined to get it right.  I elongated the holes on the mounts, bent the top bumper guide edge (the section that sits under the headlight to hold the front edge of the bumper) and also bent the whole reo bar across to the passenger side a bit.  It all sits perfect now so well worth the few hours of stuffing around!  It's probably never been right for its whole life!

Plenty of other things I could be doing but due to the time of year it is and my cyclic motivation, not much is getting done!

In the times I should be out in the 45 degree shed I've been watching all of this series which is well worth a watch if you haven't already.  The kid is only 20 years old but this is already the second car he's done a full body resto on.  He's done a brilliant job and is very honest with his mistakes.  Well worth a watch if you're planning on getting stuck into your own car but just need a bit of assurance to have a crack!  He mentions something that I've spoken of before that the hardest part of performing modifications is just starting.  Once you start you've already conquered the first and hardest hurdle.  Give it a look- 


  • Like 1
Link to comment
Share on other sites

  • 2 weeks later...

My diff guy finally poked his head back out yesterday so I can go and pick up the diffs.  I'm not actually sure if he has done anything with them, will hopefully find out today.

Otherwise I've just been fluffing around to be honest.  Just doing little bits and pieces but not much!  I gave the wheel arch areas a clean up as they were very dirty as you'd expect.  The paint is VERY thin under there so had to back off a bit once I started going through the paint....  Once the diff is re-assembled I can whack the new camber arms in and re-assemble it all.  I really want to do a full resto job on it but I'll fight off the urges and do it down the track.  I'll just clean up what i can and be done with it.  I'm putting a new set of lower ball joints in while it's all apart as the boots are split on one and very perished on the other.

Front diff housing is all cleaned out ready to re-install the diff when I get it back.  I've machined a little bit off the inside of the diff housing to make getting the diff back in a little easier.  They're a bastard of a thing to get in and out while in the car so anything to make it a bit easier is a bonus!

Cleaned up all the bolts in the ultrasonic cleaner, it does an awesome job (see pics)!

As a side job I built a very quick, slapper trolley to hold my sandblaster unit as doing it on the ground was not great for my knees and my back!

I'm resto-ing the front grill mesh so stripped it apart and have started sandblasting the powdercoat off the mesh.  It's bloody hard to get off.  I tried paint stripper but it does nothing to powdercoat I now discover!  More time in the sandblaster and they'll be all good.  not sure if I'll just paint them or go powdercoat again.

Even though I'd done it before I gave the headlights another hit on the buff to bring them back to sparkling.  One day I might actually get to use them!

Starting to contemplate getting the fibreglass kit out again to fix a few bits and pieces but I'd rather keep that till after it's back on the road.  See photos of cracked boot spoiler brake light surround.  Gunna be tricky to fix....

Hopefully getting the diffs back will get me motivated again!

20200101_165043.jpg

20200104_160814.jpg

20200105_163544.jpg

20200105_145229.jpg

20200101_213252.jpg

20200104_160802.jpg

20200105_163552.jpg

  • Like 3
Link to comment
Share on other sites

@georgev cheers for the kind words. It's become quite a lengthy read so you've done well!


Diffs are back. Both are in great condition which is good news and bad news! I'm glad it's now eliminated as an issue but it means we've still got a problem!

I'll re-assemble the front diff then get the car trailered back to the diff guy so he can set up the whole thing perfectly. He'd really rather me take the sump off and give that to him..... I'm not convinced I can be effed doing that! ?

Will hopefully get back into it over the weekend. 

  • Like 1
Link to comment
Share on other sites

2 hours ago, Looney_Head said:

yay for good news, gutted its not the issue :(

Yeah bit of a bugger....

Maybe I'll just ditch the front drive line and make it into a RWD drift pig!

Link to comment
Share on other sites

14 minutes ago, Shoota_77 said:

Yeah bit of a bugger....

Maybe I'll just ditch the front drive line and make it into a RWD drift pig!

lol as a person with a high hp rwd, i would strongly advise against that lol, unless its just for a little bit of time.


i have to wait till 4th and 5th to give mine 20psi lol

Link to comment
Share on other sites

1 hour ago, Looney_Head said:

lol as a person with a high hp rwd, i would strongly advise against that lol, unless its just for a little bit of time.


i have to wait till 4th and 5th to give mine 20psi lol

Yeah there would be a massive 'skills actual' versus 'skills required' variance if I tried to drive it in RWD.  I need AWD to be any chance of keeping it pointed in the right direction (not upside down)!

  • Like 1
Link to comment
Share on other sites

Somewhere between "I won't bother cleaning it, I'll do it another time" and "I may as well give it a quick clean" I took a wrong turn... 4 hours hunched over the parts washer with bloodied, cut up, and bruised hands I ended up with some pretty bloody clean front suspension! 

It was all done with a scouring pad and elbow grease. 

Not really progress and bloody hard work but had to be done!

Doing little things like this will hopefully keep me ticking things over so when the bug bites again there are no major obstacles.

Spent more time on shed modifications this week than working on the car. 

Too much junk in my shed so adding a new section to make more room. Maybe room for another project.... Maybe. 

20200112_172519.jpg

20200112_172508.jpg

20200112_172453.jpg

  • Like 2
Link to comment
Share on other sites

  • 2 weeks later...

Apologies this post is extremely pic heavy!  A little bit of catching up to do!

Still just fluffing around with minimal drive! 

More cleaning of the front suspension so it all looks nice. I'm now going to replace the lower inner ball joint as well as the lower outer. The only one I won't do for now is the upper outer big bastard that is a dog of a job that I'll avoid for now... 

20200127_145651.jpg

20200126_185449.jpg

20200126_184946.jpg

20200126_184938.jpg

20200127_144244.jpg

20200127_144314.jpg


On other goings on I bought a cheap metal band saw for cutting pipe easier (maybe....). Impressions so far are TBC. Hopefully it's only the cheap blade that came with it but I've already broken a blade after about 10 or 12 cuts of 4" stainless. I'll order in some new blades and hopefully get a better result. 

20200126_190210.jpg

I did manage to get enough (10) pie cut sections to be able to make a lobster back 90 degree bend. 

20200126_190159.jpg


I decided that the car is too loud so thought I'd give a Varex Muffler a go. It's the biggest one they make being 4" in and out. I'll try and fit it without having to modify the exhaust so I can reuse the other Muffler if it turns out shit. It's a tiny outlet in closed position so will knock a heap of power out but hopefully nice and quiet. 

20200125_210549.jpg

20200125_210522.jpg

Can someone help identify my front LSD? I've googled a heap of pictures but can't find one the same. I'm thinking maybe Cusco but not 100% on that. There are also some similarities with the OS Giken but I don't think it's one of them.

20200125_211955.jpg

20200125_211942.jpg

20200125_211924.jpg

Painted up some other bits and pieces to make them look pretty. These are the mid car chassis braces-

20200126_203655.jpg


I also decided to pull the box out to make sure everything is all good in the clutch area.  Plus I want to pull apart my transfer case to make sure I haven't done anything wrong there.  Once the front diff is re-assembled and I've checked over the transfer case hopefully I've eliminated everything that could have caused my noises!  I forgot how much of a dog of a job pulling the box out is!  Every other time I've pull the whole thing out as a whole unit (down through the bottom).  You guys doing it on the ground are now my heroes!  I bought a jack transmission cradle that I couldn't be bothered waiting for.  I'm going to try and mount it to my engine crane to be able to use it up in the air as opposed to on the ground.  I'll see how that turns out...

20200127_211857.jpg

20200127_211903.jpg

This is a spare (broken) box I bought that has a pre-modified transfer case.  I might use that one if i start to doubt mine too much!

20200126_190219.jpg

Ground out a bit of material from the front diff housing to make re-install a bit easier.  All cleaned out ready for re-install-

20200126_190437.jpg

20200126_190445.jpg


Again it's a slow burn on my enthusiasm but we're slowly but surely getting there!  Probably aiming to have it all back together mid Feb.  If not, what's another month or two!!  :)  :( . 


  • Like 3
Link to comment
Share on other sites

Create an account or sign in to comment

You need to be a member in order to leave a comment

Create an account

Sign up for a new account in our community. It's easy!

Register a new account

Sign in

Already have an account? Sign in here.

Sign In Now


×
×
  • Create New...