Jump to content
SAU Community

R33 GTR - Daily for 7 years and counting


Recommended Posts

R33 GTR - Daily for 7 years and counting

I recently started to read through a lot of the project threads on here, and I wanted to add my own as it's a great way to keep track of everything, and a lot of the information I've found in the project threads had been invaluable for my own build. 

I've been lurking around these forums since I got my first car, a 1994 R33 GTS4. Back then I had zero mechanical knowledge, but I planned to just dive in and learn as much as I could, which has led me to where I'm at now with a 1995 R33 GTR, doing all mechanical work myself (aside from one clutch change), and not planning on ever parting ways with it

I picked the car up back in 2010 with a few mods, such as the Enkei wheels, and a HKS catback with an unknown high flow cat, but it was otherwise completely stock. Looking back, it was a good find as I didn't really know exactly what to look out for at the time

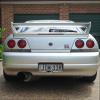
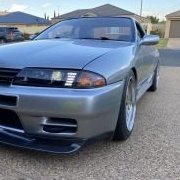
I've collected a whole bunch of pictures I've taken over the years, and my plan is to go through and post them in order until I get to where it's at now, so there's a lot more to come if anyone is interested in reading along. For now, I'll start off with a picture of how it was the day I got it home, back when phone cameras were a lot worse than they are now

26745_427866580129_396307_n.jpg

  • Like 4
Link to comment
Share on other sites

Whenever I post about parts, I'm going to try to be as specific as possible, just so if anyone is searching for info, they'll know that this specific part fits this specific car, that sort of thing

So the list of mods when I got the car is as follows

-Enkei RPF1 wheels 18x9.5 +15, 265/35r18 tyres

-King Springs super low lowering springs on stock shocks. Fronts KDFL-101SL Rears KDRL-61

-N1 bonnet lip and vents

-Series 3 xenon headlights, dash trim, and steering wheel

-Pod filters

-High flow cat - unknown brand

-HKS Super Dragger exhaust

The lowered springs were awful with the stock shocks, but not knowing any better at the time, they stayed for way too long. These have since been replaced, but I'm not up to that part of the story yet. For now, I'll just say they went in the bin, and that's where they belong

As for the pod filters, I'm a fan of the induction noise, but not of the hot air they were sucking in without a box. Like the springs, they stayed for too long, only because of how difficult it is to find a stock airbox that didn't cost the earth

Everything else was good though, and believe it or not, nothing was changed for a whole 2 years after I bought the car. Just regular maintenance, and fixing things when they broke. This was all before the slippery slope that is modifying a GTR

Some more pictures of how it was looking around this time. Engine bay is looking a bit rough, this gets fixed later

IMG_20120221_141353.jpg

IMG_20120225_191431.jpg

IMG_20121211_175655.jpg

  • Like 1
Link to comment
Share on other sites

Now we jump forward to early 2012, when one of my rear shocks gave up. I guess a combination of age, the springs installed, and the crappy roads (I was living out in the country at the time). So I got a set of Tein Super Street coilovers, used but good condition, and while they were still quite rough, they were a lot better than what I had before. No pictures of the actual install, just this one from before I put the fronts in

IMG_20120815_081156.thumb.jpg.72878e15e96410831ca6429a9b4cb564.jpg

About a month after this, I spent some time trying to track down a boost leak I'd had for a couple of months. Found a leak at the rear of the intake manifold, so that meant pulling it out and changing the gaskets. First relatively major thing I'd had to do, and it all went smoothly, no more boost leak! Again, not really any pictures of the process (I promise I get better at documenting things later), I did however get some pictures where I took the front bar off just to check all the intercooler piping, which was all fine

IMG_20120221_141527.thumb.jpg.a437d9e80105ec8460ee5ddea86ce7cb.jpgIMG_20120223_180337.thumb.jpg.8650d06c2c52678584856fd4a3a33ad4.jpg

  • Like 1
Link to comment
Share on other sites

August 2012 - Was out for a drive and I heard a POP, followed by the car now sounding like a tractor. It sounded bad, but it didn't feel like I'd lost any power. I was an hour away from home, so I just drove it carefully and hoped it wasn't anything too bad. Turns out the gasket between the exhaust manifold and the rear turbo had blown a chunk out. Broke one of the hard coolant lines while attempting to get in there to repair it, and living in a rural area meant I couldn't just get to a wreckers or something to get a new one. Ended up replacing the hard lines with braided hoses, and I somehow managed to replace the gasket without completely removing the turbos. There was also a new boost leak coming from around the stock boost solenoid, so I bypassed that with new hoses and installed a Greddy Profec-B boost controller and just ran it at stock boost

IMG_20120819_132942.thumb.jpg.07f15918ae4a3fb899b10af1568f4929.jpgIMG_20120819_141134.thumb.jpg.8eb4cfd98340d5d31d08335b121e994d.jpgIMG_20130219_185248.jpg.69e13b151285fc3bfea77f0b8596488b.jpgIMG_20130913_122640.thumb.jpg.56b48b5846229261940f76cfe0ef04ef.jpg

  • Like 1
Link to comment
Share on other sites

2013 - With around 115k on the clock now (bought it at 90k). I'd put it off because if I screwed it up, it'd be an expensive mistake, but I didn't buy it to just give it to someone else to do, so with a lot of research and triple checking absolutely everything before I cranked it over, I got it all done with no issues. Also did the cam cover gaskets as they were leaking a bit

Around the end of the year was when I decided I'd better get a decent alarm/immobilizer installed. I have a real thing about keeping everything as factory looking as possible, and this was yet another thing that I really wanted to do myself. Obviously due to the nature of an alarm install, I don't want to post the details in public, but I will say I'm pretty happy with how well I integrated it into the factory wiring. One thing I will give away is that to get the keyless entry working on the drivers door, I found that you can use the door latch from an N15 Pulsar, which has a factory actuator built into it, and bolts straight in. Works perfectly and looks factory

The only thing I actually have photos of from 2013 is a new head unit; JVC KD-X80BT. I went for this one because it's a fairly minimal design compared to most of what is on the market, and you can set different colours for when the headlights are on and off. So I have it set to the same green as the dash clock when the lights are off, and then a slightly orange colour to match the halogen bulb in the triple meter when the headlights are on. Makes it fit in with the stock look just that little bit better

IMG_20160222_164638.thumb.jpg.23d5d07d617a244fe152434b7635aeab.jpg

Link to comment
Share on other sites

Now on to 2014, when my girlfriend (now fiance) and I moved down to Melbourne for a year, and the car pretty much stayed in storage for the year. The one and only time that I left my car out of the garage overnight in the whole year that were lived there, someone broke in and tried to steal it, and it was honestly maybe one of five times that year that it even left the garage. Amazingly, our housemate happened to be coming home from work at the time, and caught the would be thieves in the act. And also just as amzing was the fact that the only thing that was broken was the ignition barrel; no broken windows, steering wheel trim neatly removed and not even any lost screws. Lucky the immobilizer did it's job or it would have been no more GTR


IMG_20141202_015416.jpg

IMG_20141202_015423.jpg

  • Like 1
Link to comment
Share on other sites

Oh I almost forgot, the one thing I did do in Melbourne while the car sat for so long is I fixed up the yellowing headlights. This was my first attempt, and there's a more impressive effort to come, but I think they came out pretty well

I know there are DIYs around the internet for this sort of thing, but for the sake of documenting everything, this involved sanding the yellowed plastic off with wet sandpaper, working up to a fine grit, then polishing with rubbing compound, and finally polishing again with cut and polishIMG_20150722_192415.thumb.jpg.14646af5ebe16c67766e5a849f7cf461.jpgIMG_20150726_130515.thumb.jpg.16ef241c1d39c0a98d5817dc54d2fa5e.jpgIMG_20150726_130532.thumb.jpg.7b0fb05a1a4e5e5e8697b9ac3998e501.jpg

Edited by jimnastic
  • Like 1
Link to comment
Share on other sites

Okay, 2015 is when I was finally able to get stuck in and spend some time and money doing some things that I'd been planning for a while

There were some general maintenance items, front CV shafts were replaced, and a new coil pack harness as the old plugs had become brittle and fell to bits during a spark plug change. Look at the shadow in the picture and you can see how hard the harness had become with age and heat

IMG_20151201_184356.thumb.jpg.46982ab80e3384e4157aa3950ce384a8.jpg

Oct 2015 - DBA slotted rotors and new brake pads went on

Front discs - DBA4928S

Front pads - DB1520

Rear discs - DBA4929S

Rear pads - DB1521

IMG_20151210_201633.thumb.jpg.0a7406d4bd4396ca4b92ae565b80c463.jpgIMG_20151212_104152.thumb.jpg.8ceb768373b27ac46dacc01bea404d22.jpgIMG_20151212_163815.thumb.jpg.b046abe57363d02fa3731750ae04e101.jpg

Edited by jimnastic
  • Like 1
Link to comment
Share on other sites

Nov 2015 - I think I forgot to mention that at some stage, the set of Teins I installed crapped out, so there was a switch back to the old lowered springs that came on the car, and a set of used shocks. Well years later, I finally binned the super low springs that the car came with, replaced with a new set that makes the car sit slightly higher (legal height now!), and they're MUCH more comfortable. Still on the old shocks at this stage

How the car sat before the new springs (sorry for the poor lighting)

New fronts - KDFL101

New rears - KDRL61SP

IMG_20151221_170757.thumb.jpg.eba1bac8b60f3f4a4042279950d6e937.jpg

IMG_20151221_182052.thumb.jpg.b05ab6283ce1ce9412da17a3f7399fc1.jpg

Also, the grill mesh was looking a bit tired and paint was flaking off, so rather than painting the existing mesh, I chose to modernise the front end a bit with some plastic honeycomb style mesh, and I was really happy with the results. A picture of the completed front end will be in the next post

IMG_20160117_144843.thumb.jpg.429e8a66718d9c27509f4b3469791565.jpg

IMG_20160117_205459.thumb.jpg.ff686b523d4352fe8c2428a23afe78b1.jpg

IMG_20160127_192845.thumb.jpg.fddd0d192a17ff2dc2f7fdd56fdb592f.jpg

  • Like 1
Link to comment
Share on other sites

Feb 2016 - Headlight restoration again, as the first time I did them, I didn't use a headlight sealant to protect the finish. 

Wet sanded

IMG_20160306_092410.thumb.jpg.c94f1acd14cf8c5372b2ca891bdf6257.jpg

Rubbing compound

IMG_20160306_092615.thumb.jpg.0c0bf13a5b033291ffef966438a06f9e.jpg

After buffing

IMG_20160306_093323.thumb.jpg.8129af30d0dab1ff2f793f38eeadbce5.jpg

After cutting compound and sealant. Sealant hasn't dried yet

IMG_20160306_094538.thumb.jpg.02146f508ffa1980d3b78212344e6ce7.jpg

Before. In this shot you can also see the new grill mesh

IMG_20160131_162818.thumb.jpg.e169b80dca16e9f6257d937216cc7dad.jpg

After

IMG_20160306_105837.thumb.jpg.1d327021ce01eb979abe46129d2d76e6.jpg


  • Like 4
Link to comment
Share on other sites

March 2016 - Found a Power FC and hand controller for an awesome price as the seller claimed it wouldn't power on. Decided I'd buy it and have a go at fixing it, turned out to be an easy fix, the wires for the controller cable had detached from the board inside the controller. I found nothing wrong with the ECU itself, but when powering it up with the faulty hand controller, it looked like it was dead. With the controller fixed, the ECU booted straight up. After some careful testing of all the functions, and then a quick drive around, it was all looking good

I didn't want to run the PFC without being able to keep an eye on AFRs, so I installed an Innovate MTX-L, and made up a mount to replace the ash tray. Also replaced the aging handbrake and shift boots with some nice new ones with red stitching, and swapped out the old Nismo Duracon gear knob with a Nismo GT500 one


IMG_20160411_083056.jpg

  • Like 1
Link to comment
Share on other sites

April 2016 - Gave the wheels some new paint. From what I can tell, they were originally silver wheels that have been spray painted a very dark metallic grey. I picked up some 'cast iron' colour high temp paint, and also used a fine tip paint brush to paint the Enkei logos red, then finished off with a few coats of clear

IMG_20160331_170502.thumb.jpg.8b34555b6e004715703d984610b67fe3.jpg

IMG_20160331_174854.thumb.jpg.d3c0dd054f2e04daf011b931f7f2721d.jpg

IMG_20160329_192149.thumb.jpg.d4797473e140a04963e9333df0cab8c3.jpg

IMG_20160330_163515.thumb.jpg.42bc310971db5595487a0199a3851e97.jpg

  • Like 4
Link to comment
Share on other sites

21 hours ago, PranK said:

Wow they look fantastic! Well done. 

Thanks! Was worried about how the paint would hold up, but it's a year later now and still looking good. Not bad for about $40 worth of paint and a bit of time

Link to comment
Share on other sites

Create an account or sign in to comment

You need to be a member in order to leave a comment

Create an account

Sign up for a new account in our community. It's easy!

Register a new account

Sign in

Already have an account? Sign in here.

Sign In Now


×
×
  • Create New...