Jump to content
SAU Community

Stagea Rebirth Thread


spudtatoe
 Share

Recommended Posts

  • 2 weeks later...

April 11/12

I'll start off with saying that a family friend who owns a panel beating company has offered to help repair my wheel arch as long as I help on some aspects of it which I'm stoked about!

He said it's gone in quite far so will probably need to go on the chassis straightener, then we'll probably have to bog it up then paint it. Awesome news :D

Now I started getting into the fuel gauge issue. Heh. Honestly the reason why it wasn't moving (I won't say working because it always was) is actually quite amusing and no one would be able to guess unless they saw it.

It took me honestly about 3 hours to even get to the top of the tank, the hardest part was removing the hoses for the out and in, I managed to loose the removable flat head piece for my screw driver, I'm hoping it didn't go into the return line lol. Another issue was that Niagara Falls seemed to have found its way to the outlet, turns out taking off the fuel cap really helps relieve the pressure ;)

IMG_0146.JPG
IMG_0145.JPG
IMG_0149.JPG
IMG_0154.JPG

I stopped there because fuel just went everywhere and filled the plugs so I couldn't test the float.

Second day I plugged in the plug after the fuel evaporated and to no surprise it didn't work (makes sense now at least haha). I really didn't want to take off the hoses and plugs for the pump under the float mainly because it looked quite daunting lol. Anyway as I do I unplugged them and pulled out the float

IMG_0165.JPG

Next I plugged in the float and as gravity works, the float moved to the 'full' position

IMG_0169.JPG

And the gauge moved! But that doesn't make any sense right? Because if it freely moves and the gauge works, it should work inside the tank right?

IMG_0160.JPG

Is that a floating fuel pump maybe? Hmm... that's not where it should be.

IMG_0168.JPG

Much better.

IMG_0172.JPG

So, all back together and it's working! I finally have a gauge that works.. no more topping up fuel every hundred kms haha.

So.. why wasn't it working before but is now even though nothing really changed? Well I'm going to take an educated guess and presume that the fuel pump was sitting on top of the float which means it wouldn't move or a fuel hose was stopping it from moving.

Anyway I'm super happy that it's fixed and for free!

IMG_0177.JPG

  • Like 4
Link to comment
Share on other sites

  • 2 weeks later...

Okay, so.. this is a little bit kinda big update lol.

So after fixing the fuel gauge, I went out for the maiden voyage as such feeling that the car was all fixed and running perfectly.

Ha.

200m down the road I stopped to give way at a roundabout... too bad the car didn't wanna leave the roundabout. It completely stalled out on me leaving me thinking that the flathead screw driver piece in the fuel lines...

I spent the whole of the following Tuesday taking off all the return fuel lines trying to find the bloody thing. Probably spent about 4 hours trying to find it.

I could not for the life of me find the thing, and it wouldn't have been able to get into the metal lines due to size so I was confused.

I had looked around the top of the tank thing where it screws in, and I couldn't find it there the other day. But I decided I'd take one more look before calling my uncle lol.

IMG_0278.JPG

Well... there's the fkn screwdriver piece...

So then why the balls is the car stalling out on me?

I put it all back together and called my mate over to take it for a drive, he drove it pretty hard and it didn't cut out on him nor did he feel anything wrong with it.

I thought it must have just been a random fluke and maybe there was air or something in the lines I'm not too sure.

So with me being confident that it was fixed I went for a drive that night. Only to fkn stall out again only 50m from my house...

I was trying to figure out why it stalled out at night but not during the day, both times the only difference between the times it stalled and when it was fine was that it was night time and the headlights were on.

So I started checking the battery and electrics thinking it could have been that, was getting fine readings for all mock situations I put it in.

Not thinking about doing the CEL test with the paper clip I did that... code 12.... afm... wtf.

So I bought another AFM the next day and picked it up. Put it in, went for a drive at night with headlights on, was fine. Cool.

IMG_0363.JPG

Now the old AFM is on the left and the new one on the right. Notice any differences? The sealant maybe? This lead me to believe that my one had been opened and repaired at some point in its life and was back to haunt again.

IMG_0366.JPG

So on my one drive I've done hopefully my problem is fixed... I just seem to be away every time I need to drive or fix the car.

And on another note when I was pushing my car someone.. unfortunately me... curbed my wheel...

IMG_0257.JPG

Okay that's it for me hopefully until Wednesday! Then hopefully I'll have some good news to share lol

  • Like 2
Link to comment
Share on other sites

Okay got that awesome news haha.

Cars running awesome, done about 150kms so far and hasn't missed a beat.

I also just passed my licence so I can now drive on my own :D

  • Like 3
Link to comment
Share on other sites

  • 1 month later...

Probably due an update lol,

Don't really have much to update on, I put on the sideskirts that no longer fit nicely lol. 
Stagea meet was a blast, i've now got some plans for this car... :2_grimacing:

Here are  some photos from the stagea meet, mine of course wasn't washed because the Wash World was fully packed with a certain type of people in their Commys and straight piped pulsars ^_^

In the future id love to find a turbo sunroof model, strip it back, rust repair and then paint it some sort of pearl purple/blue... wishful thinking and should probably just sort out this one first.


Last thing; does anyone know anyone parting out a WK1 stagea (Pearl white with silver strip) who has a right hand rear door for sale! Anywhere in NZ i'll find a way to get it whether that be drive to the south island or drive just down the road.

ive been looking for 4 months now and still can't find a door, you'd think white would be the easiest colour to get panels for but its seriously not.

DST_2542.jpg

DST_2543.jpg

DST_2547.jpg

DST_2548.jpg

DST_2555.jpg

DST_2561.jpg

DST_2564.jpg

DST_2571.jpg

DST_2576.jpg

IMG_2301.JPG

IMG_2340.JPG

IMG_2350.JPG

IMG_2368.JPG

Safe as.jpg

  • Like 1
Link to comment
Share on other sites

Aight, today I fixed up all of the wiring I've done on the car, which is just the tail lights and the radio wiring.

We'll start off with the first thing I did, the tail lights.

I've had the tail lights installed for well over 6 months now but the wires were only ever twisted together. And for the trailer wiring I just cut away at some of the wire then had just twisted and taped the trailer wire to it, which was super dodgy and would be 50/50 chance of it working lol.

You can see here that I've done the indicator wiring I think? I've used the wire tap blocks for the trailer wiring which were quite good. Then I've used wire joiners for the indicator bulbs for the tail lights

IMG_0802.JPG

And then here you can just see all of the wiring fixed, this was kinda done to the best of my abilities lol. If I had the equipment like a soldering iron etc I would've used that though.

IMG_0804.JPG
IMG_0806.JPG

That's it for the tail lights and trailer wiring. I verified that the trailer wiring works by using a test light.

Now I moved onto the radio which took about 2 and a half hours max. I went into this job not really trying to achieve anything other than making the wiring more safe I guess, rather than the wires being taped together lol.

Previously I had been using a piece of wire going from the antenna on the back of the headunit running up along to the side of the dash. Worked average in the beginning and over time it just got worse and worse to the point where I stopped using the radio and stuck to Bluetooth.

I was at the point where I didn't really care about the radio and was just going to put up with using Bluetooth.

So I took the centre console apart... nice wiring mess haha

IMG_0809.JPG

Along with some dirt n shit that I never cleaned out last time.

IMG_0811.JPG

I have my best shot with a vacuum and cleaned up what I could in there but it's certainly still not nice looking.

You can see here in this next photo that the wires were just taped together and some had already come undone.. the previous bullet connectors were for tweeters that were still plugged into the front speaker ports, meaning that the speakers I installed into the front doors weren't even being used lol.

IMG_0816.JPG

So I started making all the wiring look nice nice and put the bullet connectors on. Now I just went and bought a pack of different connectors from super cheap. I definitely wouldn't recommend buying them for anything other than what I've done here, probably not even that. They're real shit plastic things that don't even really work that well lol.

IMG_0818.JPG

And now after taking out all the wiring you can see here that I've got 2 wires left over, can anyone shed some light on what the wires are for? Currently they are just left as is and have been for the last 8 months so I presume it's old wiring or something.

IMG_0819.JPGF149A2C8-73CD-4571-A714-7CB29DB2F59E.jpg

This next bit kinda peeved me off a bit, whether it was me 8 months ago when I hacked in this radio or whether it was the previous owner(s). The previous owner I got the car off did tell me when I test drove it that the radio was wired in and shouldn't be too hard to do. So I'm not sure whether I cut the wire or they did, I'm sure if it was me I wouldn't have been stupid enough to cut it so far down...

(Blue wire)

IMG_0822.JPG

I didn't really have much clue on what to do about the wire, I knew by the end of the night I would have it connected to the blue wire coming from the head unit and I knew it was for the antenna (I didn't think the wire even worked because I swear I tried connecting it to the yellow wire for constant power 8 months ago, but it would've been from the wrong end lol)

So yup, I took the pin out and added a connector to the end of it, if the radio ever stops working one day I'm gonna guess this gave in haha.

IMG_0823.JPG

And here is the wiring harness all sorted out with connectors going to the right places

IMG_0825.JPG

And now everything's back together!! I tested it out and the radio wouldn't turn on, 99% chance it's always gonna be the earth which it was. I had wired the earth from the head unit to the factory Nissan plug which didn't even have anything come out into the harness that goes deep into the cars heart haha.

Don't worry the interior and centre console went all back together until it was working 100%

So now I've got a working bloody radio!! After 8 months or the whole time I've owned the car I can now listen to crystal clear radio!!! I was so stoked on having it working.

Here's all of the old wiring that I've pulled out that went nowhere or just got removed, a lot of it is from the tweeters that sat on the dash which I removed.

Image1496660415.696567.jpg

Anyway thanks for reading lmao

  • Like 1
Link to comment
Share on other sites

Have you still got the tweeters in the pillars?

You sure have done a lot of work! I have used bullet connectors etc myself but best practice for long term security is soldered connections covered by heat shrink. Seeing as you have a lifetime ahead of you as and when funds allow invest in a soldering iron and a heat gun...

Link to comment
Share on other sites

11 hours ago, KiwiRS4T said:

Have you still got the tweeters in the pillars?

You sure have done a lot of work! I have used bullet connectors etc myself but best practice for long term security is soldered connections covered by heat shrink. Seeing as you have a lifetime ahead of you as and when funds allow invest in a soldering iron and a heat gun...

I have the tweeters that came with the previous setup, but then I have some fusion ones that i'm considering putting in as my front door speakers are component.

I definitely would have done soldering, and should have. Would probably have been cheaper too lol, it cost about $38 for the connectors and $33 for the stripper/crimp tool. 
I got a decent heat gun for when I was going to paint my headlights.. I still haven't got around to doing that haha

Link to comment
Share on other sites

  • 4 weeks later...

Okay so last month-ish I started getting a clicking from the front right wheel, determined it to be the CV Joint. Can't remember if I had mentioned it above. I put up with it for a while as it would only click when you're giving gas so I just took corners slowly. As that month had progressed up to last week when I was going around a large busy roundabout I had to give it a bit of gas, and it was a kinda tight turn but the cv clicked away then it just locked in and I think the wheel was dragging along and no longer spinning but it didn't feel right. So it kinda put me off driving it a bit, so I decided to take out my front shaft to release the load on the CVs

For everyone that says its a 5 minute process can walk right out. Might be if you've done it before and it went smoothly. But for me it took just about 3 hours. 

In the next few weeks I will be purchasing both front CV Joints along with all four boots as they are split both sides. I just need to find the part number or a shop selling them. Along with doing the CV I will also be doing the panel beating and getting the door sprayed. I will try go to Apache Panel beaters as suggested by @KiwiRS4T. And if I have any spare money I will be looking to upgrade the brakes. Exhaust will also be on the list, thinking about replacing the cat with a res and then have a straight pipe with a decent muffler at the end. Will just need to find a resonably priced shop/person to do so for me. 

Some could say it's a waste of money doing this all on a DE stagea, well it probably is, but I enjoy the car and am planning on keeping it for a while. May turbo it further down the road when funds agree. 

This is the CV Joint which has definitely seen better days. 

IMG_1065.thumb.JPG.13291fbc1312d29f1adcf8af34001bd3.JPG

Okay, shaft time. 

Got the 4 bolts off releasing the front diff side, I just had to shake it and pry it gently away. 

IMG_1070.thumb.JPG.a89c08bc4c9c520eff9544295f305f6e.JPGIMG_1072.thumb.JPG.8fe9604ba021e2873745e828e89c75c6.JPG

Honestly the next part here was what took this process a long time, the metal cover as such was hitting the auto gear selector cable, but it was a metal bracket that it was getting stuck against. I tried pulling it, twisting it, everything you can think of, it jst wasn't going anywhere. I was getting quite fed up at this point and was getting ready to throw things :P

IMG_1073.thumb.JPG.a077d49d00bdb1ba422cc3b3460ba483.JPG62CFA36D-8BBF-411D-AF33-0322D885D134.thumb.jpg.9339e1a37f47cae91476382718a27bae.jpg


Well I finally got it out after using my breaker bar wedged between the subframe and shield thing on the shaft.

IMG_1075.thumb.JPG.b2ac53a55b0e605aed7ac11b6535df5a.JPG


Was a real PITA and am not looking forward to putting it back in, mind you it probably would have been a lot easier if I had access to a hoist or such. 

IMG_1063.JPG

Link to comment
Share on other sites

  • 1 month later...

Finally got a muffler for the stagea after 2 months of not having any rear muffler lol, got this for $100  on trademe, I hawk trademe everyday and this was probably on it for a couple of hours with quite a bit of interest... the hangers looked off from the photos so I asked questions and kinda came to the self guess that it was probably from an S2 stag or a turbo stag, probably without a tow bar due to the hanger placement. Even with being slightly skeptical that it wouldn't fit I bought it, if I couldn't use it, nobody could use it!! lol. I knew the bend was correct and I could always get the hangers fixed, and for $100 what could go wrong!

IMG_0584.thumb.JPG.2c15725c7446ee59cc1f9782907de122.JPGIMG_0583.thumb.JPG.997228f6cb69b116096a226706c2827c.JPG
IMG_0585.thumb.JPG.314b3f05ab483606029fe0d604cddbef.JPG

Okay so it kinda fits weird with the hangers, because I could only attach one due to the tow bar

IMG_0587.thumb.JPG.6fc590eda72a7e80d05f0cb7723dd224.JPGIMG_0588.thumb.JPG.62b05738863977f3d6b0b2a75fd15255.JPG

I just kinda used some force and used the unused hanger as a point to hold it into a better place so it didn't look as shit

IMG_0593.thumb.JPG.46378f686ddd07af39c6af14d8ceb32c.JPGIMG_0590.thumb.JPG.8f2e5ca52f777e808887ddce829de24f.JPG

IMG_0594.thumb.JPG.1d99b61bb4af1dd8fc8a7580cce8ceeb.JPG


So it kinda sits too low and too far out for my liking but its fine for now :D

  • Like 1
Link to comment
Share on other sites

22 minutes ago, PranK said:

I'm loving this thread. Well done! 

I had a S2 exhaust on an S1 also. It stuck out too.

xSAU_Show_and_Shine_2_013_edited.jpg.pag


Cheers mate!

Yeah, it sticking out is growing on me, think it would look better if it had a rear lip though, only because I can see pretty much the whole side of it lol

Link to comment
Share on other sites

  • 2 weeks later...

Aight, so repco, hah, dont get me started on them. They're useless, don't go to them for CV Joints...
This is what they gave me... mines on the left and the two they gave me to the right aren't even the same.. wat.. lol
IMG_0824.thumb.JPG.9c966424ea18f78146b54ccb8d9bd3a9.JPGIMG_0825.thumb.JPG.ee86e13bf919e205f66754bdd904eea8.JPG

also went to Autostop who couldn't help, and then to ADL who wanted big $$$$ as they needed me to buy the cv joint then $70+ ontop of that to machine the correct ABS ring on or something. So I ended up heading to Partmaster who had the correct ones (hopefully) cost $270.. :(

IMG_0847.thumb.JPG.11eb1b3df574a6d3775eff2e437ab3d6.JPGIMG_0870.thumb.JPG.f5a068f39e10981e0891475312208d04.JPG

Hopefully i'll be able to put them in on sunday and oh boy I can't wait to have 4wd back, oh and abs!!! ^_^

Also picked up some second hand RE003 tyres for the rear seeing as the current ones have gone hard and are from 2012.

IMG_0841.thumb.JPG.eff9ec7c438e89a70e07dfa76601108b.JPG


Now onto some bloody awesome news, I finally found a new door which took 9 months! I bought it sight unseen and it wasn't in good condition, wish I had known before I bought it but I probably would have bought it regardless anyway lol. I reckon a clay bar and wax/polish and it'll turn out nice and white minus the 10 little dents lmao.

IMG_0848.thumb.JPG.de56125b16f945ea133fb2056b841e84.JPGIMG_0849.thumb.JPG.343733797183ed1414ba6fc26b45af06.JPGIMG_0851.thumb.JPG.e862e0b4aad4a059a61d705f977b2864.JPGIMG_0852.thumb.JPG.893ff784b9820afa46d31a577a68b20a.JPGIMG_0854.thumb.JPG.f82347348d81686628267076134c8f58.JPGIMG_0856.thumb.JPG.61450a004acf0e8292c8605cc26d04de.JPGIMG_0857.thumb.JPG.bd0b3fea99549dc9d2aa4dd7bda48d6e.JPGIMG_0858.thumb.JPG.084e45b347745cb3e7c487c64c4b3fc9.JPG


So hopefully I will get the cvs done and the tyres on next week after doing a good skid :15_yum:

Link to comment
Share on other sites

This has to be one of the most satisfying build threads. I love it.

Laughed at those CV's! Wtf ? Just a lucky dip maybe.... 

Door looks ok. Def better than the camo :D

As a side note, I like how the pics are a grid instead of massive. 

Link to comment
Share on other sites

18 minutes ago, PranK said:

This has to be one of the most satisfying build threads. I love it.

Laughed at those CV's! Wtf ? Just a lucky dip maybe.... 

Door looks ok. Def better than the camo :D

As a side note, I like how the pics are a grid instead of massive. 

Heh, thanks. It's no 1000 HP engine building but its the story of the 25DE piece of poo stagea haha.
Every listing Repco had for a stagea and R33 GTR/ GTS4 came back to these ones, I even got them to bring out another one to confirm. I take it back to cheap chinese manafacturing and cost cutting, because this means even people asking for R33 GTR cv joints are going to get the same crap, not that i'd expect a GTR owner to go to Repco anyway lol.

Mate im bloody stoked on the door aye! No more hideous camo, although I probably will miss it in a weird way 

and yeah, sometimes (a lot of the time) I forget to double click and half the px size lol. Smaller photos are so much easier to look at

  • Like 2
Link to comment
Share on other sites

  • 3 weeks later...

Okay, so i've finally done the CV joints and boots all round. Again, for everyone that says its hard and not worth it and send it off to a mechanics/cv specialist, it's not actually that hard, it takes a couple of hours and is worth it if you want to save some money. Along thing I would note is that the CV Joints from Partmaster have a 32mm nut and it doesn't have a splitpin as backup but a crush thing to stop it from comig undone (which I don't really trust). 

IMG_0940.thumb.JPG.e70efbe2d9b98581d263e22a7f3e4c4e.JPGIMG_0953.thumb.JPG.d6fff250e235804c4a6139e7666bcc2c.JPGIMG_0955.thumb.JPG.5b26fbec5aa319420a91b8ff8e78510c.JPG

Repco gave the wrong drivers side inner boot so don't bother going to repco for that part as they dont have it. Autostop has the correct boot though. It's bloody awesome having 4WD back, more yet having ABS back lol!

Along with getting the cv joints done I also put some Potenza RE003 all round... omg... feels so good.... didn't reaise the stagea could ever be that smooth and nice handling. They are 245/45/18 which is quite a large sidewall but I prefer that over a ugly thin sidewall people like, each to their own. 

IMG_1060.thumb.JPG.9d9fbcb085817df4ba69490eb4db74c7.JPGIMG_1064.thumb.JPG.4a7673eba755c3dcff165db92cc7f397.JPG


I have a pre ignition pinging issue too, i'd had it for a while but didn't really think much of it until my uncle took the car for a drive after the cvs were done. We put a timing light on the car but used the white wire at the back of the coil pack loom which apparently isn't accurate nor did we realise you're supposed to disconnect the TPS lol. But from doing it that way it did show I was on the second mark? I think thas 5 degrees or whatever. One to the right of the bigger white mark. Unsure of what mark it should be on for a 25DE Neo.. I can ony find info on DETs.. My CAS is also located almost all the way to one side which I don't think it should be. Quite possibly when the previous owner got the cambelt done they just put on the cas however as I haven't touched it since I bought the car.

 IMG_0991.thumb.JPG.5b85c8294d6ab6044c4de058a1789543.JPG


But I finally have my dash all back together and have working LEDs all round now

IMG_1052.thumb.JPG.c276b4943fe67775fc1dc2fc85ca8e4e.JPG

Link to comment
Share on other sites

Create an account or sign in to comment

You need to be a member in order to leave a comment

Create an account

Sign up for a new account in our community. It's easy!

Register a new account

Sign in

Already have an account? Sign in here.

Sign In Now
 Share


  • Similar Content

  • Latest Posts

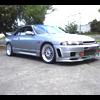
    • I think the pic in the first post is another car, and post 7 is OP's car with standard arms and swaybar swaybar swaybar. I can't tell what brand the silver coilovers are, and even if I could I don't know whether the spring rate is OK, if you can find a brand on the shocks and numbers on the springs that might help. Also, if you can measure the ride height from centre of your wheel to the guard that will help with advice too as handling suffers if ride height is too low
    • sadly, pics no work. that car must have spent a lot of time in a cryo bubble
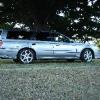
    • In the first photo you posted, the colour of the control arms are the signature colour for Ikeya. Same for the swaybar, signature colour for Whiteline.  I like Hardrace, they also do hardened rubber bushes if your car is mainly a street car.  I like GKTech as well, but they use a lot of rose joints in their stuff so might not be the best choice for everyone.  The system might have been good back in its day, but it's a prehistoric system now. I suspect that most people have removed the HICAS as they want the car to do what they want to do, not what the car wants to do. From what I also understand, it isn't consistent in it's behaviour on track so it's hard to trust the car/know where its absolute limits are for track use.  Having said that, I think the HICAS eliminator kit was the first thing I installed when I bought my car. I don't personally have any experience with the HICAS system on a race track.  
    • Thanks for the info. Didn’t know I had aftermarket control arms already? Will talk to my garage. What brand would u recommend if I want to play around with my camber more? I would think my camber is around stock level right now or more negative now due to lowering with coilovers. I will be lower her again 1.5 cm to get some more.    also why does everyone like to remove the hicas system? Is it because most don’t work properly anymore or ppl just don’t like them. Mine is functioning as it should be right now.    thanks for the good info 
    • It looks like you've got Ikeya control arms and an aftermarket sway bar, maybe whiteline?  Or am I just going crazy? lol Unfortunately it won't, but what it will do is look really pretty. That's about all unfortunately.  How much neg camber do you currently have? Generally lowing the car dials in quite a bit of neg camber as it is. If you do go down this path, your best bet is get adjustable arms, toe arms (or preferably a good HICAS elimination kit) and traction rods. With all 3 being adjustable, you'll be able to dial out any bump steer that is introduced by playing with the camber settings. 
×
×
  • Create New...