


Lenno1
-
Posts
2 -
Joined
-
Last visited
-
Feedback
0%
Content Type
Profiles
Forums
Events
Gallery
Media Demo
Store
Posts posted by Lenno1
-
-
On 22/07/2009 at 12:51 AM, Jason82 said:
Hi All,
Well I am sure all of us have experienced the wet coolant leak appearing on the passenger side floor? If you haven't yet, well I am sure you will soon enough as these heater cores have a tendency to rust out and leak, it happened to me a few weeks ago! There are many posts of the heater core rotting out and how to replace these. All the posts I have read involve the removal of the whole dash and a weekend of labour. Well I am here to tell you that; YOU DO NOT NEED TO REMOVE THE WHOLE DASH IN ORDER TO GET THE HEATER CORE OUT AND THAT IT IS ACTUALLY QUITE AN EASY, SIMPLE AN EFFORTLESS TASK TO PERFORM.
When my heater core started to leak I did a search on SAU on the replacement for the heater core for a Nissan Skyline and found allot of pictures and write ups on how to do so. All of these write ups involved the removal of the dash which is a long and tedious job. After studying quite allot of forums, I thought 'outside the box' and thought there has to be another way to do this. Whilst I was working on my 33 I worked out that there is another way to replace the heater core – let me remind you, YOU DO NOT NEED TO REMOVE THE WHOLE DASH – please, read on.
Here are the steps in process to actually removing and replacing the heater core of an R33 Skyline GTS-t and GTR. R32's and R34 would most likely be the same way; however I haven't worked on these models yet.
· Step one: Go to your local Air Conditioning specialist and get him or her to extract your refrigerant (gas) from your air conditioning system. This cost me nothing to get the old gas extracted from my 33. VERY IMPORTANT NOTE: DO NOT EXTRACT THE GAS YOURSELF – VERY HARMFUL TO THE ENVIROMENT APPARENTLY
· Step two: Then drive home, DO NOT ATTEMT TO TURN ON YOUR AIR CON as it will be in a non compressed state, it will actually be in minor vacuum state and this is not good for your air con pump as it needs lubricant flowing around the system. Your pump will be fine providing you don't turn it on.
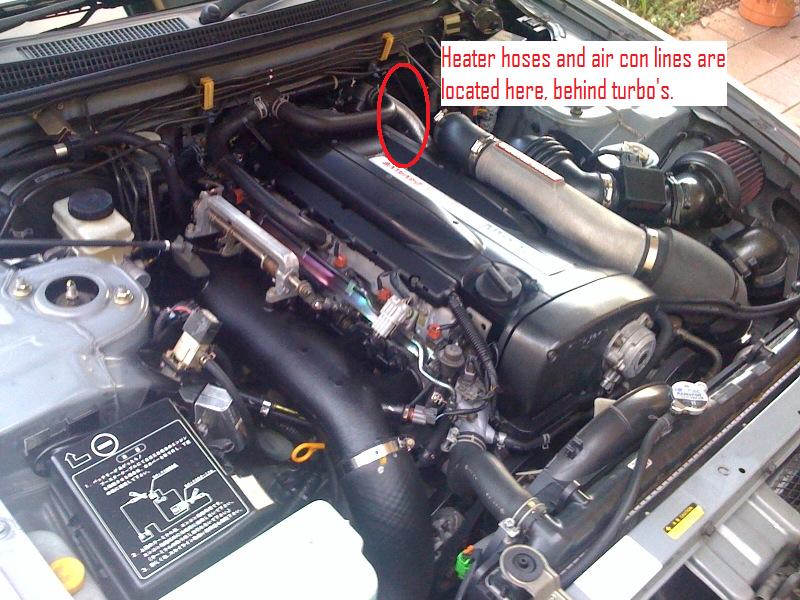
· Step three: Then you can remove the high pressure line (thin pipe) and low pressure line (larger pipe) using a set of spanners, I am not sure to what the sizes are. The pipes you want to disconnect are located on the firewall behind the turbo(s); the pipes are aluminium and lead into the cabin right behind the glove box. These pipes attach to the Evaporator unit located in the cabin behind your glove box. ANOTHER VERY IMPORTANT NOTE: Do not let any dirt, water or grease actually get into these pipes, so cover the ends up with duct tape or stuff a tissue in there (tissue lint is harmless). And take note of the amount of lubricant that leaks out, if any.
· Step four: Now, go into your cabin passenger side and proceed to remove the glove box (there are two pins holding the glove box in place, which are located at the bottom hinge of the glove box itself). Then you can access the back panel behind the glove box, you will need to remove several screws that hold the back panel in place.
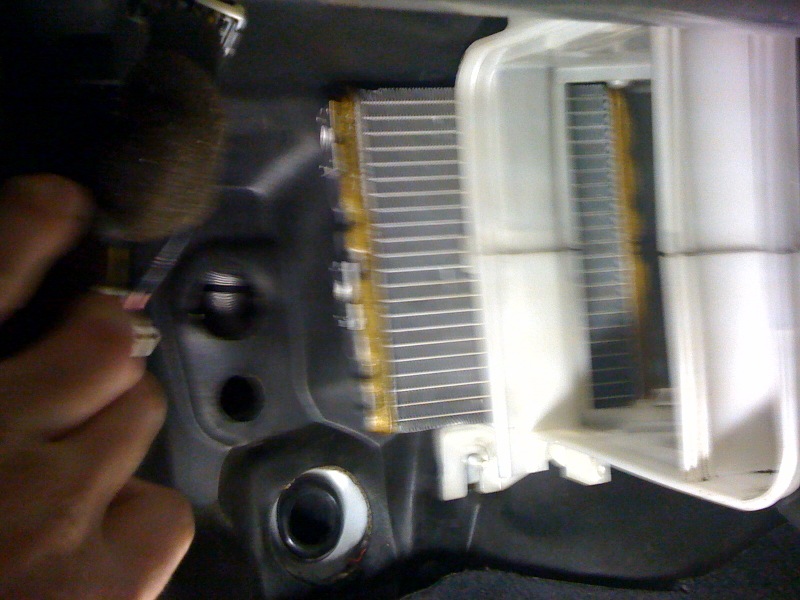
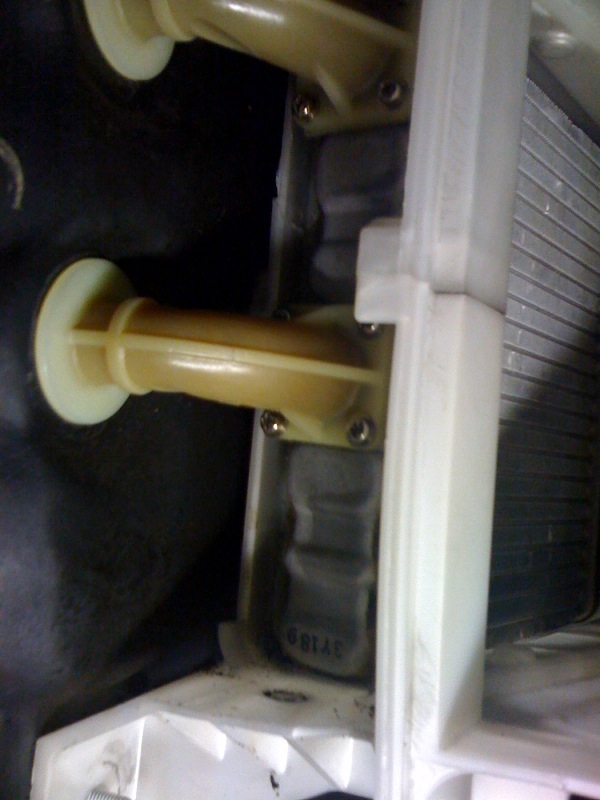
· Step five: Once you have removed this back panel, you can see the evaporator unit in all its glory. It is directly behind the glove box back panel – to the left is the fan box, middle is the evaporator unit and right is the actual heater/air direction box over the gearbox tunnel. The unit you need to remove is the evaporator unit only (middle piece). There are several strews top, bottom and sides, you will need to remove first and some plugs, but then you will be able to remove the evaporator box. Since you have the evaporator unit removed from the car it is a good idea to remove the lint, leaves and dirt which have built up inside the unit, especially on the element (the radiator looking thing). As this dirt restricts airflow through the system and can cause your air-condition system to work poorly, but you must completely seal the air- con gas line ends before you hose this out with water (the lines that you disconnected at the beginning). Water must not get into the gas system as it will freeze once you ragas/recharge the system later on and it will cause you big troubles throughout your Air-conditioning system. Anyway that aside let's move onto removing the rotten heater core.
· Step Six: Now that you have the evaporator unit removed from the car you will have full access to the heater box. Look right down the back on top of the gearbox tunnel right up against the firewall, you will see a little aluminium radiator looking unit housed inside the heater box, this is in actual fact your heater core element and this is the thing that is leaking coolant on your passenger floor. It is this unit that needs replacing NOT the whole heater box.
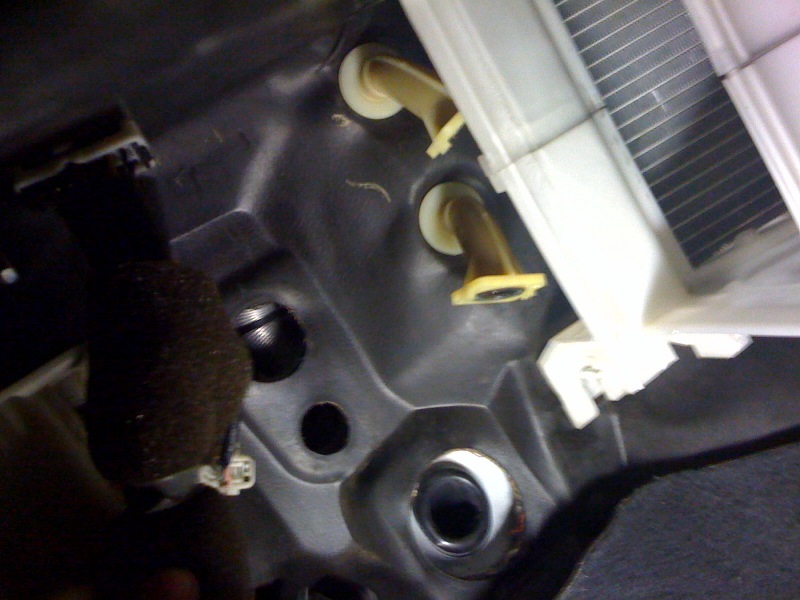
· Step seven: To remove the aluminium heater core element you need to do the following; There are two pipes, plastic pipes (one at top and one at bottom of the element) coming into the cabin from the engine bay. You firstly need to disconnect the heater hoses under your bonnet on the upper level of the firewall near the rear end of your right cam cover. Now place some plastic sheeting on you passenger floor to prevent any further coolant spilling while you do the following; There are four Phillips head screws holding the plastic pipes to the aluminium element, top and bottom. You will need to undo these screws in order for you to pull the heater core element out. These plastic pipes run through your firewall preventing the element from sliding out of the heater box. Once you have undone all the eight screws, you can easily remove the two pipes from the firewall. DONT LOOSE THE RUBBER SEALS.
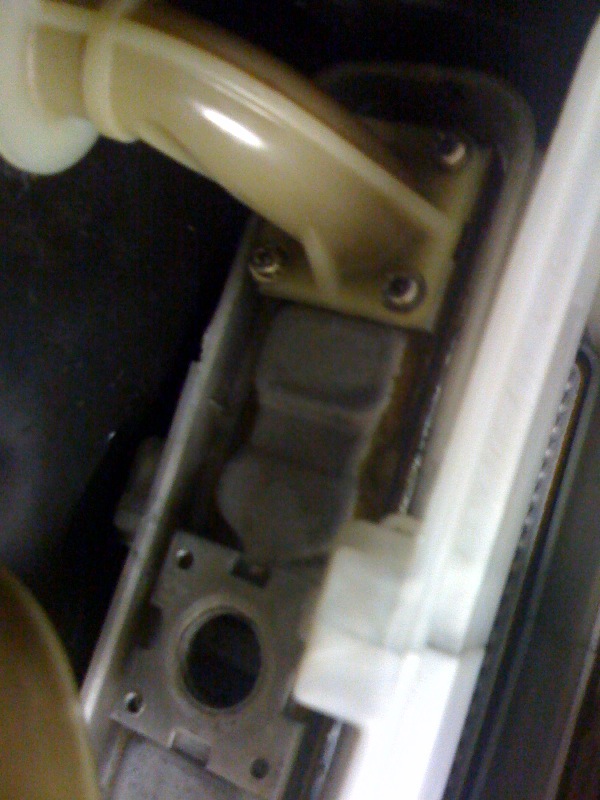
· Step eight: So now that you have the upper and lower plastic pipes removed from your firewall, you will now be able to remove the heater core element from the heater box. BUT FIRST...There is a plastic clip running across the element holding the element it in place, you can do one of two things here: snap it off in frustration or take your time and try prying it off slowly. I cracked the shits and just snapped it off – you don't need it anyway, all it does is hold the element in place during manufacture, that's what I think anyway! The aluminium heater core element will happily slide out of the heater box and you will be holding it in your hands.
Well, that's it guys, that is all the hard work you have to do. All you need to do now is obtain a replacement heater core element either new from Nissan (approximately $550) or go to the wreckers and get a good second hand one for about $80, that's what I did! With the second hand one I bought from a wreckers in Sunshine I just washed it out with a little bit of acid (diluted with water of course) and left it no longer that five minutes sitting in the element. If you leave the acid in longer than five minutes it will actually start to eat away at the aluminium properties of your heater core and probably kill it. But washing it out with acid removes any dirt, rust and makes sure it will not rust in the near future. I tested my second hand element for leaks by placing it in a bucket of water and applying compressed air to the inlet and placing my thumb over the outlet to see if any bubbles occurred, which they did not. I then simply just put the second hand one back in and did the reversal for re-assembling the car. Make sure you flush your cooling system thoroughly and replace your coolant with a good grade – you don't want another rusted element any time soon!
Once your car is back together, you can either get you old gas put back in the air con system or have new gas supplied – I'd recommend new gas, as the old gas would probably be ten years old. Cost of recharging the gas system cost me around $110 including GST. So the whole job will cost you $80 for the second-hand heater core (give or take a few dollars) and $110 for new refrigerant gas and 3 hours of your time, you do the math! Much better than paying someone $1500 dollars to remove your whole dash.
I will happily do the job for probably $200 bucks, providing you get the car to me de-gassed and you supply a replacement heater core element, and of course if I have the time to do the job. But I highly recommend you give it a go yourselves it is a piece of piss to do and you will be proud of yourselves at the end knowing that allot of people have done it the long and time consuming way which is; REMOVING THE WHOLE DASH.
Good luck all and I am sure this will definitely help you all out. In my opinion; I believe that this was the way Nissan intended for the heater core to be serviced/replaced.
NOTE: I have pictures of the whole job from start to finish, however I am new to SAU and only signed up tonight and I do not know how to load the pictures on to this forum, maybe someone could tell me how to load the pictures? Or if you want a copy of the pictures simply email me and I'll send em your way.
Thanks for the read and good luck! Jason
 On 22/07/2009 at 12:51 AM, Jason82 said:
Hi All,
Well I am sure all of us have experienced the wet coolant leak appearing on the passenger side floor? If you haven't yet, well I am sure you will soon enough as these heater cores have a tendency to rust out and leak, it happened to me a few weeks ago! There are many posts of the heater core rotting out and how to replace these. All the posts I have read involve the removal of the whole dash and a weekend of labour. Well I am here to tell you that; YOU DO NOT NEED TO REMOVE THE WHOLE DASH IN ORDER TO GET THE HEATER CORE OUT AND THAT IT IS ACTUALLY QUITE AN EASY, SIMPLE AN EFFORTLESS TASK TO PERFORM.
When my heater core started to leak I did a search on SAU on the replacement for the heater core for a Nissan Skyline and found allot of pictures and write ups on how to do so. All of these write ups involved the removal of the dash which is a long and tedious job. After studying quite allot of forums, I thought 'outside the box' and thought there has to be another way to do this. Whilst I was working on my 33 I worked out that there is another way to replace the heater core – let me remind you, YOU DO NOT NEED TO REMOVE THE WHOLE DASH – please, read on.
Here are the steps in process to actually removing and replacing the heater core of an R33 Skyline GTS-t and GTR. R32's and R34 would most likely be the same way; however I haven't worked on these models yet.
· Step one: Go to your local Air Conditioning specialist and get him or her to extract your refrigerant (gas) from your air conditioning system. This cost me nothing to get the old gas extracted from my 33. VERY IMPORTANT NOTE: DO NOT EXTRACT THE GAS YOURSELF – VERY HARMFUL TO THE ENVIROMENT APPARENTLY
· Step two: Then drive home, DO NOT ATTEMT TO TURN ON YOUR AIR CON as it will be in a non compressed state, it will actually be in minor vacuum state and this is not good for your air con pump as it needs lubricant flowing around the system. Your pump will be fine providing you don't turn it on.
· Step three: Then you can remove the high pressure line (thin pipe) and low pressure line (larger pipe) using a set of spanners, I am not sure to what the sizes are. The pipes you want to disconnect are located on the firewall behind the turbo(s); the pipes are aluminium and lead into the cabin right behind the glove box. These pipes attach to the Evaporator unit located in the cabin behind your glove box. ANOTHER VERY IMPORTANT NOTE: Do not let any dirt, water or grease actually get into these pipes, so cover the ends up with duct tape or stuff a tissue in there (tissue lint is harmless). And take note of the amount of lubricant that leaks out, if any.
· Step four: Now, go into your cabin passenger side and proceed to remove the glove box (there are two pins holding the glove box in place, which are located at the bottom hinge of the glove box itself). Then you can access the back panel behind the glove box, you will need to remove several screws that hold the back panel in place.
· Step five: Once you have removed this back panel, you can see the evaporator unit in all its glory. It is directly behind the glove box back panel – to the left is the fan box, middle is the evaporator unit and right is the actual heater/air direction box over the gearbox tunnel. The unit you need to remove is the evaporator unit only (middle piece). There are several strews top, bottom and sides, you will need to remove first and some plugs, but then you will be able to remove the evaporator box. Since you have the evaporator unit removed from the car it is a good idea to remove the lint, leaves and dirt which have built up inside the unit, especially on the element (the radiator looking thing). As this dirt restricts airflow through the system and can cause your air-condition system to work poorly, but you must completely seal the air- con gas line ends before you hose this out with water (the lines that you disconnected at the beginning). Water must not get into the gas system as it will freeze once you ragas/recharge the system later on and it will cause you big troubles throughout your Air-conditioning system. Anyway that aside let's move onto removing the rotten heater core.
· Step Six: Now that you have the evaporator unit removed from the car you will have full access to the heater box. Look right down the back on top of the gearbox tunnel right up against the firewall, you will see a little aluminium radiator looking unit housed inside the heater box, this is in actual fact your heater core element and this is the thing that is leaking coolant on your passenger floor. It is this unit that needs replacing NOT the whole heater box.
· Step seven: To remove the aluminium heater core element you need to do the following; There are two pipes, plastic pipes (one at top and one at bottom of the element) coming into the cabin from the engine bay. You firstly need to disconnect the heater hoses under your bonnet on the upper level of the firewall near the rear end of your right cam cover. Now place some plastic sheeting on you passenger floor to prevent any further coolant spilling while you do the following; There are four Phillips head screws holding the plastic pipes to the aluminium element, top and bottom. You will need to undo these screws in order for you to pull the heater core element out. These plastic pipes run through your firewall preventing the element from sliding out of the heater box. Once you have undone all the eight screws, you can easily remove the two pipes from the firewall. DONT LOOSE THE RUBBER SEALS.
· Step eight: So now that you have the upper and lower plastic pipes removed from your firewall, you will now be able to remove the heater core element from the heater box. BUT FIRST...There is a plastic clip running across the element holding the element it in place, you can do one of two things here: snap it off in frustration or take your time and try prying it off slowly. I cracked the shits and just snapped it off – you don't need it anyway, all it does is hold the element in place during manufacture, that's what I think anyway! The aluminium heater core element will happily slide out of the heater box and you will be holding it in your hands.
Well, that's it guys, that is all the hard work you have to do. All you need to do now is obtain a replacement heater core element either new from Nissan (approximately $550) or go to the wreckers and get a good second hand one for about $80, that's what I did! With the second hand one I bought from a wreckers in Sunshine I just washed it out with a little bit of acid (diluted with water of course) and left it no longer that five minutes sitting in the element. If you leave the acid in longer than five minutes it will actually start to eat away at the aluminium properties of your heater core and probably kill it. But washing it out with acid removes any dirt, rust and makes sure it will not rust in the near future. I tested my second hand element for leaks by placing it in a bucket of water and applying compressed air to the inlet and placing my thumb over the outlet to see if any bubbles occurred, which they did not. I then simply just put the second hand one back in and did the reversal for re-assembling the car. Make sure you flush your cooling system thoroughly and replace your coolant with a good grade – you don't want another rusted element any time soon!
Once your car is back together, you can either get you old gas put back in the air con system or have new gas supplied – I'd recommend new gas, as the old gas would probably be ten years old. Cost of recharging the gas system cost me around $110 including GST. So the whole job will cost you $80 for the second-hand heater core (give or take a few dollars) and $110 for new refrigerant gas and 3 hours of your time, you do the math! Much better than paying someone $1500 dollars to remove your whole dash.
I will happily do the job for probably $200 bucks, providing you get the car to me de-gassed and you supply a replacement heater core element, and of course if I have the time to do the job. But I highly recommend you give it a go yourselves it is a piece of piss to do and you will be proud of yourselves at the end knowing that allot of people have done it the long and time consuming way which is; REMOVING THE WHOLE DASH.
Good luck all and I am sure this will definitely help you all out. In my opinion; I believe that this was the way Nissan intended for the heater core to be serviced/replaced.
NOTE: I have pictures of the whole job from start to finish, however I am new to SAU and only signed up tonight and I do not know how to load the pictures on to this forum, maybe someone could tell me how to load the pictures? Or if you want a copy of the pictures simply email me and I'll send em your way.
Thanks for the read and good luck! Jason
I just completed this job and it was pretty easy. My old heater core slid out nicely which was a aftermarket heater core. I ordered a new heater core from eBay and when I got it I noticed it was about 5mm wider and better looking than the aftermarket one that was in it. All the pipes were the same. When I went to slide it in the heater box it wouldn’t fit. The ribs that hold the core in inside the heater box were too narrow. I had to grind away the ribs with a dremmel die grinder. Once I ground them away the wider heater core slid in. The core is originally slid in from the top once the heater box is split in half, so if your heater core is the wide one your probably going to have a hard time getting it out. Just prey to god that your old core is a narrow one otherwise your going to have a hard job of getting it out.
-
 1
1
-


Removal & Replacement Of Heater Core Skyline - The Right Way, Without Removing The Dash At All
in Tutorials / DIY / FAQ
Posted
I had the same problem I ground the lip away that was stopping the bigger one sliding in. It’s not suppose to come out that way. It’s supposed to come out from the top after you split the heater box.