


KwS
-
Posts
63 -
Joined
-
Last visited
-
Feedback
0%
Content Type
Profiles
Forums
Events
Gallery
Media Demo
Store
Posts posted by KwS
-
-
Should've come with the bar. The seller is being a muppet.
Look here for details of how it mounts. http://www.sau.com.au/forums/topic/417703-location-of-r33-rear-strut-brace-mounting-bolts/
-
Should just use the CA18 from the R32. Its a beast. Look at all the free space you gain in the engine bay too.

-
hmm, id be keen to know as well. My LH one is sitting slightly proud too
-
the remote starter wouldve been a dealer fit option at a guess. Cheaper and easier to not have it tied in to the immobiliser system.
-
Interesting. Im in Wellington and the dealer isnt listed on that site, but does sell and service the GTR.
http://www.gazley.com/nissan/nissan-range/
They dont seem to have one on the yard to at the moment, but they have sold a couple.
Gazley had no trouble doing my key for me, it was just the firmware they wouldnt do.
In saying that Infiniti isnt in NZ at all either.
-
As long as I continue to love the sound of my 370 it's not going to have the ecconomy of a Prius...
amen, the noise these engines make during acceleration is addictive.
-
Hi all.
Fairly long time member, had a few R33 skylines and now have a 2006 V36 Skyline 350GT Type SP. Love the car, crazy power for a sedan and so many features.
Have some plans for it (lowering, front tints, spacers, axle back exhaust).
Excuse the dirty car, had just driven it home from picking it up.... a 6 hour drive away.
-
 2
2
-
-
no such thing as a "GTR" dedicated dealership here in NZ. This was the official Nissan dealer, they also just so happen to sell and service GTRs (like most ive come across).
-
I took my V36 to the local dealer the other week to get a spare key cut/coded, and requested whilst it was there for them to check and update firmware if required. Apparently the local dealer cant touch it because its an import. The key works fine, but the firmware update or even checking the version was a no go.
Its a shame, my car left Japan in 2012, and has a few issue the update appears to fix
-
Hi, i got it through my local dealer. Part number is on the box in the picture.
-
i do have the "bunch of grapes" on the display, but i thought that was just the icon for the plasmacluster system, which mine is optioned with.
Ive turned off all the maintenance reminders in the system, and i havent noticed that grape icon change. Its got all the dots filled except for one, like this but with purple dots (and the pink dot in the below pic is empty).
I have since been informed by a friend of the Heisei years thing, and it does make sense (and aligns with the mileage). Crazy way of working out the date!
-
Welp, when driving the car home last weekend not long after i left New Plymouth i started to notice the blower fan was blowing a rather unpleasant smell. It got so bad that i had to stop and get an air freshener (it was hot so i had the fan on high).
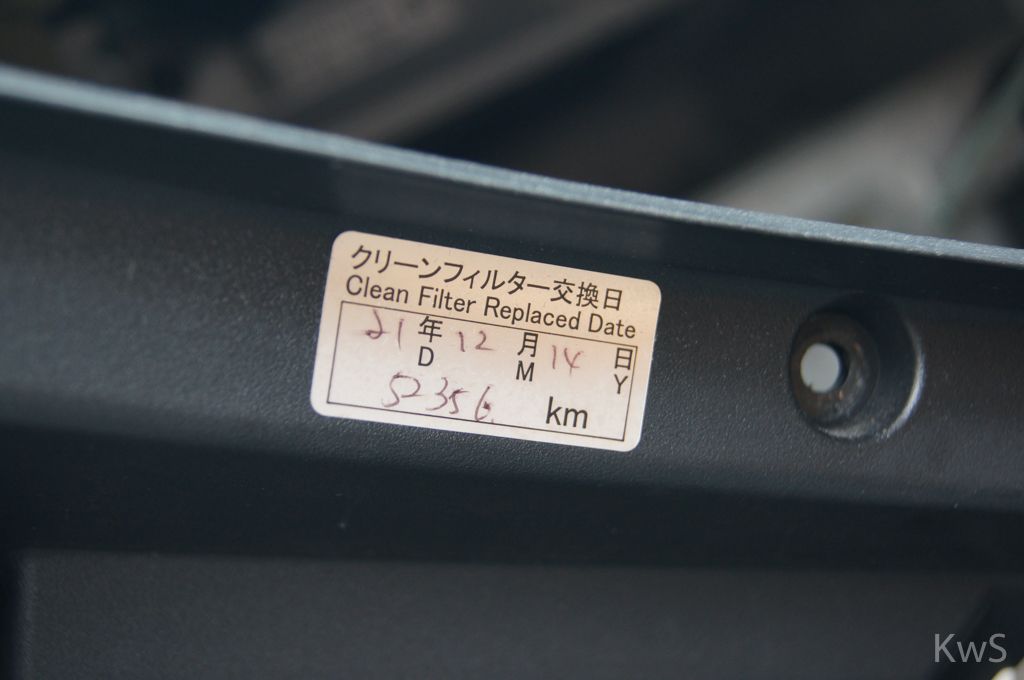
The other day i purchased a new cabin filter, on the premise that it was probably stuffed. After reading plenty of LHD US G35 DIY guides for the filter i decided to rip into it today. I have written this as i had some trouble finding a step by step DIY guide for RHD Skylines as they are slightly different.Step one is to remove the little panel under the glovebox. Just grab it at the front edge and pull down. It is held in by two hooks towards the front of the car, it needs to be gently pulled towards the rear of the car to release it.Once that is off, open the glovebox grab the top edge and pull up towards the roof of the car. You should feel it pop out of the clips at the bottom edge. You then need to wiggle and twist to get the side pegs out of their slots. I found it was easiest to push the LH side of the glovebox towards the windscreen and then pull the RH side out towards the rear.There is also the little retractable cord that needs to be removed. I gently wiggled and pulled and it came free.Once that is out, i also removed the little side panel in order to see the panel clips for the next step. This just pulls off.Ok, so now you have the covering panelIn order to remove this, there are two screws in the lower corners, and four along the top edge.Interestingly, there was a sticker that indicated that the filter was last replaced in December 2014 at 52356KM (which it cant have been as the car is at 141000 now).Anyway, with that panel removed, you are greeted by the blower fan and filter housing.The covering panel is right in the middle and comes free quite easily. A clip on the LH side and then the panel is moved to the left to release it from its slots.Once removed, this is what greeted me. A black filter that was certainly not correctly fitted.Removed, it was clear why i had bad smells and bad airflowAnd compared to the new filterThis is the new filter,Slap the foam on the sides as per the instructions with the filter (they go on the two sides. The front is where "UP" is written). Gently slot it into the housing. It will go up on rails and sit at the top of the housing. It should sit flat, other than the front. The front will be lifted and supported by the front cover which has raised ridges to hold it.Stick it all back together, which is reverse of disassembly, and away you go.My fan now blows more air, is quieter, and best of all, actually smells fresh and clean. Mine also had the side effect of no longer having a misplaced filter blocking one of the vent flaps. -
Okay. Managed to get hold of an R32 RB20DET wastegate actuator.
From factory, R33 actuators run lower boost (5psi) under a certain RPM and then 7-8psi over that. The WG actuator has a softer spring to accommodate this change (auto R33 is about 5psi). So running a line from intake to WG directly results in 5psi all the time.
If you ground the factory boost control solenoid, you can get it to stay at the high boost all the time, instead of low than high. I did this as soon as i got my car, as it was running WG pressure when i got it.
The 20DET doesnt run the 2 stage boost, and has a 12psi spring in the actuator. Thus installing one of these puppies on a 25DET will result in 12psi all the time.
pretty easy to install, take off heatshield, remove circlip, unbolt old WG, remove vacuum lines. Refit new one in reverse.
Took it for a quick boost, and by god its quick with that actuator. Boost comes on quicker, harder and holds stronger. Wheel spin from a stop was pretty much a given.
Unfortunately the high ambient temps, and the 95 oct gas in the tank showed its nasty side whilst giving it some stick. Heard a couple of little pings of det as i was boosting. Quickly backed off and cruised home, before i make my pistons religious.
In the mean time i have reverted back to the old 25DET actuator, just to be safe. Before the 20DET one goes back on, ill be fitting the manual conversion, front mount, walbro and a tank of 98. Just not worth the risk.
Can also see my fancy new BOV-less intake pipe here...
WG pressure yo!
space...
Old bits
My chur-bro
-
Turbo noise could be the bolts holding turbo onto manifold. Most RB25DETs seem to have this issue. Just pull back the metal locking tabs, and be shocked at the fact the nuts will be finger tight.
Make sure the gauge is wired correctly. If the constant and switched 12v is hooked up wrong you cannot turn off the beep.
Once thats sorted,
Press the button on the gauge and Hold
Switch the ign on
Let the gauge finish the opening ceremony
Then let go
-
Managed to score a J-Pipe to SMIC pipe from trademe, to replace the blitz pipe and BOV.
From
To
Made a hell of a difference. Boost comes on much stronger and much quicker. Getting full 7psi almost instantly. Idle is also smoother, and better throttle response. Hopefully this will cure my fuel use problem.
My theory is becuase the BOV had no vacuum line attached to it (as it was incorrectly hooked up to start with), it mustve been creeping open slightly, causing a boost leak.
Also checked my manifold to turbo nuts.... sure enough, loosen off the locking tab and the nuts were finger tight. Tightening them up has increased response, and fixed the loud howling i would get at high rpm on boost.
Great success.
-
Okay, long time no update.
Black center wheels have been swapped with my mate, so now im the owner of the white RP01s from above. Put my wider tires (235 and 255 front/rear) on them, and looks a ton better.
No work to be done yet, as im saving up for manual conversion. Hopefully ill be able to do that around feb 2011.
Some pics i took today.... in need of a clean, but still looks nice.
-
Been playing around with my new wheels, to see how to make them fit.
17x8.5 (235/45) for the front, and 17x9.5 (255/40) on the back.
Needs 8mm spacers to clear 4 pots. Just need to source longer studs, and then ill fit them once and for all.
-
Did the O2 sensor yesterday, as my milage was so bad that i went from 20l/100km to 19l/100km just by unplugging the old O2 sensor
Thats how stuffed it was.Got a mint price on a genuine one from Nissan ($340 something RRP), so decided to bite the bullet and do it, in the hopes it would save me a tank of gas a week.
Before the change, on a full tank, the first 40km would use 1/4 of a tank
Now ive done 40km and the needle is still above the Full mark.I wouldnt recommend changing it without getting or having an O2 sensor socket... incredibly hard otherwise (due to angle and lack of space). Powerbuilt part number is 648442. 7/8" or 21mm.
-
Replaced the rear speakers today, they were beyond shot. The ****ty parts bin 100w 6.5" 2 ways make the stereo sound a million bucks now compared
Whilst doing the rear speakers, i managed to find a couple of JDM gems, along with $2 under the rear seat!
Petrol card, a calling or gym (?) card, a random little sticker and an old jap sticking plaster (unused, but threw that out after the pic as it was a bit icky)
Also fitted my JDM Klaxon air horns too. Should scare some of the dickheads that keep cutting me off or sitting at the green light for too long.
Similar to these, but silver. The pair fit into the factory location, and factory wiring.
-
Selling my wheels, so borrowing a mates. 17x8 on front, 17x9 on back. Suit the car a hell of a lot better, just a pity he put lightly stretched tires on them (wider tires wouldve been much better).
-
Some small progress....
Installed my stereo
Btw, repco "Raptor" brand wiring adaptors are ****. I purchased them becuase they were half price, and i didnt want to cut the factory harness. Firstly, the plugs in the middle to join the two halves (you purchase them in a car side and a stereo side) are loose and pretty average. Secondly, why the hell was the ground wire in their harness going to a nonexistant pin on the cars harness?! Wasnt a hard fix, and a new ground is probably better than the factory loom one.... but ****, how did they stuff that up?
When i first got the car i pulled the panel filter out, and noted although it was black, it was still in one piece; Gave it a shake and put it back in. When i went to do my spark plugs i took it out again, in the clear daylight and saw how bad it really was.
Also turned out it was a genuine K&N filter (yes, when cleaned an un-oiled, its white. Oiled, its red... and mine is black). I did intend on getting a filter cleaning kit, but i decided i cant be without the car for a day or so until it dries, so in the mean time i went out and got a Simota panel filter for it.
The difference is amazing. Im now getting full boost quicker and harder, with less throttle. Intake is a lot louder too. Seems it was more stuffed than i thought.
Next up was the battery ground. When i was resetting my ecu i took the negative terminal off via the two bolts on the boot wall. Once i got these off i was dismayed to find very little bare metal for the earth to conduct through... its all painted! In an effort to improve on this system, i decided to get some 4gauge cable, some gold plated terminals and make another ground.
TBH it made NO noticeable difference, but meh.... puts my mind at rest. Might help make the alt last a bit longer. Cant see it normally anyway.
Also found out why my speakers sound like complete ***....
-
Is there any way in the new version to show attached picture thumbnails in posts, instead of a link i have to click? Is this a setting, or possibly an issue with my adblock?
As per screenshot, can be annoying. Also appears to be an odd "Post_snapback" at the top of the post, instead of quote box
-
Well, here it is. After a year of being without my old one (since it was stolen and not recovered) i have finally made it back to an R33 coupe.
Loved the first one so much, that i couldnt resist trying hard to get back to another one. Sure, the Integra was fun, a hell of a lot of it infact, but it was starting to become impractical to use as my daily (tiring to drive, too tempting to do license losing speed etc).
I swapped the integra (300hp turbo type R) for a SR20DET Nissan Laurel, which although it looked cool also didnt fit the criteria of daily driver for me (mainly comfort and the exhaust was WAY too loud), not to mention laurel chassis are as flexible as a freakin sheet of thin plastic. Whilst owning that i noticed a couple of R33 coupes come up forsale, so i offered a potential swap to both of them. One was a green series 1, 25T manual. High K (200 ish), and not too tidy overall. The other was a white series 2, 25T auto. Low k and immaculate. Needless to say, i went for the low k white one. Easier to convert to manual than to convert to S2 front (S1 is UGLY) and low ks
As purchased,
116000ks
2 Owners in NZ (im the 3rd)
Service history, cambelt done at 100,000k
Very straight body, interior also very good bar a couple of old tiny ciggy marks on the seats
Drives great, but when i tested it it was down on power. A quick look under the hood quickly showed that the owner had bypassed the factory boost solenoid and was running wastegate pressure (5PSI vs 8PSI). This was one of the first things i changed, hooking the solenoid back up and then grounding the wire to deliver 8PSI constantly (rather than the stock 5PSI under 4500rpm and 8PSI over it).
The car did come with the factory rear strut brace, although when the owner changed the battery he was a bit useless and didnt know how to get the bolt hole in the brace to line back up (needed to loosen it off in the middle of the brace), so that was quickly and easily fixed. No front brace though sadly. The car is lowered on some unknown springs.
I also kept the polished R32 GTST wheels that were on the laurel, as i liked the look of them and didnt want the R33 stock wheels the owner was offering with the car instead. At only 16x6.5" and an offset of 40 they are quite a bit on the small side for the skyline. They look great side on, but are easily swallowed up by the massive guards at any other angle. They are also on the short list to get replaced by 17x8s with fat as tires on them (245s on the rear hopefully, like my old R33 had).
I started ownership by making a list of things to get done to the car. This included a damn good service (oil, filter, plugs, silicon up the coils, clean IACV, replace rear wiper blade, and check the air filter). Finished the service yesterday, giving it some fully synthetic valvoline 5w-40 and a nismo filter. Although the coilpacks werent cracked at all, and were in good condition i still decided to smear some sealant on them to lessen the risk of them arcing. Also turns out it has a (very dirty) K&N panel filter already in it.
So the list as it stands now,
New 17x8 wheels and tires
Fix up the damaged paint on the front bumper (from me clipping a hidden concrete drain as i parked at the supermarket
)Install my Sony headunit (requires me to purchase a din pocket and antenna adaptor)
Polish headlights
Possibly a manual conversion in the far future
Possibly a decent boost controller set to 10PSI with the hopes it will get boost to come on a bit quicker too
Otherwise the car is fantastic to drive, and the auto makes it great around town.
Anyway, pics.
-
lol, the rain made it shine... but it hasnt been cleaned for about 3 weeks or so.
17" Enkei RP01s. 17x8 front, 17x9 rear.


 Now ive done 40km and the needle is still above the Full mark.


 )
)


V36 Rev Probs, Firmware Update Anyone?
in VQ Series - V35, V36 & Infiniti
Posted
Im guessing you never got anywhere with it? I ended up selling my V36 because the lurch pissed me off. Its a shame, they are such awesome cars.