

jimnastic
-
Posts
131 -
Joined
-
Last visited
-
Days Won
5 -
Feedback
0%
Content Type
Profiles
Forums
Events
Gallery
Media Demo
Store
Posts posted by jimnastic
-
-
On 6/12/2019 at 9:38 PM, Dose Pipe Sutututu said:
that's awesome!
You need on a cashie and powder coating stuff for my shit box R33?
Sure, if parts for your shit box find their way into my garage ?
On 6/13/2019 at 8:31 PM, jmknights93 said:Is that the HKS twin turbo pipe?
The Y piece and straight pipe on top are HKS, rear is the standard turbo outlet
-
I recently got a powder coating gun so I've been playing around with that. Pretty happy with the results, and much more durable that normal paint. So far I've done the wiper arms, radiator brackets, and the new HKS intake

-
 5
5
-
-
And a couple of small updates for the GTR
A pair of definitely not genuine Tein bonnet struts, but they were $70 and they do the job perfectly well. Only required a tiny bit of modification as they are made to fit an R34
Also got a HKS Racing Chamber kit, which seems to have completely fixed my turbo shuffle issues
-
3
-
-
I wasted no time tearing into the Evo. Removed the terribly installed aftermarket alarm and the Mitsubishi Diamond Track system. Installed a new immobiliser, a set of Defi BF gauges, Sony XAV-AX5000 stereo, all neatly integrated into the factory wiring harness (this is a not so neat work in progress photo). Also replaced the worn out gear knob for a Tomei duracon knob
-
2
-
-
Inspired by the recent trip to Japan, the wife decided it was time to upgrade from the 2 door Polo to "something more practical" ?
-
2
-
-
February - Stripped down the intake side for a little bit of a tidy up. Removed some hoses/vacuum lines that were no longer being used, repainted the intake manifold, and cleaned up the tired looking wiring at the front of the engine. Put it back together with some HKS metal gaskets
-
4
-
-
On 4/7/2019 at 8:34 PM, JGTC said:
Sry just found the post saying rhdjapan, all good, awesome pics, been a dream of mine to get out there for TAS.
Yep, RHDJapan https://www.rhdjapan.com/behrman-headlight-repair-lens-kit-r34.html
Highly recommended, such an improvement to the look of the car ?
-
On 4/7/2019 at 5:21 PM, mlr said:
Cheers
Any more of the red Z?
-
1
-
 1
1
-
-
Went over to Japan in January for a belated honeymoon, which we planned around dates for Tokyo Auto Salon. Here's a selection of GT-R related highlights
Wise Square demo car for their replacement headlight lenses. They were very excited to see pictures of their lenses on my car!
My car on the customer photo wall at Up Garage (top row)

-
2
-
1
-
-
8 hours ago, jmknights93 said:
Those covers painted with the anodised red or the engine enamel red?
4-5 coats of anodised red, with a clear coat as well. I probably went a bit overboard with the red coats, but I didn't want it to fade again like it did before
-
1
-
-
Engine covers finished
-
2
-
-
On 4/3/2019 at 12:23 PM, Figjam Jimmus said:
Any more updates??
Probably about time for an update. Here's a couple of pics to get started
September 2018 - Changed the absolutely shagged hicas ball joints (part # 55154-30P01)
Started repainting the engine covers. Did this the same way as last time (VHT anodised base coat + red top coat), just with more coats of red. Came out a lot better this time
-
So this took a lot of stuffing around, but I reckon it was worth the effort
-
5
-
-
On 8/25/2018 at 1:37 PM, JGTC said:
Wrapping the headlights is a genius idea, spotless carpet and factory looking radio are fantastic.
Thanks! Happy that people seem to enjoy the focus on all of these minor bits and pieces
-
Headlights installed and looking pretty good, needs a wash though. I'll also need to give some attention to the front lip soon, it's looking pretty average
Another update coming very shortly
-
2
-
-
Quick update
Headlight lenses installed, covered with clear vinyl wrap, hopefully that will keep them protected and looking good
-
3
-
-
Today I pulled the headlights out and got started on replacing the lenses. Nearly have one of them done, just need to stick it back together. Not particularly difficult to do, but it does require a lot of patience to get the old lens off. The biggest issue I had was static that made the new lens a dust magnet, which resulted in some tiny scratches on the inside of the lens from trying to clean it out. Nothing too noticeable unless you look super close, but still annoying
Here are some comparison photos, hard to get a good picture, but they look great in person
And just a quick photo comparing the standard GT-R stereo vs the Micra one, they're almost identical. I want to at least add a 5V USB output for a phone charger and to power the dash cam, but I'll also see if I can get the boost controller to fit in like I've done with the current JVC unit
-
3
-
-
That brings everything up to date again. On the to do list at the moment, I need to get the new headlight lenses installed, finish up my little window switch side project, and I'm considering fully removing the stereo system. I actually can't remember the last time I even had the stereo turned on, and the OEM stereo I want to install would need to be modified for Aus FM frequencies, so I could save myself a lot of trouble and just rip the whole lot out to save some weight. I'll still have the OEM stereo installed, but only for looks.
The GT-R hasn't been on daily duties as of around a year ago, as I now have a work car, so I guess the title of this thread is no longer accurate, but fortunately that means I can get a lot more done to it as I don't need to make sure it's always put together and ready to drive.
Longer term, I'd like to get the tune touched up now that the clutch and ignition system are dealt with, but I'll also be looking into what else I can do for a bit more power, then get one final tune done and leave it at that. Will try to keep this up to date as things happen.
-
1
-
-
Installed the rear camber arms (PN 8628 from Hardrace), along with a set of camber lockout bolts from GKTech to replace the standard eccentric camber adjustment bolts. Forgot to get pictures, but the process wasn't very involved, just wheels off and undo a couple of bolts.
The drivers side seatbelt has never fully retracted properly, so I remove the seatbelt and cleaned it in some soapy water. This picture is after the third time I changed the water, absolutely filthy. While cleaning it didn't completely fix the problem, I'd say it probably made it about 50% better
I got a bit carried away while doing the seatbelts and ended up stripping out the interior for a big cleanup
Before
After
I also removed the drivers side and rear seats for the same treatment. It's all looking pretty spotless now, until everything gets covered in filth again
-
2
-
-
The gearbox put up a fight, but I managed to persuade it back in (no pictures as there's not much to see). The new clutch made a huge difference, made me realise how bad the old one actually was, and the car now feels a bit quicker too as I suspect the clutch was slipping more than I thought.
As mentioned in an earlier post, the one and only time I've had work done to the car by a mechanic was when I had the previous clutch installed in around 2013, and I was quite annoyed when I realised a few months after that he hadn't reinstalled the exhaust mount that hangs off the gearbox, so I replaced these while I was at it
Rubber mount 20610-24U00
Metal bracket 20711-04U11
Finally got around to cutting the coil cover to fit as well. The engine cover paint is looking a bit rough, will be redoing that some time
-
It took three trolley jacks and creative use of a garage creeper, but I managed to get the gearbox out. Attempts were made to clean it, mustn't have looked much better after cleaning because I didn't get any pictures
Removing the old clutch reveals a sad looking flywheel. Further creative use of tools with a 12mm spanner being used to stop the flywheel from turning when removing the flywheel bolts
New vs old
New crank seal in. Oil seems to just be left over from a leaking cam cover seal a while back, nothing to worry about
New flywheel and spigot. Managed to get the spigot bush out by inserting an appropriately sized socket and sort of wiggling and rotating it out. Flywheel bolts torqued as specified in instructions for the clutch
Clutch is in
-
1
-
-
5 minutes ago, zoomzoom said:
Nice work. I thought about making something similar for the power windows after having to dismantle the switches and clean the deposits off all the little individual copper rocker arms and contacts.
It's crazy to think that 20 years ago, all of those little components of the switch were the cheapest way to manufacture a power window switch.
But if that arduino assembly sits in the door panel, I'd be concerned about moisture and corrosion. It's essentially an outdoor area, electrically speaking.
The plastic on the under side of my drivers switch actually completely fell apart, which is what led me down this path of various window switches. Wasn't going to pay $600(!) for a new one from Nissan, and I didn't trust a used one to not have the same problem. I was even thinking of getting a replacement 3D printed, but I figured it probably wouldn't be a perfect match, and it seems to just be an inherently flawed design with the way the spring inside the button is forced at an angle every time you use it.
Good point about the corrosion, I hadn't even thought of that. I was going to fit the whole thing in some kind of plastic enclosure when it's done, but I guess if it fails, the parts I've used aren't very expensive to replace
-
Clutch replacement time!
Parts:
Nismo Super Coppermix Competition Twin Plate Clutch (3002B-RR598-C), comes with clutch release bearing (30502-12U00), Nismo clutch fork boot (30542-12U00), and flywheel bolts (not sure if there was a part number on them?)
Nismo braided clutch hose (46211-RS596), comes with copper washers (46237-A4600) and bleed nipple/clutch damper delete (41128-RS024)
Rear crank oil seal (12279-5L310)
Spigot bush (32202-B950A)
Nissan clutch fork boot (30542-12U00), didn't realise the clutch comes with one
Random clutch alignment tool found on eBay
-
Whoops, premature post, ignore this one lol


.jpg.88dce590484bb9167b5df2554c99565e.jpg)


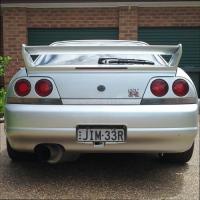
R33 GTR - Daily for 7 years and counting
in Projects, Overhauls and Build-ups
Posted
Intake side stripped down again to replace the stock oil/water heat exchanger with a Ross oil distribution block and Greddy oil filter relocation, all hooked up with black AN hose and fittings. Also powder coated the collector while it was out, and fitted a new engine cover badge
And some new shoes for the Evo - Enkei PF05 18x9.5