


Jordie Lewis
-
Posts
29 -
Joined
-
Last visited
-
Feedback
0%
Content Type
Profiles
Forums
Events
Gallery
Media Demo
Store
Posts posted by Jordie Lewis
-
-
Thanks for the kind words. The flanges are really simple to make / have made. the hard part is the fabrication of the welding and porting the openings to match which is why I would be hesitant to sell them as a kit.
Plus I bet very few are as stubborn as me haha
-Jordie
-
 1
1
-
-
On 1/5/2022 at 8:41 PM, Dose Pipe Sutututu said:
jesus, that's some solid determination!
One would think just running a Plazmaman complete intake manifold/plenum with a DBW throttle would be miles ahead of what that RB26 ITB setup would/could offer with all it's mid century fittings.
I 100% agree that another intake setup would be better performing but I like the uniqueness it brings to the build. I am not paying someone to do the fabrication and this has become something I want to figure out. Call me stubborn for being sold a "bolt-on" adapter plate.
The waterjet has been down so it was quicker to machine them. I had one of my machinists at work (who is enthusiastic about making car parts) to give me a hand over the weekend.
We started with .75" scrap we had kicking around and profiled out the shape.

I transferred over the studs from the balance tube for a test fit. There is a slight interference caused by the distance between the top and bottom studs being off by .75mm.
Not a huge deal as the split pins which locate the throttle bodies are on the bottom holes and they fit perfect. I just oversized the top holes on the ITBs to accommodate my stupid error in measurement
You can see the difference in the ITB spacing vs the OEM RB20DET runner spacing here. The plan is to fill it with weld on the inside and weld on the outside as well. I can then smooth out the transition.
-Jordie
-
 2
2
-
-
Bumping this thread to keep the dream alive.
Finally got cracking on this yesterday.
Cut the runners off with a bandsaw and machined the runners flat.
The plan is to retain these two sensor locations. But remove the steel insert, cap the end and thread a nipple in which will go to an aftermarket swirlpot.
The lower coolant runners will have to be cut and modified after seeing where everything mounts up.
Hopped on the computer and measured up the flanges. They have been sent to the waterjet and should be back in a couple days.
Ill update when the parts get here.
-Jordie
-
5
-
-
On 4/26/2021 at 8:59 PM, iruvyouskyrine said:
I also purchased mine in 2017 so not sure about that. I believe you are running an RB25 though? so our RB20 half of the adapter is different to the RB25 half which is where the issue is in both of our cases. I still maintain its a shit design.
A dude i know actually designed and built a single piece adapter that just truly bolts on and works. He is a fitter and turner by trade and was able to knock it up himself. It is a true bolt on affair, no extra gaskets or sealants etc. I have been harassing him for years to sell it or at least make another couple but he said it was very difficult and tie consuming to make and can't really be f**ked making another one.Maybe with enough interest he may relent?
His is superior as its one piece, and doesnt require cutting and welding of lower runners or any of that rubbish
For the record I am Canadian 😆.
I am still waiting on my spare lower manifold to show up then will be cutting and welding adapters on. Do you have any pictures of your friends adapter? Maybe there is an easier way. Like I said before, I'm a mechanical designer by trade and play around with 3D CAD for 8hrs a day. My current company has full machining capabilities as well so we might be able to get something done!
-
That's the thing. I don't want to give up on this. I think just need to take a different approach.
Adam, I wish it were that easy

-
It was leaking from where the forward most coolant passage met the block. On the small ear. (shown in the screen cap from your video)
-
Not the update I wanted to make but I feel its important to keep people updated.
As everyone else echoed the Otaku adapter kit is TRASH and will leak no matter what. I've taken every precaution with getting this to work and it leaks no matter what I did. It Achilles heal of this kit is the added points of failure. Stock you have a single leak point where there manifold meets the head.
With this kit, you create 3 potential leak points.
I've gone back to my single throttle setup for the time so I can enjoy the car.
Not to give up on having ITBs, I have also ordered a stock lower plenum to cut and weld on adapters I have designed and had machined at work.
Ill keep everyone updated as we move forward.
-Jordie
-
1
-
-
On 9/15/2020 at 10:12 AM, jmknights93 said:
Sad thing about this, Otaku know about this issue yet they continue to sell the product.
Yea thats the thing that gets me.
I design stuff for production at my day job. There would be no way I would release a part or product that would require that much dicking about to get to work properly. AND sell it as a bolt on solution.
-
10 hours ago, r33cruiser said:
Must....have....separate......build.....thread

Here you go. Not on SAU but its pretty detailed. You might need the photobucket fix extension for chrome to see the first post but other than that its all though flickr so it mostly works.
https://zilvia.net/f/showthread.php?t=579803
Enjoy
-Jordie
-
Just to update everyone.
Got the car together and running. No leaks or big dramas.
Ive adjusted the ITBs and managed to get everything to idle at around 1050-1100 RPM. Which seems decent by old ITB standards. Since im an expert at removing it all, I might try from throttle coat over the winter.
Drove it to work today and it ran super well (surprisingly) with my tuned ecu. Once I figure out a turbo and manifold I will properly get it mapped.
If anyone has any questions about this conversion, feel free to inbox me.
-
1
-
-
I drilled them all out to 9.5mm and everything mounted up just fine. I used a little bit of RTV sealer to make sure it seals well. I filled the coolant with water to check for leaks and we are all good
(yes I have added rad hose clamps )
Just need to get some cold side piping fitted and I should be able to start it all tonight. Fingers crossed.
-
3
-
-
On 8/5/2020 at 5:02 AM, iruvyouskyrine said:
I ended up doing what you did and drilled out the adapter plate on the locations where the RB26 bolt holes align to the RB20 (which i think is 10 bolts IIRC) and measured for all brand new bolts. I have some pics i might throw up later on but it's almost ready for final installation now.
Got everything all apart again last night. You're right, 10 holes line up with those in the block. I am going to drill out the threads and get fasteners to go right through the plates into the block. There seems to be enough tolerance in the holes that if they are not 100% bang one (less than 1-2mm either way) it should still all bolt up. I believe that I have the right fasteners for the job but Ill assemble tonight without gaskets and double check.
-Jordie
-
4 hours ago, iruvyouskyrine said:
The balance tube is the top piece that links all the ITB's together to get an average pressure reference source, so that shouldn't be able to effect the sealing of the manifold?
no no I mean the cast portion of the intake manifold assembly. that goes between the throttle body and the adapter plate. I have it all apart again now. going to take another crack at it.
-
On 7/31/2020 at 4:05 AM, iruvyouskyrine said:
Haha, whats leaking, air or water? Where is it leaking for you?
it started leaking at the back. it looks like when I bolted the RB26 balance tube piece on, one of the bolts was a little proud and caused the plates to separate. New gaskets should be here today so Ill try again
-
Can confirm Otaku plates leak like a sieve. There are just too many failure points.
I slapped on my old setup so I can at least enjoy my car for the rest of the summer. Ill revisit this again over the winter.
Am gutted.
-
Getting there.
-
2
-
-
On 6/25/2020 at 7:11 PM, Dose Pipe Sutututu said:
Looks great, but all that time/money/stress you could have put in a RB26 lol
Damn. I really wish they had $500 RB26's where I live. Would have saved me lots of headaches. ?
8 hours ago, iruvyouskyrine said:I just took all mine apart and you are correct, that's an excellent idea, wish I did it 3 years ago. I'll take some more pics for people as well when it all goes back together. I just sent all my stuff off to high octane today to be coated.
Yea. I was surprised that Otaku didn't do that from the get go. I used an M8 x 80mm bolt to go through everything and thread into the block.
Did you make a gasket for in-between the plates as well, or did you just use RTV?
-
1
-
-
On 6/26/2020 at 7:11 PM, iruvyouskyrine said:
Okay i re-read it and it looks like you drilled out the threads on the RB26 side of the adapter and the bolt that mates the ITB to the RB26 side of the adapter now goes through the ITB's, RB26 side, RB20 side and directly into the head? is that correct?
This is correct. the holes lined up perfectly here. So I drilled the threads out and de-burred the holes.
There were a couple other holes which almost lined up but were not spot on and would require some enlarging to fit properly.
Ill see how it goes, my injector seals showed up this morning so It shouldn't be much longer before I try and fire it up. Ill keep you all posted.
-Jordie
-
Now I understand.
Copied from my build thread on Zilvia
So. As the saying goes, bolt on is never truly bolt on.
This post will detail the mission, rather exercise in frustration that is getting ITBs to fit with the Otaku RB20DET adapter plates. People who have used them have just said that they are tough to get to work correctly but dont offer any details in what the process actually was.
To start, I would like to add that they were quick to answer any questions I had over instagram and this isnt a stab at them or anything.
When I had mocked everything up on the stand there was a huge interference in between the coolant passage on the Rb26dett intake manifold and where the thermostat would like to live. Turns out that even with the proper parts it would be a game of Millimetres to get everything to play nice.
Otaku instructed to get an RB30 thermostat housing for more clearance and to modify the lower coolant passage.
I marked in black the areas I needed to further modify the thermostat housing.
Modified the coolant passage and machined down the lower screw boss to get it to clear the thermostat housing. Just clears as is but still no room for the lower rad hose.
Got the thermostat housing cut and angled down to free up some more space. Also you can see I had to countersink the top bolt hole as well. Everything finally clears. Time for "final" assembly.
I also drilled out the threads marked with the "X" this is to allow the fastener to go through both plates into the block. I was concerned that the small area around the front water port wouldn't seal correctly.
I made a gasket to go inbetween the two plates and used a light buttering of RTV to make sure everything is sealed correctly. I completed the assembly with an HKS RB26dett intake manifold gasket set.
Those are the main hurdles in getting the otaku ITB adapter kit to work on RB20det. I can see why people knock on the kit because its pretty fiddly and doesnt fit out of the box.
Now I dont know yet if it leaks or anything. This was just to make it all physically fit.
-
The paint came out looking great!
-
1
-
-
On 11/5/2018 at 8:43 PM, iruvyouskyrine said:
I did it on my car and while i don't regret doing it i would not do it again or recommend it to others. If i had my time over i would have gone plazmaman top half and a DBW throttle 100%.
Do not, and i repeat, do not buy the OtakuGarage adapter plate. It looks great but the f**king around required getting it to (barely) fit is nothing short of a nightmare and requires a lot of custom fabricaiton to be done. Who else out there is offering an adapter kit?
Sorry for bumping and old post. Just wondering if you or anyone else has any experience in using this adapter plate. If so what were the main hurdles needed to get it to work.
-
Plug 1 is either park lights or washer bottle perhaps
Plug 2 looks like one that connects to the headlights or something near the relay box
Plug 3 I think is an intermidiete connector near the relay box as well
Plug 4 not 100% sure, looks familiar but cant quite pick it
Plug 5 looks the same as plug 1, same wire colours so they are possibly both park lights or indicators
Plug 6 Not sure, maybe AC
Plug 7 is coolant temperature switch on bottom of radiator (should be drivers side)
I'm not sure if I am anywhere near on the money, seen as its an R32 and a GTR, I could be completely wrong lol..... Just going off what some plugs are like on my 33
Thanks for your help. The car is an R32 GTS-T I have most of them labeled but it was just these few that were left which leads me to believe that they were for the A/C system.
Plugs 1 and 5 are indicators, plug 7 is coolant temp sensor.
The easiest way is to put the loom in and see what plug ends up near what item

I would if I could. The reason i am having difficulty is because the car was incomplete when I bought it. perhaps I should just run the wires for the headlights, signals, cabin air temp sensor ( which I believe is plug #5 as it is paired off with the horns in the centre of the harness) and horn and remove almost everything else.
-
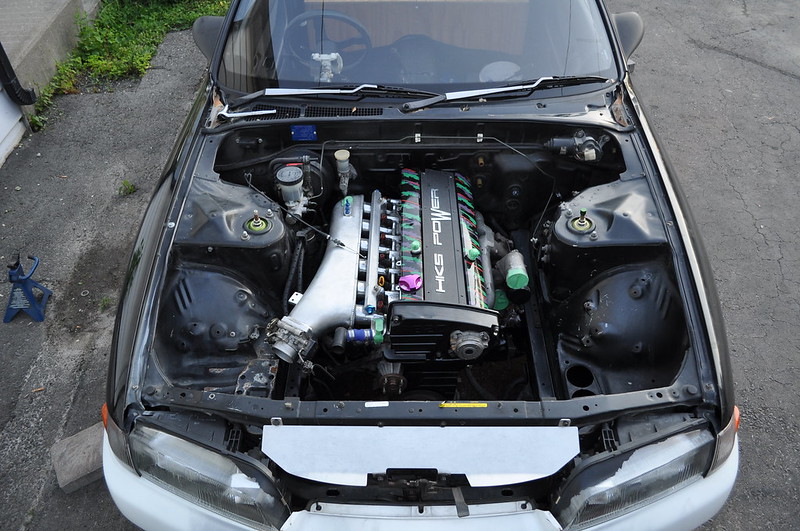
Hi All,I am in the process of slimming down my harness and am relocating the fuse box to inside the cabin. As I bought the car with front end damage and without A/C there were many connectors that were not plugged into anything and not being used.Can anyone help me identify these to see if I need them or can go ahead with deleting them. All these connectors are part of the same harness that runs under the rad support and runs power to the headlights ect.Plug 1 (Pretty sure this is for fog lights) But it shares the same connector as the signal so i want to be sure.Plug 2Plug 3Plug 4Plug 5Plug 6 (most likely for A/C)Plug 7Any Help is appreciated, I will do a write-up on the wire tuck once completed. I just want to keep the bay as clean as possibleThanks,Jordie
-
Bay Paint to follow after the intercooler is mocked up.
-
3
-


RB26 intake manifold on RB20
in RB Series - R31, R32, R33, R34 (1986-2002)
Posted
That would be great for N/A applications but having to adapt back to use the GTR plenum would be a pain with DCOE style throttles. Luckily many people discard this over complicated setup so parts can be had fairly cheap.
If anyone wants a set of flanges I'd be open to making them. It would just be up to the buyer to fit them properly. The distance between the runners and throttle openings do not line up well so there is a considerable amount of welding to fill and porting. But I have heard of welding on the flanges and forgetting about it.
I just dont want to catfish people into thinking this is an easy solution, bolt-on or otherwise. 🤣