Jump to content
SAU Community

Recommended Posts

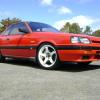
Make/Model: HR31 GTS coupe

Year: 1988

Kilometers: 151,200

Transmission type: R32 5-speed manual

Engine: Redtop RB20DET ECCS

Colour: Red

Modifications: See below

Roadworthy Certificate: N/A in SA

Registered: Yes

Accident History: Nothing major, front bar skin has been slightly damaged behind number plate after being reversed into

Asking Price: Around the $10 mark, slightly neg.

Location: Adelaide, southern suburbs

Contact Details: Message me is best, 0430 285 717 (Josh)

Other Comments:

This is an EOI for the moment, found another car, so if it sells before this does, I'll keep this.

I bought this from rolls around 1 1/2 years ago, and since have put about 15,000km's on it.

Current mods;

Engine/Drivetrain

- RB25 turbo

- FMIC

- Apexi pod

- Split dump into 2.5" straight through exhaust, 1 cannon on rear (sounds good, people will attest to this)

- Rebuilt LSD with 3.9:1 ratio, oil changed 10,000km ago with synthetic Motul (really tight, will lock up around slow corners on cold mornings)

- New Nissan aus-spec rad around a year ago, along with thermostat, clamps, new coolant (Toyota) and genuine cap

- New clutch master and slave around 2 months ago, new solid line from master, and new rubber line to slave (basically new clutch hydraulic system)

- Jim Berry H/D clutch, feels almost factory, really nice clutch

- Catch can mounted in wheel arch

- Splitfire coilpacks, new NGK plugs 5,000km ago

- Battery relocated to boot

- New fuel filter 5,000km ago

- All new drive belts 12 months ago

- Reconditioned RB30 alternator fitted (probably around 20,000km since rebuild)

- Turbotech MBC (set to 12psi, holds it perfectly to redline, sheet below)

Running Gear

- Front Bilsteins and Espelir springs, really firm

- Front genuine GTS-R strut brace

- Rear KYB Gas-A-Justs with Espelir springs

- Front R33 GTS-t front calipers with R32 GT-R slotted rotors, braided brake lines (approx. 4mm left on pads)

- New genuine lower control arms and link pins with link bushes

- 3rds adjustable rose jointed caster rods

- Whiteline adjustable front 27mm swaybar with new D bushes

- Rear pads replaced when I bought the car Bendix GCT (approx. 6-7mm left)

- Front Z31 5 stud hubs

- New wheel bearings fitted with hubs around 9 months ago

Wheels & Tyres

- 17x8 +5 and 17x9 +11 Work meshies

- Bridgestone Adrenalin RE001 tyres on front, around 4-5mm tread left

- Roadstone tyres on rear, around 5mm left

Interior & Exterior

- GTS-R front bucket seats

- Tomei 240km/h dash

- Momo steering wheel

- Genuine original HR31 flootmats

- ADThree mudflaps

- GTS-R spoiler

- GTS-R style bar (vents both sides)

- Pioneer stereo, front splits and tweeters, rear has speakers fitted but pretty sure they don't work

I'm bound to have missed shit, refer here for build thread whilst in my ownership: http://motamota.r31skylineclub.com/index.php?topic=136322.0

This car isn't perfect. It has flaws, I'll try to name as much as I can here;

- A/C compressor leaks, I've lived with it, I was going to pull it all out, up to you

- Rear bushes make funky noises, probably something to do soon, would remove HICAS at the same time

- Front wheels could do with re-rolling, gives a mild shake at around 80 - 100km, again, I've just dealt with it. There's also a bit of clear coat peel on the centres, hasn't bothered me

- Both rear inner CV boots are split

- Extension housing seal on the gearbox is weeping (have a couple of new seals here, Repco was unsure which it was so I bought both)

- Rocker covers have a very minor weep

- Power steering rack is leaking and both rack boots are split (have new rack boots, will need a new rack eventually though or a rebuild)

- Biggest one, paint, really not too good on the bonnet, boot and tops of the 1/4 panels. I've had a look in the front 1/4's and haven't seen a lot of rust, although there is a little bit developing near the spoiler

- Brake fluid needs a change

- Cigarette burn in drivers seat, I never notice it because I have a seat cover on it since I bought it

I'm as honest as I can be when it comes to selling cars, I've been f**ked over and I hate it, so I will answer any question you can throw at me the best I can.

People know how I look after this thing, serviced every 3 months regardless of km (usually 2,500 or so) using genuine filter and Elf synthetic oil. I've done all of my own work on this since I've owned it, and spent probably near on 4k since owning it, and I purchased it originally for 9k. Seriously the most reliable car I've ever owned, never missed a beat, runs really smooth, albeit a little rich. Ideally I'd go a Nistune and probably get some more power out of it.

There's probably other things which have been done that I've failed to mention, it should all come to me eventually.

good1Medium.jpg

DSC02579Medium.jpg

DSC02588Medium.jpg

5 stud

Image0007Medium.jpg

New LCA's

Image237Small.jpg

Bay

Image232Small.jpg

Can sorta see the paint in this one

Image0023Medium.jpg

  • 2 weeks later...

Create an account or sign in to comment

You need to be a member in order to leave a comment

Create an account

Sign up for a new account in our community. It's easy!

Register a new account

Sign in

Already have an account? Sign in here.

Sign In Now


  • Similar Content

  • Latest Posts

    • I wanted to try and preserve the front bumper as long as possible, they're not cheap and are made to order in Japan. Taking inspiration from my previous K11 Micra build where I made an undertray for the Impul bumper, I did the same for this BN Sports bumper but a little slimmed down.  This time round I only made a 'skid plate' (if that's the correct wording/term) for just the bumper surface area, the Micra version covered the gap like an undertray. Starting off with a sheet of mild steel approx. 0.9mm thick 4ft x 2ft in size. I traced around the bumper, cut it out and cleaned the edges. Luckily I was able to get two halves from one piece of metal In the video I installed it as is, but I've since then I've removed it to spray and add a rubber edging trim. The rubber trim is suitable for 1-2mm and it's a really nice tight fit. The bolts had to be loosened due to the plates being too tight against the bumper, the trim wouldn't push on I used some stainless M6 flat headed bolts for a flusher finish (rather than hex heads poking down), I believe this style fastener is used for furniture too incase you struggle to source some. The corner's are a little wider, but this may be an advantage incase I get close to bumping it  The front grill got some attention, finally getting round to repairing it. Upon removal one fixing pulled itself out of the plastic frame, one side is M8 that fixes inside of the frame, where as the other side is M5. Not knowing I could get replacements, I cut down an M8 bolt, threaded it inside the frame along with a decent amount of JB Weld.  The mesh was replaced to match the bumper. One hole on the bonnet/hood had to be drilled out to 8mm to accommodate the new stud, once the glue had set it could be refitted. I think the reason the grill was double meshed was to hide the horn/bonnet latch (which makes sense) but I much prefer it matching the bumper Bumper refitted and it's looking much better IMO The Youtube video can be seen here: https://www.youtube.com/watch?v=bVZP35io9MA
    • The video for the servicing and fuel filter change can be seen here: https://www.youtube.com/watch?v=uLJ65pmQt44 One of the main jobs I wanted to do before the car officially went on the road, was to remove the awful looking blue silicone hoses. There's nothing wrong with having coloured silicone hoses, but I realise as I'm getting older I prefer monotone engine bays with a splash of colour on the engine cover(s). I cover this in a lot more detail in the Youtube video, so unfortunately there's limited photos of the process. The intercooler, upper radiator, boost vacuum and upper breather hoses were all changed to black silicone with mikalor clamps. The only blue left is a blanking cap at the back of the inlet manifold and the GReddy pulleys (which will be replaced for stock when the cambelt gets replaced) While the intercooler pipes were off I gave them a quick clean/polish too A before photo I do have a replacement air filter on its way. Fuse box covers were painted blue, they're now satin black Another job on the list while the bumper was off, is to add some mesh https://live.staticflickr.com/65535/54737966256_99b28bfa30_c.jpg[/img] I was hoping to use some thin wire to secure it, but it seems I've misplaced it and the wire I had was too thick to twist easily. I ended up using cable ties for the time being https://live.staticflickr.com/65535/54737131882_c2b7989dcc_c.jpg[/img] Was pleasant to see this https://live.staticflickr.com/65535/54737131627_8b2aab13b3_c.jpg[/img] The last thing to do was to fix the front grill and re-mesh that to match but I ran out of time The Youtube video can be seen here: https://www.youtube.com/watch?v=R4FsF6tgizE&t=23s
    • Hi all,I already introduced myself in the Victoria section, but only saw this section now lol XD New to forums and new to skylines. Hoping to buy my new skyline within October
×
×
  • Create New...