

Mitchee
-
Posts
365 -
Joined
-
Last visited
-
Feedback
100%
Content Type
Profiles
Forums
Events
Gallery
Media Demo
Store
Posts posted by Mitchee
-
-
Cheers Howie.
Not much progress lately. I've run the fuel lines, im going to redo the main tank to surge tank lines in teflon now that i found some parts to do it correctly.
Block has been to Duncan Foster at Moorebank and had all the machine work done, just waiting for my engine builder to put the damn thing together.

-
Just clearing some stuff out that I have no use for anymore...
BNR34 Tomei Poncam Type-B in&ex - $500
Tomei Cam Gears - $250
^ Or both for $700
BNR34 fuel rail - $50 (or $100 with nismo reg)
Sard 800cc injectors x6 - $450
PM or O4664957O1
Cheers.
-
Looks better with TE's
Heres the guys Carview page if anyone wants to have a browse: http://minkara.carvi...10/profile.aspx
-
Cheers for the help guys
drawings will definitely answer my difficult questions lol -
There was some info on it, in the first thread:
http://www.skylinesa...ll-makesmodels/
Have a read and see if it covers the question, if not post up again and see if we can search for more detail
Thanks for that Nismoid.. I did see the post towards the end of that thread from Aaron.. Are there technical drawings available of the kits from D2? I really only need two measurements, caliper protrusion from face of disk hub, and radial distance of caliper from center of disk. Sorry for the big ask, I really want to run these wheels without spacers and if I can manage this with a brake upgrade then its win win!
-
How far does the caliper on the 356mm setup protrude perpandicular to the mounting face of the disk? Just trying to work out of these will clear the spokes on my high-offset RPF1's, as I needed an ~8mm spacer to clear my stock GTT brakes.
-
Take it to Vince at Brookvale Auto Service in Mitchell Road. He knows his Nissans and will do you a good price.
-
Whoa they look amazing. Rough cost on getting this done?
-
-
Cheers Links. I mentioned that day to Stan, he gave a chuckle and a grin. Good memories.
Not much to report lately, Tomei cams and my Supertech kit came from Raw Brokerage today. Good timing as I had my work car loaded up to drop all the engine bits to my engine builder for assembly. Cams are Procam 260's 10.8, and the Supertech stuff is the TS1015 kit with guides, retainers, seats, dual springs, +1mm OS in/ex valves and seals. Should help the 26 head breathe with some port work too. I kept to a mild duration to keep the midrange strong as I wont be revving the 3.4 too hard.
My engine block was at my machinist fresh from being dipped and cleaned, tested and ready for mods. Starting to see the light at the end of the tunnel. Forgot to grab a pic, bugger.
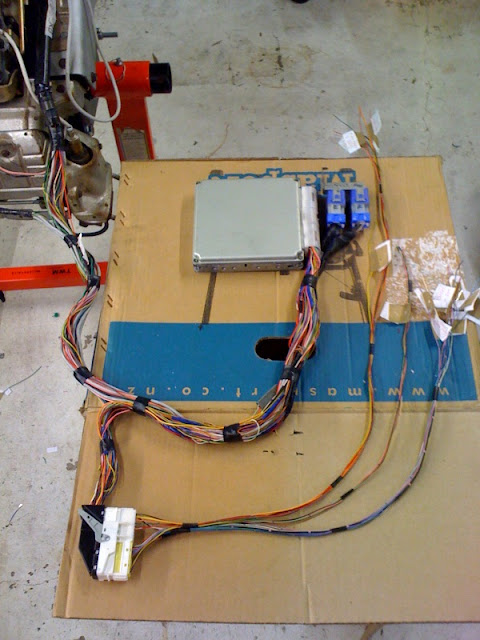
Trying to get my head around the wiring of the Haltech PS2000 as i have a full loom for it. Unfortunately not plug and play, but I was prepared for this and I have a good grasp on auto electrics thankfully. Had to manually create a pinout of the R34's 'M63/F3/Bodyloom' plug, some pins I wasnt able to work out so ill be making a visit to Terry34gtr this weekend who has kindly offered to let me copy down some of the diagrams in his Nissan R34 wiring schematics book. <3 SAU community.
-
The r32 loom will take some power feeds from that plug near the headlight. However the r34 loom gets all its power from the large white plug up near the ecu. There is approximately zero information out there in regards to pinout information of this plug in the r34.
If you can find someone with an r34 electrical circuit schematic book, ask them to take a photo of the dual a3 size diagram and post it here. I'm currently searching for it too as I'm about to wire a haltech in and the pinout for this plug would be super handy.
-
James, I see you're over in Perth. I've got a mate who's an absolute wiring guru over there (i think the NOR area) and he would be able to do the job pretty easily. I can put him in touch with you if you want?
-
Epic bump here...
Webber, Im after a document you had on your website a while ago. Its no longer there. I left a message on your SAU profile page, I hope you can help.
(PS your SAU PM inbox is full/not working)
Cheers.
-
R34 ECU doesnt need to be there to run anything. ABS and all that have their own ECU's. You just need to patch together the corresponding wires in the body loom plug thats about 30cm up from the ECU end of the loom on each one, so that the R32 loom can get its power feeds and signals into and out of the ECU to the dash, fuel pump relay etc etc.
You can see someone in the process of doing this here: http://lh3.ggpht.com.../s640/photo.jpg
About 30cm up from the ECU end of the loom is the body plug. This is various in/out signals to/from the ECU to things like tach signal, speed signal, A/C signal, power feeds etc etc.
The problem is that the R34 loom also carries more through the firewall compared to the R32 loom. The R34 loom has passenger indicator, ABS, and some power feeds that connect down near the headlight too. All of these need to be removed from the R34 loom and added into the R32 loom.
If you dont have the patience to dismantle both looms and collect full wiring diagrams of each in order to know what needs to go where, then send it on to someone that does. You'll pay a fee but it will literally be plug and play. Theres nothing worse than assembling a custom wiring loom thinking you have everything correct, only to have missed an ECCS relay wire and have nothing work. Pull it out, start again. Not fun.
-
What series RB26 is it? If its an R34 RB26 you can retain much of the RB25DE loom & engine sensors and simply plug up to the RB26. You'll have to make something up for the TPS to mount correctly or rewire the TPS plug. Then get a Nistune fitted to the RB25DE ECU and chuck a RB26 map onto it. Will need to upgrade to a Z32 AFM or something also. If its an R32/33 RB26 then you'll need to rewire the CAS plug and the same with the TPS.
Alternatively, you can use the RB26 engine loom and ECU, and make the wiring changes required to get power into and out of the loom at the dash plug near the ECU. The problem here is that if you have anything but an R34 RB26, you'll have to cut out some of the old R34 RB25DE loom which carries ABS and the wiper/passenger side indicator wiring. Theres also the alternator and knock sensor loom you'll need to cut out of the RB25DE loom and move that into the 26 loom.
Not any easy job by any approach unfortunately, especially if you have a non R34 RB26 in there.
-
Id just like to drop my 2c in on this thread with regards to the dealer mentioned and my previous experience with them.
I was looking at a Cube around this time last year and popped into this dealer as they had a few on display. I was interested in a clean example they had, relatively low kilometers and was ready to put a deposit on it. I requested the Japanese dereg papers/export certificate and was told this wouldnt be a problem, they would email them to me.
I was emailed an export certificate as promised, but upon opening the image they sent me, something didn't look right. I opened the image up into Photoshop and played around with the brightness/contrast and immediately it was obvious the document had been altered. Take a look yourself: http://i.minus.com/i3USkFyChtM4n.jpg
Needless to say I told them to jam it and went and saw Gavin at IMG, and bought my Cube from him.
-
Had a couple of hours today to dick around with the coilpacks..
Grabbed some old boots of some stock RB coilpacks and found they fit nicely over my LS2 truck coilpacks I have. Standard these are a 'Coil Near Plug' which means they are designed to have a small lead from pack to plug. With the contact spring pulled from the RB coilpacks, stretched slightly, they fit perfectly over the electrode in the LS2 coil so I can run these on the plugs. The contact spring compresses about 5mm once the coilpack is in place on top of the plug. Should work OK. I wrapped some electrical tape around them just to keep them in place and give it a bit of strength.
Heres how they sit.
And some brackets I made up which will hold them all firmly in place, just need to pick up some more nuts and bolts.
Also received notification today that my Tomei Procams and Supertech stuff is on its way from the states. Stoked!!
-
Frosty, good to know, thanks. Never really had much to do with gearboxes and stuff, ill definitely do some research.
I had a few hours this arvo so I got stuck into some more fiddly shit...
Cleaned up the radiator brackets and replaced the rubber mounts with some suspension bushes I had lying around. Work great and now the radiator wont flop around like it used to... Koyo fits nice and neat too.
Made up some alloy brackets to mount the oil cooler. I put it here as the lines are premade and are slightly too lengthy. May remake the lines down the track but for now this will do OK. Also replaced the intercooler with a new unit as the old one was getting on and the fins were full of rocks and bugs. Its just a generic 100mm one, nothing special but the last one held up fine and for $205 you cant complain!
-
Cheers guys.
Dori, had the box rebuilt by Gearbox Logistics/Gearbox Solutions whatever they want to call themselves. While the turnaround was quick, and the picked up and delivered the box, the final charge was $2000 as the box was completely shagged. I knew this, but it still hurt knowing I could get a new one from Just Jap for $2700. Budget is just too tight.
They put sealed bearings throughout, replaced the gearset with one that was in better condition, new 1/2 and 2/3 syncros and replaced anything that looked worn with new bits. When the box returned to me the speed sensor was smashed off and it took a few weeks and a few phone calls to get them to send me a replacement. Im no longer interested in smashing through gears so hopefully this box can hold up with the torque. Its been in my mind that if the build streches out longer than expected and I have some spare cash i'll try and offload this if something stronger comes up for sale - say with a PAR gearset or something.
Anyways I made some progress today with my time off.
-6AN Feed and return lines from main tank to surge.
With some extra protection! The plastic cover that goes over this is off for the pic, once its on you really only see the lines in the wheel well for about 10cm before they disappear again. Should keep things nice and safe. If theres any damage to the loom tube ill fit some form of cover over the exposed section.
Here you can see where the lines drop down into the surge tank. The top left fitting is the return back to the main tank, and the feed from the main tank goes over the top of the surge to a 90 degree fitting on the rear. This means 'cool' fuel from the tank enters above where the twins draw from, and returns to the tank at the front. Im hoping this will keep a good flow of 'cool' fuel moving around the surge.
The top right fitting is the -6AN teflon return from the fuel rail, and of course the other two are the -8AN teflon feeds from each fuel pump.
Where the cable is coming out of the chassis rail, this is where ill run these final three hoses once i enlarge that hole, this will let them travel protected in the rail until they get to the front of the subframe where they'll exit and continue under the car where the standard fuel lines normally run.
Also you can see I've wired up the pumps, the wiring enters the boot through a rubber grommet normally used for the 4WD system in a GTR.
3 Relays triggered off the stock fuel pump feed. This gives full voltage to my in take pump, and the two 044's. I had two relays there already for the old setup with a single 044 and stock internal pump. I could have just run the 2nd pump in series but I decided to add another relay in case I want to switch the pumps off individually down the track. The old wiring was a bit of a mess and pretty ratty so it was nice to clean it up a bit.
And the final view of the boot before it will get covered up under trims. You can see the wiring for the twin pumps exiting on the right, the two braided hoses for the surge tank feed and return, and the relay setup. The boot is half black because there was some pretty bad fuel spillage from the old setup and everything was brown and gooey. A can of chassis black and we're good to go.
-
Browsing Yahoo Japan last night I came across something that I had to google for a good hour in order to work out if it was the real deal or not.
4" HKS Ti-Racing catback exhaust to suite ER34. Very f**king rare, especially for an R34 GTT. Lets hope the seller hasnt f**ked up and its actually a BNR34 item
Stainless main pipe with a titanium rear muffler. Loud and obnoxious
Got it for a relative steal considering its brand new, less than anything similar anyway.Also pulled the old girl out of the factory for a quick scrub. The layer of dust and grime on her was pretty depressing. It was pretty motivating scrubbing back all the crap, really makes me want this back on the road sooner rather than later..
Before..
Dat dust.
Squeaky clean!
Also gave the engine bay another degrease and pressure wash..
Was pretty stoked when this lit up for the first time.
Once xmas is out of the way, plenty of progress will be made.
-
I purchased a fresh S2 RB30 block which will be checked over, cleaned up and bored to 87mm. Tensioner relocated and the block drilled and tapped for ARP studs. The old block is on the floor...
Whilst the BBS LM have been great, they really are too aggressive for the car being 18x10+20 all around. So I purchased some staggered Enkei RPF1's in SBC colour.. 18x10+38 and 18x9+30.. These should be more suited to the GTT's guards. I'll have to run a 10mm spacer up front to clear the brakes, and possibly a 5mm spacer at the rear depending on tyre as the rim sits pretty close to the coilover..
Starting to collect some bits... here the gearbox has returned from being rebuilt with new syncros and sealed bearings.. Nismo engine mounts to go in too..
After some reasearch I decided that decent spark was needed. I ditched the twinpower/splitfire setup I had previously and purchased a set of LS2 coilpacks. These things pack a pretty big punch apparently.. Plugs were also sourced which ill have to wire in. I'll make up a bracket to run these 'coil near plug' using stock coilpack boots. Not sure if they will squeeze under the engine cover though.
So at this point I have a good fuel setup, a good hot-side setup, and the majority of the bits to give spark and control everything. All thats left is for the engine itself. After plenty of thinking I decided to bite the bullet and go all out on the motor. The torque increase from the RB25 to the RB30 was pretty amazing, so I thought it would be appropriate to go bigger again with a Spool RB34 kit. 94mm stroker crank, I beam rods and CP pistons.
Along with a box of goodies from Spool... Extended and baffled sump, ROSS balancer, full Cometic engine gasket kit, billet oil pump gears and a timing kit.
From Cartel a HEL braided brake & clutch line kit and some steel wheel nuts.
From Kudos motorsports a box of genuine Nissan stuff.. a new water pump, timing drive gear, exhaust manifold stud and nut kit, rocker cover bolt kit, belts, thermostat etc.
From Driftworks a thermostatic oil cooler kit..
Thats the majority of the bits ive collected so far for the build. The block is currently at the engine builders and assembly and machine work will begin early 2013.
The RB26 head will be copping Supertech 1mm oversize valves, dual valve springs, ti retainers and Tomei Procam 260 10.8mm cams. Along with a full port job by my engine builder. I dont have any pics of these parts yet as they are still in transit from the states.
All in all im really excited to get this build happening, and I have a feeling it will be completed in a few months time. Most probably a year since the day it broke.
I chose the RB34 kit after a lengthy discussion with my engine builder who has done a few Spool RB32's and Spool 2jz stroker kits and he is familiar with the bits. The extra torque and driveability from the 3.4 should be great. Im not expecting any specific power outputs, but a t04z on a 3.4 should be pretty responsive and make good power, especially on E85. Ive heard a lot of bashing from people about the Spool kits, especially the RB34, but I wont be wringing the neck of this thing 24/7, it will be a weekend car and to be honest, with the money im spending ill probably be too scared to drive the thing and somehow break something
I'll try to keep this thread updated with progress. Apologies if its a bit scattered, its hard remembering the last 3 years of owning this car, not to mention the flurry of activity over the last few months.
Cheers,
Mitch.
-
The interior was removed and I went to town cleaning up the mess of wiring. The Defi's were going, and I am taking a 'less is more' approach with the interior. Anything that isnt compulsory is going. No excessive gauges or tackyness. Just oem+ styles.
A matching set of Nismo gauges were purchased and installed, and all wiring under the dash cleaned up.
I came across a great deal on some very low km used parts.. 6boost manifold, garret t04z, turbosmart progate and a haltech PS2000 with full loom.
A koyorad to keep things cool
New fuel system will be going in... Its comprised of an undercar surge tank with twin Bosch 044's, twin teflon braid 8an feeds to a 14mm fuel rail, turbosmart fpr2000, 6an teflon braid return line. 100 series braid between the tank and surge. All Aeroflow gear. The surgetank was sourced from Unique Metal Fabrications and the fab work is amazing.
Yep, she'll be running E85 hence the overkill fuel system. Ive not yet purchased injectors but will be going with a set of ID2000's.
-
March of 2012 Powercruise Sydney rolled around and I managed to grab a garage entry which was awesome. Plenty of rain but still had a great time in the car. On the last day of powercruise, I went out for two sessions in a row then had to come to a stop, oil temps got a bit hot and when reversing back into the pit garage a rattle could be heard coming from the engine. At this point I was heart broken and knew what the noise was, as much as I didnt want to believe it. Oil pump was definitely gone, and something in the bottom end broken.
The car was towed home to my garage where it stayed untouched for a few months while a few things in my life changed, new job, moved house, turned 25. In the meantime I purchased an 250rwkw S13 silvia which kept me happy until I quickly grew bored of it.. Sold it off to a mate and began working on rebuilding the 34.
This is where the story pretty much begins! I tossed up my options for ages until I decided that the car deserved a full rebuild...
The front end was stripped and bits removed ready for disassembly..
Turbo out, the first work done,.
Gearbox out! It was f**ked after powercruise. Wouldnt stay in gears and was making some interesting noises. Too many 4th gear clutch kicks down the main straight I think. The JB clutch held up great
Engine starting to come out..
Engine out! Forklifts make light work of this job. Very lucky to have a spot in my dads workshop to keep the car!
Engine bay will be cleaned of most of this crap.. Its all old and dirty. New engine bay will hopefully be much cleaner and less cluttered..
The engine was found to have cracked the n1 oil pump drive gear, causing a loss of oil pressure and thus the f**ked big ends. It was at this point I decided that I would be building a new motor with a new turbo and fuel system setup, and I started collecting bits.
The engine was stripped down and parts put aside... I had quite a collection of bits at one stage..
-
Some may recognise this car as 'Satanic', owned by an SAU regular Stan a few years ago. Stan bought the car bog stock from Northshore Prestige as a 1998 R34 GTT, Triptronic auto. Stan brought the car to me for regular servicing and mods, and we both learned alot about R34s and cars in general. The car was the basis for a lifelong friendship that was formed, and when the time came for Stan to move on from the car, it was only natural that I take ownership of the car and have my way with it.
A quick rundown of what was done to the car while in Stan's ownership.. The stock engine was modded with boltons, highflow, front mount, injectors, shift kit the usual. What is considered 'normal' these days was pretty new territory for R34 GTT's as they were still relatively expensive from dealerships and there wasnt very many on our shores. The stock motor popped with a dodgy tune, and we built a forged RB26/30 for her. GTK-650 turbo, FCON Vpro ecu, 500rwhp through the auto.
It was at this point I purchased the car from Stan, and started to make the car my 'own'. The starcorps were dropped, and I picked up a set of BBS LM rims. I always loved these rims and with a bit of guard work the 18x10's were slotted on.
My biggest problem with the car was the auto. The car never ran right with it, and ive never liked 'performance' auto's. Out came the auto and in its place an R33 5 speed was fitted. An xtreme cromoly flywheel and Jim Berry full monty clutch were installed at the same time. The FCON vPro was retuned for a safe 480rwhp on 20psi.
I cleaned up the interior, moving the defi's to the triple gauge and fitted an techedge wideband o2 which gave feedback to the vpro on air/fuel ratios. An eBoost 2 controlled boost and the exhaust had an apexi ecv installed to quieten it down when required. The car was lowered slightly and it was in this form that the car stayed for quite a while.
I took the car to some hillclimbs, drift days, and wakefield days and generally had a great time in the car. It performed flawlessly and was always rewarding to drive with the torque and power from the 26/30. I fitted a whiteline front swaybar and a Nismo GTPro diff after a trip to wakefield, and next time out managed a 1:09 on street tyres. Very happy for a large heavy car.
I took the car to plenty of meets and drove it every opportunity I got.
Heres a gallery of pics of the 34 at this stage: https://www.facebook...66155351&type=3
more to come...


34Gtr Poncam B's, Tomei Cam Gears, Sard 800Cc
in For Sale (Private Car Parts and Accessories)
Posted
You're welcome Terry.
Hey, im not at Ryde during business hours unfortunately. However today I am running some errands and will be passing through Macquarie Park at around 11:30 and can drop them off. Cheers.