Jump to content
SAU Community

Recommended Posts

  • Replies 58
  • Created
  • Last Reply

Top Posters In This Topic

Top Posters In This Topic

Posted Images

post-18577-1128599874.jpgpost-18577-1128599932.jpgpost-18577-1128599975.jpgpost-18577-1128600066.jpgpost-18577-1128600118.jpgpost-18577-1128600173.jpgpost-18577-1128600219.jpgpost-18577-1128600283.jpgpost-18577-1128600330.jpgpost-18577-1128600366.jpg

Your kit is in the hyper rev mag. It says" M's FACTORY" whoever they are.

OK.

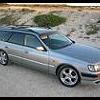
Attached are some photos of 2 x Series 2 Stageas with different kits.

The gray S2 has a DAYZ kit (as identified by the DAYZ badge on rear), the white one has, what I believe, the Dolphin Aeroform. I am missing the front spoiler at the moment - being repaired. I have attempted to photograph both vehicles side by side for comparison sake.

You will notice the rear spoilers are different shapes also. Due to time constraints, and being too short one end, I did not manage to get a photograph looking down onto the spoilers for a clearer definition.

Regards,

Marc2

Ok, by the sounds of it ppl's arnt quite ready as yet, ie with cash and decisions.

I'll leave it for now, but make a couple of phone calls anyway to see who can take moulds and produce quality skirts. There are a quite a few places, but pretty much WAY out the other side of the city from where I live, although there are a couple of local places I can try.

I'll be off from xmas to february (paternity leave for the 2nd kiddie), so can do running around for people then!!! Unless ppl's order bulk kits in from Japan???

EDIT: I wont be getting any bodykit parts whatsoever, but if I can help ppl out then I will. :P

Edited by bwilkeson
Ok, by the sounds of it ppl's arnt quite ready as yet, ie with cash and decisions.

I'll leave it for now, but make a couple of phone calls anyway to see who can take moulds and produce quality skirts. There are a quite a few places, but pretty much WAY out the other side of the city from where I live, although there are a couple of local places I can try.

I'll be off from xmas to february (paternity leave for the 2nd kiddie), so can do running around for people then!!! Unless ppl's order bulk kits in from Japan???

EDIT: I wont be getting any bodykit parts whatsoever, but if I can help ppl out then I will.  :(

I'm ready, have cash, want Dayz side skirts.

:P cheers :)

Thought so SK,......

So, tell me what you'd like me to do?

See if I can get moulds made and 1 copy set made up?

Just that Ive got no contacts as such as Im not involved in the car industry (besides mod'n the Stagea!)

Or can Sydney bodymoulders be able to do the job? I had a full GTR-style kit made up for our old Pulsar N15 hatch about 5yrs ago, done in Sydney from one of the more-recognised manufacturers (JetSpeed?).....

BW

Your'e here (Adelaide) for Mallala arnt you Gary (SK)?

Maybe you might want to meet up with me somewhere in the city, I can Loan you my Dayz side skirts for you to take back to Sydney, make your moulds and skirts (Im sure you've got contacts) and then post my skirts back to me?

UPDATE

Made a phone call, going to see a proffessional company either tomorrow (Saturday 8th Oct) or the following Saturday.

They can make up a mould, which I get to keep, and make up however many sets are required, whenever they are required.

They have assured me that my car's Dayz side skirts bodykit wont be damaged, so Im aok with all of this.

This is for side skirts only, not the rear bumper skirts or the front bar. Also, I will say straight out that I dont want to be held accountable if purchasers percieve the replica side skirts to be of poor construction/condition etc. Im doing this as a favour to the rest of you (wonderful) Stagea owners.

I'll get some quotes and go from there..... and update this forum thread once I have more info.

WOW - now Im a bodykit seller!

Brendan

:P:D But its going to cost me for the moulds..... :D:P

I'll get prices and post it all up and you ppl's can make your decision from there. For it to be viable I reckon 5 sets would need to be made up, depending on the cost of the moulds.

Please confirm - is this what people want? Some sexy replica Dayz side skirts? I can confirm they look FANTASTIC on the Stagea, not too pimpy but yet not too constrained either.

Brendan

:P  :D But its going to cost me for the moulds.....  :D  :P

I'll get prices and post it all up and you ppl's can make your decision from there. For it to be viable I reckon 5 sets would need to be made up, depending on the cost of the moulds.

Please confirm - is this what people want? Some sexy replica Dayz side skirts? I can confirm they look FANTASTIC on the Stagea, not too pimpy but yet not too constrained either.

Brendan

ok ive decided ill be in for a replica set of dayz side skirts ASAP :P

i got cash and waiting, just need a rough price first :D

cheers

Brad

If I can tomorrow I'll get down to the shop and ask for a quote - but I dont see the point in paying that kind of cash ($600) for a set of moulds. Youd want 12 ppls straight away ordering a set of side skirts to make it viable.

Isnt it better for you lot (who want bodykits - Im fine, Ive got a Dayz!!) to buy a bulk lot from Japan and share the costs?

Brendan

i cant see the jap genuine sideskirts to be anymore than $400 max i reckon + postage obviously.

i think the abflug ones are $250 or so

Personally I think I would be more comfortable with a genuine (plastic) set rather than fibreglass copies. To get the ball rolling I have sent out some enquiries to the usual Japanese exporters. I will try and set up a Group Buy on Dayz and Autech body kits. I will post up the progress as soon as it comes to hand.

:D cheers :blink:

Your'e here (Adelaide) for Mallala arnt you Gary (SK)?

Maybe you might want to meet up with me somewhere in the city, I can Loan you my Dayz side skirts for you to take back to Sydney, make your moulds and skirts (Im sure you've got contacts) and then post my skirts back to me?

Yep, I will be in Adelaide for the Improved Production Nationals from 11th to 13th November. At this stage it looks like I will be flying down, not Stagea driving. But I could always load stuff into the transporter.

Let's see how the Group Buy approach works first.

:D cheers :blink:

Personally I think I would be more comfortable with a genuine (plastic) set rather than fibreglass copies.  To get the ball rolling I have sent out some enquiries to the usual Japanese exporters.  I will try and set up a Group Buy on Dayz and Autech body kits.  I will post up the progress as soon as it comes to hand.

:blink: cheers :(

Really appreciate it Sk... :D

Well done SK,

Ive been to the moulder / fibreglass maker..... COST prices as follows:

Mould per side of side skirt only: $375 per side

Fibreglass 'Dayz' copy of mould: $250 per side

So $750 to get moulds made up, and around $500 per pair (could be cheaper if a large run happens at the same time, ie 10-off may be $450 a pair).

Plus shipping and cost of packaging..... not worth it in my opinion, the first 10 ppl's would be up for around $575 a pair plus freight.

But thats an option for what I can do on my end, from a reputable company.... hope that helps somewhat.

Brendan

I want that EGZART rear bumper, front grille, and side skirts :O

EGZART side skirts are $670

rear bumper is $766

no price on the grille ;)

front bumper is ok, but doesnt suit a large front mount cooler :D

stager.gif

Edited by StageZilla

Create an account or sign in to comment

You need to be a member in order to leave a comment

Create an account

Sign up for a new account in our community. It's easy!

Register a new account

Sign in

Already have an account? Sign in here.

Sign In Now


  • Similar Content

  • Latest Posts

    • Did this end up working? Did you take some pictures?
    • And finally, the front lower mount. It was doubly weird. Firstly, the lower mount is held in with a bracket that has 3 bolts (it also acts as the steering lock stop), and then a nut on the shock lower mount itself. So, remove the 3x 14mm head bolts , then the 17mm nut that holds the shock in. From there, you can't actually remove the shock from the lower mount bolt (took me a while to work that out....) Sadly I don't have a pic of the other side, but the swaybar mounts to the same bolt that holds the shock in. You need to push that swaybar mount/bolt back so the shock can be pulled out past the lower control arm.  In this pic you can see the bolt partly pushed back, but it had to go further than that to release the shock. Once the shock is out, putting the new one in is "reverse of disassembly". Put the top of the shock through at least one hole and put a nut on loosely to hold it in place. Put the lower end in place and push the swaybar mount / shock bolt back in place, then loosely attach the other 2 top nuts. Bolt the bracket back in place with the 14mm head bolts and finally put the nut onto the lower bolt. Done....you have new suspension on your v37!
    • And now to the front.  No pics of the 3 nuts holding the front struts on, they are easy to spot. Undo 2 and leave the closest one on loosely. Underneath we have to deal with the wiring again, but this time its worse because the plug is behind the guard liner. You'll have to decide how much of the guard liner to remove, I undid the lower liner's top, inside and lower clips, but didn't pull it full off the guard. Same issue undoing the plug as at the rear, you need to firmly push the release clip from below while equally firmly gripping the plug body and pulling it out of  the socket. I used my fancy electrical disconnect pliers to get in there There is also one clip for the wiring, unlike at the rear I could not get behind it so just had to lever it up and out.....not in great condition to re-use in future.
    • Onto the rear lower shock mount. It's worth starting with a decent degrease to remove 10+ years of road grime, and perhaps also spray a penetrating oil on the shock lower nut. Don't forget to include the shock wiring and plug in the clean.... Deal with the wiring first; you need to release 2 clips where the wiring goes into the bracket (use long nose pliers behind the bracket to compress the clip so you can reuse it), and the rubber mount slides out, then release the plug.  I found it very hard to unplug, from underneath you can compress the tab with a screwdriver or similar, and gently but firmly pull the plug out of the socket (regular pliers may help but don't put too much pressure on the plastic. The lower mount is straightforward, 17mm nut and you can pull the shock out. As I wasn't putting a standard shock back in, I gave the car side wiring socket a generous gob of dialectric grease to keep crap out in the future. Putting the new shock in is straightforward, feed it into at least 1 of the bolt holes at the top and reach around to put a nut on it to hold it up. Then put on the other 2 top nuts loosely and put the shock onto the lower mounting bolt (you may need to lift the hub a little if the new shock is shorter). Tighten the lower nut and 3 upper nuts and you are done. In my case the BC Racing shocks came assembled for the fronts, but the rears needed to re-use the factory strut tops. For that you need spring compressors to take the pressure off the top nut (they are compressed enough when the spring can move between the top and bottom spring seats. Then a 17mm ring spanner to undo the nut while using an 8mm open spanner to stop the shaft turning (or, if you are really lucky you might get it off with a rattle gun).
    • You will now be able to lift the parcel shelf trim enough to get to the shock cover bolts; if you need to full remove the parcel shelf trim for some reason you also remove the escutcheons around the rear seat release and you will have to unplug the high stop light wiring from the boot. Next up is removal of the bracket; 6 nuts and a bolt Good news, you've finally got to the strut top! Remove the dust cover and the 3 shock mount nuts (perhaps leave 1 on lightly for now....) Same on the other side, but easier now you've done it all before
×
×
  • Create New...