

Smity42
-
Posts
8,085 -
Joined
-
Last visited
-
Days Won
3 -
Feedback
100%
Content Type
Profiles
Forums
Events
Gallery
Media Demo
Store
Everything posted by Smity42
-
 The healing properties of lakeside obviously aren't up to scratch
 -
lucky bugger. I guess you can use the savings to buy a battery
-
Morning Mangs work
-
For those that care: http://www.skylinesaustralia.com/forums/topic/317281-my-new-track-hack-project-alfa/page__view__findpost__p__5977852 For those that only care a little bit:
-
My New Track Hack: Project Alfa
Smity42 replied to Smity42's topic in Members Cars, Project Overhauls & Restorations
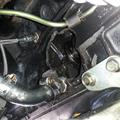
UPDATE! Yes, its been a while, looks like nearly a year since I've done anything. Slack . Anyway, progress has been happening again. First problem to solve was the alternator/belt. Basically, stock the V6 has the alternator on the drivers side, and the A/C and P/S on the passenger side, all driven by one big 6 rib belt. Problem is, if you remove the A/C and P/S, and leave the alternator where it is, due to the location of the tensioner there is no way to route the belt and make it work. So I set about modifying the bracket to sit the alternator on the other side, where the A/C used to be. Used one of the original holes and had to drill 2 more and then grind them out enough to get a socket on: Alternator then bolted up (after shortening the studs, as they were way too long) and I was hoping that there would be enough adjustment on the bracket to set the pulley in the right spot for the belt. Unfortunately, even with it as far forward as it would go, it didn't line up : A bit of grinder love and some nuts acting as temporary spacers, and that issue is sorted: Used some masking tape to try and determine approximately what length belt I need, the tensioner applies force in the direction of the arrow: With the tensioner at min adjustment the length of tape was 1250mm, at max it was 1315mm. Thoughts on what belt length to try? I am thinking maybe 1280 or 1300... Next problem was engine mounts. You can see in some of the pictures above 3 studs in a triangle pattern on the block, this is for the RWD engine mount brackets, amazingly still on this block even though they haven't made a RWD car in 20 years or something... I got some brackets to suit, but the next problem was the rubber. The alfa engine mount rubbers are: A) expensive (nearly as much as Nismo engine mounts) B) Really weak, and known to break all the time c) Would not work without modding anyway, since my shell suits the 4 banger motor. Dan_B suggested trying to make RB30 mounts work, since they are readily available for test mounting, and if they do work I can get some Nismo ones for added strength. Here's a shot of an RB30 rubber on the alfa bracket: What's the cardboard for? Well, the mounts in the engine bay look like this: I had another bit of cardboard that goes on like this: The idea being that the stud in the 30 mount will go into that hole, then we would just sit the engine in position and tape the two bits of cardboard up, which would give me a template for cutting a steel plate... So anyway next the sump had to come off, because it doesn't fit past the crossmember/steering rack: Bellend attached to the engine: The compliance bush in it was shagged, so I filled it with sikaflex for the purposes of test mounting the engine, but it seems to have worked really well. I think when I get the replacement bush I will fill the gaps in it with sikaflex too, to help reduce movement: Time to stick it in: The first snag we hit was that the studs on the engine mounts were catching, preventing the engine from going back far enough. So I cut them down: That helped, and then we discovered that the holes in the rear engine mount did not seem to be wide enough apart for the studs it had to go on... seemed the studs were a bit bent. A bit of love with a pry bar sorted that out. The engine was o so close to going in, but not quite: The holes in the body were just not quite in the right spot for the stud/nut on the RB30 engine mounts . So, grinder time again: These cuts still need to be tidied up... but for today it was good enough. Success! A couple of new problems to solve now... 1) The alternator does not fit: I suspect hammer love will solve this... 2) If the engine mounts are mounted at 90deg to they way they are in a 31 like this: You can put a nut on the bottom stud, but there is no way to get a bolt into either of the top holes. If the engine mounts are mounted the proper way like this: Again you can get to both bottom studs, and you can get to the top hole on one side but not the other. Basically on that side we will need to weld another nut in behind the mount (marked in red). But then both will be holding the mount from the same side, so we will have to put a second on in the opposite corner as well (marked in blue). Then she will be apples: So that's pretty much it. Took some measurements to figure out how much the sump has to be cut up to fit, but I will double check them once the engine is mounted in properly. Oh also, Dan informs me the engine looks like it has been rebuilt before... and the rods have been balanced... -
Ahh sorry Noel. Next time try to get close enough that I can see you in the rear view, and I'll let you past.
-
of course *raises hand*
-
believe what you want. I'll upload some pics soon, and see if I can find my build thread and update it... P.S. Yes happy laps was suitably awesome
-
Yeah was a great happy laps mildly moist conditions FTW MMmmmm I thought they were a bit quick, especially on the straights. Fortunately they let us past eventually Looked like rolling grid starts for a few laps there onto the straight, the two evo's would line up side by side and go for it, and Dave and I would do the same behind them
-
so, a certain vehicle may have made it's way into my garage today, where it may have had a certain engine put into it
-
Aaaaaannnnnnd phone has cleared customs in Brisbane F*ck UK customs.
-
Morning Mangs, Happy Laps today
-
go to autobarns, get a "supercharge gold". http://www.supercharge.com.au/products_auto_gold.php Pretty cheap, pretty awesome. 3 year warranty. Can't go wrong.
-
I am officially too drunk to drive the nurburgring in a belntey speed 8 racecar
-
P.S. F*ck work
-
Lucky Bugger! I try not to go out too often, but sometimes it is unavoidable. e.g. Cricket, Motorsport, not being a lamer, etc.
-
I has aircon in most rooms, just not the garage Also, air con does not work outside
-
Lol, true. I wholeheartedly agree with this statement in its entirety. Where were you last night?
-
mmm the only problem is summer season will be farking hot
-
Morning Mangs TFIF
-
Baskin Robbins Chappel Hill. From 7:30PM. Pants optional.
-
Might be late tonight... still working
-
It's only hit single digits once this year
-
The healing properties of a BnR meet are almost as good as a day trip to QR hospital.
-
Morning Mangs TFIT. Who's in for ike's cream tonight?
