Blk33
-
Posts
181 -
Joined
-
Last visited
-
Feedback
100%
Content Type
Profiles
Forums
Events
Gallery
Media Demo
Store
Everything posted by Blk33
-
Have updated part 1, Will do part 2 and part 3 over the weekend.
-
Updated thumbnails into article. Looks like the old images had dissappeared! Cheers
-
Hi JimX I wouldn't suggest using the Olil Cooler setup to feed the turbo with oil! If you do, remember the oil pickup for the turbo on the engine block has a very small hole in it. This is to meter the correct amount of oil fed to the turbo bearings. You will have to fabricate a fitting. Cheers
-
Feedback on the R33 Group Buy My R33 GTST came from Japan with teeth shattering hard suspension. In an effort to soften the ride for Melbourne’s roads, 18 months ago I bought a set of Whiteline springs. The softer springs certainly helped the ride but the Apexi shocks fitted were way too stiff for road use (even on setting 1 of 1 to 10). I have been looking round for quite a while for a decent set of shocks. A few weeks ago I saw the SK group buy for the R33, so I thought I would give the Bilstein shocks a go. I checked with SK and I was advised the new shocks are valved for the Whiteline springs. No need for additional springs. I fitted the shocks yesterday and I would like to provide some feedback for other interested members. 50 KPH side streets Old Settings - Stiff New Settings - Choppy Comment - Could be better Highway cruising Old Settings - OK New Settings - OK Pot Holes Old Settings - Teeth rattling New Settings - Fantastic Comment - Stiff but good Blackburn Railway Crossing Old Settings - Teeth rattling New Settings - Fantastic Comment - Stiff but good Speed Bumps Old Settings - Teeth rattling New Settings - Fantastic Comment - Stiff but good All areas so far has been an improvement. Every time I venture from home I have to cross the railway line at Blackburn. The car now glides over the crossing, not as compliant as my XR6 but quite acceptable. The same goes for speed bumps that are everywhere in Melbourne, slow down to 40 – 45 KPH and over we go. The only area is travelling at 45KPH round the backstreets where the ride is what I would describe as choppy. Seeing the car has an empty tank of gas, I am expecting the ride will improve with a full tank of gas which will add extra weight over the rear wheels. Anyway I can live with that for the increases elsewhere. SK, thanks for organising the group buy. Anyone want to buy a set of Apexi shocks? – maybe good for drifting! Cheers Rob
-
Hi SK, Have PM re order for shocks and stops. Cheers
-
Hi SK, My R33 GTSt was originally imported from Japanese with modified suspension (very stiff) I bought a set of Whiteline R33 springs which softened the ride. It is still way too hard! – (Apexi shocks set on the softest setting) Will the valving you have the Bilsteins set to be suitable for the Whiteline springs I currently have fitted? (are these the one you use in the kit?) (73175F 83139R) What sort of external adjust is there with the Bilsteins? Bump Rebound. Cheers Rob
-
Standard pump works quite OK.
-
Gallery - Uploading Images
Blk33 replied to Blk33's topic in Site discussion - including Ideas/Feedback & Bugs
Uploading is working for me. Cheers Funkymonkey! -
My Personal Gallery
-
-
From the album: Blk33's Gallery
-
From the album: Blk33's Gallery
-
Get rid of that weak little horn in your R33
Blk33 replied to cheek's topic in Tutorials / DIY / FAQ
I used Volvo horns! -
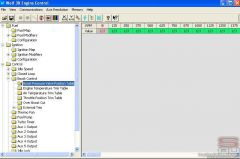
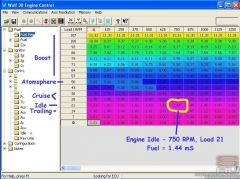
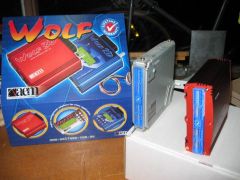
Part 3 - FAQ What does the ECU Look Like? From left, Wolf box, standard ECU and Wolf on the right How much does the Wolf ECU Cost? I chose a Wolf3D PlugIn for R33 GTST at around $1395 from suppliers Where is the Wolf 3D Plug in available from? The Advanced Engine Management web site has an up to date list of suppliers in all states; http://www.wolfems.com.au/company/dealers/australia Support? Support is supplied by the factory at Advanced Engine Management web site: http://www.wolfems.com.au/home You can download the laptop software; print comprehensive manuals get updated technical bulletins. E-mail support is also provided by the manufacturer. Ease of Installation? Not easy – complex! Manuals provided are very extensive but additional expertise is still required by the installer. If you want to do it yourself, find a good supplier that will provide additional support for you. See part 1 for ideas on installation complexity. Does the ECU work on Autos? I believe the Wolf will only support manual transmissions. There is no provision to provide information for the automatic gearbox. What is the Wolf Resolution? Maps for fuel and timing, 16 load bands by 125 RPM steps up to 15,000RPM How is the Wolf Tuned? Tuning is achieved by a Hand Controller or by software loaded onto a laptop computer. The software can be down loaded from the manufactures web site. It is free and no software keys are required. Any one can download it and try it. I had a spare laptop, so I chose to use the laptop method of tuning. The base fuel and timing is calculated by the engine RPM and engine load at each location. These are then changed by numerous other modifiers such as engine temperature, air temperature battery voltage etc. Picture of Wolf screen on the laptop The X Axis is RPM, and the Y Axis is the engine load. I have shown 5 areas or bands on the Y Axis, Trailing throttle, Idle, Cruise, Atmosphere and Boost. Load band 93 represents about 12 psi boost and load band 107 would represent about 20 psi boost. In the example shown above, the engine is idling at 750 RPM with a load of about 21, thus the fuel injectors would be open for 1.44mS. Ignition timing is calculated in a similar way. The Wolf comes from the factory with a safe base map for the ignition and timing. You will need to find someone who can tune the ECU for you on a dyno. Martin at EFI Hardware did the initial dyno tuning for me. http://www.efihardware.com He downloaded a work in progress map to start dyno tuning with. This kind of assistance saved heaps of time and money. From there, one to two hours on the dyno will have the tuning pretty close to optimum. After the Dyno, what then? 1. Cruise Loads The basic cruise loads were done on the dyno and were relatively easy to map. I was keen to ensure the air fuel ratio was at 14.7 to ensure good fuel economy. I have since driven thousands of kilometres (maybe a few times) up and down Melbourne’s Eastern Freeway over the last year. I load the engine in the cruising range at each RPM and adjust the air fuel ratio for 14.7. Now finished, at any load in the cruise range between 2000 and 5000 RPM the air fuel meter sits around 14.7. On a trip with the occasional overtaking I can easily see 500 to 600 Km out of a tank of gas! 2. Starting Starting was easy after I read the manual many times as there are many options. The engine now starts very easily in Melbourne’s current cold weather of 5 degrees and also on 40 degree plus days in summer. 3. Idle Idle tuning has been the most difficulty for me to get right. It appears it is difficult to get this right with a MAP sensor. People have suggested I remove the MAP sensor and go back to the mass air flow sensor which will measure the engine load more accurately at idle (maybe another day). It appears when addition light load is added to the engine by way of the alternator, under some certain circumstances the engine will hunt. For example if you turn on the parking lights, fog lights, heated rear window or maybe the air conditioning etc, the load on the engine will change, and the fuel demand changes. Anyway I now have a nice compromise with the air fuel ratio set about 12.5. As the load increases I enrich the fuel slightly. What do you use to Tune the Wolf? As part of my obsession to get the tuning of the ECU better than the original ECU, I purchased a Tech Edge Air Fuel meter. http://www.techedge.com.au/vehicle/wbo2/ This uses a wide band oxygen sensor which updates at about 5 samples per second and allows accurate measurement of the Air Fuel Ratio. I had anticipated using one of these before I fitted my dump pipe and had a suitable bung fitted. This took all the guess work out of tuning the engine. What are the Nice Features? Laptop interface, lots of adjustments, easy to use, save or reload your maps. You can purchase a hand controller at additional cost and use this instead of the laptop. MAP sensor on board to 20 PSI Boost Control – Programming boost solenoid bleed value every 125 RPM Diagram showing Boost Pressure Value Over boost limit Rev limiter Thermo fan control Spare outputs and inputs And more! 11 Sept 2005 Images updated. 13 May 2006 Images updated again Cheers
-
Gallery - Uploading Images
Blk33 posted a topic in Site discussion - including Ideas/Feedback & Bugs
I don't seem to be able to upload images. I had to login to the Gallery again but I loose the ability to UPLOAD. I think the user name after I login is Unregistered. Any help would be appreciated. Cheers -
The Wolf web site is a good source of data. http://www.wolfems.com.au/home If you view the Installation Manual, page 27 gives the pin outs for the temperature sensor. A Delco temperature sensor is used. I bought my Wolf through Steve Newing at EFI Hardware. http://www.efihardware.com/ I'm sure he would ship one up north if you wanted. Cheers Rob
-
Check out mounting http://www.skylinesaustralia.com/forums/sh...ead.php?t=82100
-
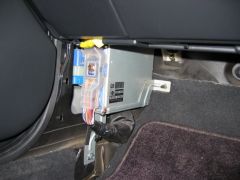
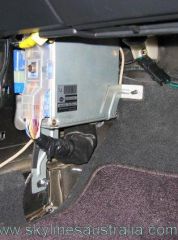
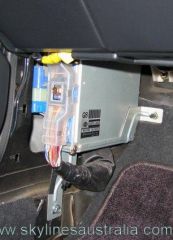
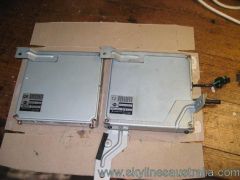
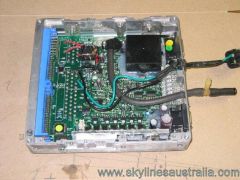
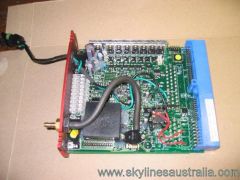
Part 2 - Mounting Up until now, the ECU has had its first dyno run and tuned by EFI Hardware. The car has been running well and I have continued to play with adjustments with the software to make it drive better. At this stage the Wolf ECU had been sitting on the floor on the passenger side. Not a good long term prospect! I tried several ways to mount the Wolf into the space where the original ECU came out of. In the end I decided the Wolf case was much deeper than the original ECU and because of this, I would continue to have difficulty in replacing the kick panel. I really wanted to keep the car looking standard in all aspects as possible. One day while looking through for sales in SAU, I notice a cheap ECU box for a R33. This gave me an idea; maybe the Wolf ECU printed circuit board (PCB) would fit into the standard ECU box. Some rough checking of the sizes of each PCB indicated it may fit. I duly purchased the standard ECU from Queensland and started disassembling the original case and PCB to see how I could fit the Wolf PCB. Wolf PCB removed from its case I decided to glue four plastic mounting brackets to the back lid of the old case and then slid the Wolf PCB into theses brackets. The back lid was then screwed to the chassis. In order to do this, I had to file a substantial amount from one end of the aluminium case where the Wolf connectors and indicator leds sit. I then fabricated a piece of thick aluminium between the case and the Wolf PCB output transistors so the case would act as a heat sink. The Wolf PCB required a little trimming in one corner, and a little trimmed from the rear lid as well. Wolf PCB mounted into old ECU case A little insulation tape in the right place just in case the PCB moved, mounted the top lid and wallah! Newly assembled Wolf with the lids on (Wolf on the right) Mounting the new Wolf ECU box is now as easy as mounting or removing the original box! Finished and installed, only the kick panel to go. Which one is the Wolf? Would I do it again? I don’t think so!
-
From the album: Blk33's Gallery
-
From the album: Blk33's Gallery
-
From the album: Blk33's Gallery
-
From the album: Blk33's Gallery
-
From the album: Blk33's Gallery
-
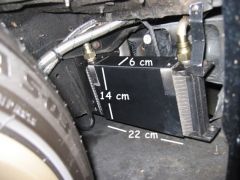
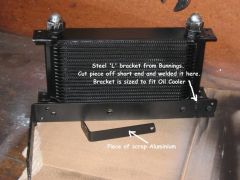
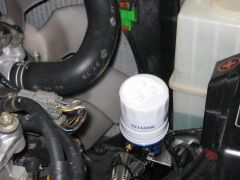
For road use and the occasional blast the standard oil cooler attached between the sump and the filter on the RB engines (don't know about the S15) is quite satisfactory. For track use though, you will need an oil cooler as your oil temperature would be exceeding 130 degrees C (260 degrees F) after a couple of laps. Sounds like an easy job to replace the sump on the S15, I know the VL with the RB motor is a B...... job to change the sump. Cheers
-
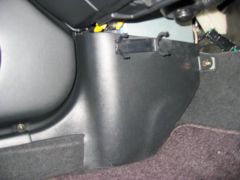
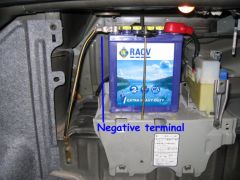
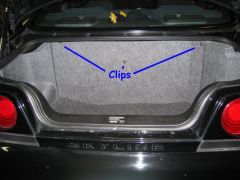
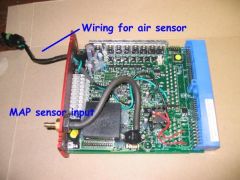
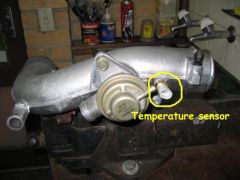
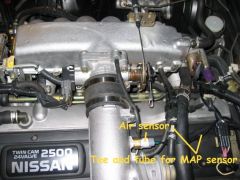
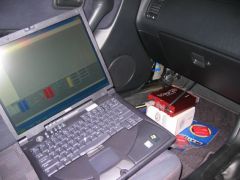
** Have updated lost Pictures ** Part 1 The Wolf R33 ECU GTSt plug a play version allows one to pull out the old ECU and plug in the new ECU… well almost. A few decisions have to be made prior to the installation. 1. Air flow sensor or internal map sensor? - I chose to use the internal ECU map sensor which allows the removal of the air flow sensor which will eventually limit power levels. 2. Air temperature sensor has to be mounted if using a map sensor. – Where to locate it? 3. Adjustable boost controller valve controlled by ECU? – I chose to the use the ECU boost controller which meant I could remove the bleed valve. I had to upgrade the valve size. The standard ECU is shown on the left and the Wolf on the right Air Temperature Sensor Installation into Pipe The Wolf requires an air temperature sensor to be fitted. Rather than drill holes in my standard intake pipe, I purchased a second hand pipe. This allowed fabrication in preparation before installation. Temperature sensor mounted into intake pipe The intake pipe was drilled, tapped and air intake sensor fitted to the intake pipe. I chose a location near the blow off valve as the pipe has a thicker ridge. Temperature sensor installed into the car, you would hardly notice it. While I was installing the intake pipe, I also made a two-wire wiring loom for the air temperature sensor. I cut the hose to the blow off valve, inserted a tee piece, and ran a tube through the firewall along with the temperature sensor wires for the ECU later on. Modifications to Wolf ECU board The notes supplied with the Wolf ECU showed the temperature sensor mapped into a spare pin on the wiring loom. I chose not to do this but to cut tracks on the WOLF ECU and hard wire the temperature sensor via a plug and socket directly into the new ECU. I did this so I could plug the standard ECU back into the wiring loom at any time. Note green and back wiring loom for temperature sensor and hose for map sensor Time to fit the Wolf ECU Most manuals suggest the vehicle battery is disconnected before any attempt at removing the ECU. Disconnecting the Battery The R33 has it’s battery in the boot. Remove the back cover, which has 3 clips holding it in place. Usual practice is to remove the negative terminal first (left terminal). Removing ECU Once the battery is disconnected it is time to remove the ECU from the passenger kick panel. Remove nut holding the kick panel in place and remove the kick panel. Once the kick panel is off, remove 2 nuts on the firewall and lower sill. To remove the wiring loom use a 10mm socket and ratchet, as the bolt unwinds, it will lift the loom connector out with it. Attaching the Wolf to the Wiring Loom The Wolf has some nice features like a MAP sensor which replaces the mass airflow sensor. This means no upgrades are required later on when you increase the power output of the engine. As previously mentioned the tube from the manifold and the air temperature has already been fed through the firewall. Attach these along with the wiring loom to the Wolf. Another nice feature of the Wolf is it interfaces to a laptop computer Picture shows the Wolf on a box attached to manifold hose, air sensor, R33 wiring loom and the laptop First Engine Start At last it is ready to start the engine. The Wolf comes with base mapping tune that is very rich and does not have much timing advance. Turn the ignition on, ensure the lights on the Wolf ECU light up. Listen for the fuel pump that should run for about 2 seconds and then turn off. Assuming the Wolf software has been loaded onto the laptop, connect the cable and synchronise the Wolf with the laptop. A quick check of the laptop software should show maps for fuel timing etc. A fair amount of time was required to get a good feel for how the software works. My engine took quite a bit of cranking before it started. When it kicked, it started and then stopped. This went on a few times and finally by pumping the throttle feverishly the engine started. Once I had started the engine and warmed it up a little, the engine would start OK. A short drive revealed the base maps quite adequate but it definitely required tuning. Boost Controller Solenoid Martin recommended the boost solenoid be replaced with a larger boost solenoid that can control the air bleed function better than the original solenoid. Solenoid supplied by EFI Hardware mounted on the standard frame and wiring plug attached. Tuning A few weeks later I had the engine tuned by Martin at EFI Hardware. Martin dyno tuned the engine after loading a tuning map he had previously used. Following this tune, the car was transformed and turned the rear wheels at about 180kW with about 12psi boost. I must say I have spent the last year fine tuning the drivability of the car; starting, idle, with air conditioner on and off, lights etc. All these seem to affect the idle characteristics. It is still not as good as the original ECU in those respects but it is pretty good. Part 2 - Mounting and Part 3 - FAQ See below in this thread
-
From the album: Blk33's Gallery