


Blk33
-
Posts
181 -
Joined
-
Last visited
-
Feedback
100%
Content Type
Profiles
Forums
Events
Gallery
Media Demo
Store
Everything posted by Blk33
-
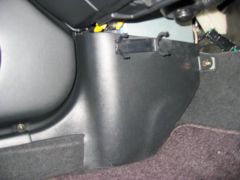
From the album: Blk33's Gallery
-
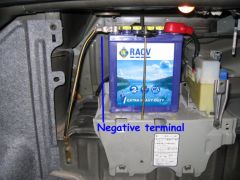
From the album: Blk33's Gallery
-
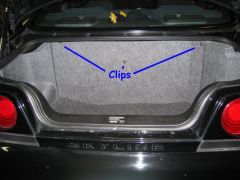
From the album: Blk33's Gallery
-

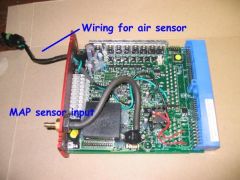
From the album: Blk33's Gallery
-
From the album: Blk33's Gallery
-
From the album: Blk33's Gallery
-
From the album: Blk33's Gallery
-
From the album: Blk33's Gallery
-
From the album: Blk33's Gallery
-
Cold weather covers added to article!
-
From the album: Blk33's Gallery
-
 Great KITs! See http://www.skylinesaustralia.com/forums/sh...ead.php?t=79130 for installation ideas. Cheers
 -
Have updated Oil Filter types in the article. Z160 or a physically larger style Z30 can be used.
-
That is a great idea Packy. I wondered about cuting the hoses and a adding a few more 45 deg bends. With the option of cutting the hoses and adding 45 deg bends, you could mout the filter upside down in another location on the strut tower. Do you know what PIRTEK charge per cut? Look forward to your photos.
-
I have a as new Turbo Smart Gated Boost Control Valve for sale, FG-GBCV-BT. The boost controller was used for 2 months before I fitted a Wolf ECU with its own boost controller. Asking $75. Cheers
-
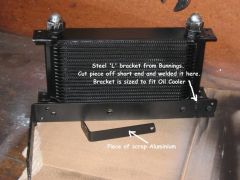
The bracket I chose fom Bunnings was the biggest that I could find. I had to cut a piece off and weld it to the long end.
-
From the album: Blk33's Gallery
-
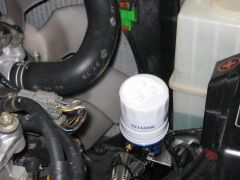
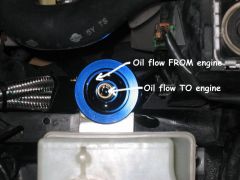
Spin on engine adapter just like the oil filter. It has 2 'O' rings on the adapter to seal it.
-
I agree loosing the oil when the filter is removed is a pain! The oil filter holds oil up to the top of the threaded section the filter attaches to. Thus when the filter is undone a cm or so of oil in the filter goes everywhere. I just wraped a rang around the the filter to catch it all. Mounting the filter upside down would not pose any problems, just where to fit it! The braided hoses are difficult to work with. Post up addition locations to mount the filter when you get your bits.
-
Adjustable cam gears question???
Blk33 replied to yoga-serega's topic in Suspension, braking, tyres and drivetrain
Check out http://www.skylinesaustralia.com/forums/sh...ead.php?t=73824 Cheers -
I have used the A/F meters from Tech Edge http://www.techedge.com.au/. They have a link to their A/F meters http://www.wbo2.com/ I bought mine 2 years ago and it has performed very well. I have used it to tune the Wolf ECU in my car. I added an extra bung (into the dump pipe) next to the O2 sensor and additional sensor sits there quite happily. I have run a cable into the cabin so I can see the A/F ratio. Cheers
-
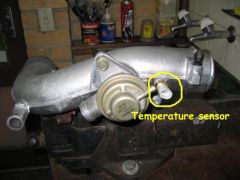
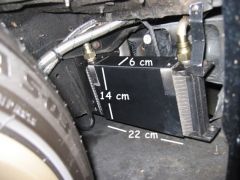
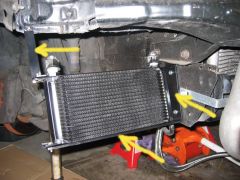
For normal driving around town the standard heat exchanger fitted between the engine and the oil filter is quite satisfactory. However, 3 or 4 times a year I take the car to Sandown or Calder raceway for a blast around the track. I remember running around Philip Island a few years ago with a mate in his R32 GTR on a mild day. Three or four laps of the track at wide open throttle (WOT) was enough to raise the oil temperature to over 130 degrees C and activate the oil temperature light. Three or four laps of Philip Island represents over 8 minutes of the engine under full load at WOT. This cannot be duplicated on normal roads for obvious reasons. Last March I ran the car at Sandown and the air temperature was 32 degrees. I figured 2 or 3 laps flat out would be enough to boil the oil! I didn’t have an oil temperature gauge fitted at that time but I imagined the oil would be very hot. Another factor to take into account is the engine is developing 220kW at the rear wheels, which means about 250kW at the engine. Thus an increase in power developed by the engine from 170kW to 250kW must transmit the extra heat somewhere! Oil Cooler Kit I purchased an oil cooler kit from Hong Kong over the internet for $400 delivered. It also came with a remote oil filter mounting which was an added bonus! Kit on the bench after it arrived Fabrication the Mountings Where to mount the oil filter and cooler? The reinforced hoses that came with the kit are way too long for the R33, thus a compromise on location for the cooler and remote filter had to be found to make the installation easy. For obvious reasons the cooler should fit in the driver side guard, near the vent on the series 2 front bar. First step was to remove the front bar. I fabricated an ‘L’ shaped steel bracket from my favourite shop – Bunnings. I also mounted an aluminium support bracket for the right hand side of the cooler. Trial mounting showing L shaped bracket and additional support bracket made from aluminium. (Front view) Trial mounting. (Rear view) Oil Temperature Sensor Mounting One of the objectives of the exercise was to reduce the engine oil temperature, but what was it? I had previously fitted a VDO oil temperature gauge, but I lacked a suitable place to mount the sender! I took this opportunity to mount the temperature sender in the remote oil filter adapter. It has two bungs for such a device. The thread was different, so I had to re tap the hole with the correct tap. Remote oil filter with temperature sender fitted. Remote Oil Filter Mounting I looked and looked to find a suitable position to mount the remote filter taking into consideration the length of the hoses and I wanting the hose installation to look like a professional installation. I have seen many filters mounted near the driver side strut tower. Unfortunately the hoses are way too long for this. I found a suitable place down on the front chassis rail near the radiator and below the windscreen washer tank. This location, if you look carefully has two blind 6mm nuts attached to the chassis rail. I don’t have to drill any holes – beaut! I quickly made a bracket, now for the hoses. Fabricated bracket attached to oil filter Remote oil filter location Attaching the Hoses Remove the oil filter from the engine and attach the engine adapter. Make sure the two ‘O’ rings are in place. I used a little grease to hold them in place. Take note of the orientation of the engine adapter hose connectors, check the markings, inner and outer, this orientation will be required later. Outer is for the outside of the filter, and the other is the inner of the filter (threaded section). The oil from the engine is pumped through the outer of the engine adapter, through the remote filter outer (small holes with rubber one way valve), across the oil filter element to the inner threaded section of the filter, then to the cooler and returned to the engine via a long hose to the inner threaded adapter on the engine. If the hoses from the engine adapter are on the wrong way, the one way valve in the oil filter will prevent oil circulating through the filter and cooler. Take note of the orientation before you mount the adapter. By the way the standard oil filter will not fit the new remote adapter because a different thread is used to attach the oil filter. An oil filter for a Commodore V8 will fit – Z160. I also sourced a Z30 which is physically larger filter and has a larger filter element. I will upgrade to the Z30. The installation of the hoses and attaching them to the fittings is a slow and time consuming job. Oil filter removed and the engine adapter mounted Hoses attached to adapter Oil Cooler in place with hoses attached Finished item from front of the R33 Starting the Engine for the First Time Most likely the oil will require topping up with the addition of the oil cooler. Firstly, oil has been lost by removing the oil filter and we have now added addition hoses and cooler capacity that all requires to be filled with oil. Take this opportunity to do a complete oil change while the filter is off. Any way I estimate you will need about 4.8 litres of oil (a little left in a 5 litre container). Disconnect the ignition wiring loom on top of the rocker housing at the rear of the engine. We don’t want the engine to start just yet. Now remove the new remote oil filter if you have fitted it. Crank the engine for a few seconds until you see oil appearing at the remote oil filter housing. Remember the oil must appear around the outer gallery of the oil filter housing. If it comes out of the centre gallery, you have he pipes connected to the engine adapter the wrong way round. It is most important to get this correct before you go any further. Oil should appear from the outer gallery If all is OK, attach the new oil filter and start cranking again. This time we are cranking the engine to fill the new oil filter, the hoses and the oil cooler with engine oil. Keep cranking the engine until the oil pressure light goes out and the oil pressure gauge shows a reading. It is now safe to start the engine. Reconnect the ignition wiring loom and start the engine. Make sure you have oil pressure and this time check for oil leaks around the fittings. Once the engine has warmed a little, check there is heat in the new oil filter and the oil cooler should be getting warm as well. If these are not warm or hot, you still may have the oil flowing the wrong way. For normal driving in the cooler months I have fitted a cover to the oil cooler to stop airflow through the cooler fins. The engine oil temperature sits at about 70 degrees once warmed up. I am interested in what temperature the oil rears on the track now. Cold Weather Covers Melbourne’s winter is 10 to 15 degrees, so I figured oil cooler covers would be appropriate while the car is not on the track. I wanted covers that were easy to install and remove. I formed 2 pieces of aluminium in an ‘L’ shape to make a front and a rear cover. The size was 220 x 140 and 60 deep. The front cover has 2 additional brackets pop riveted to them to hold both covers in place. To install, I hold the rear cover in place and slip the front over to hold both in place. Cold weather covers in place Good luck! Updates: Oil filter types Oil capacity Cold weather covers Updated thumbnails into article
-
From the album: Blk33's Gallery
-
From the album: Blk33's Gallery
-
From the album: Blk33's Gallery


