
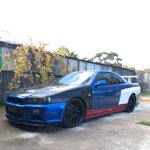
Got My Volk Rays Fzero Rims! Need Help Chaging The Colour

Announcements
-
Similar Content
-
-
Latest Posts
-
 Agreed, I've never seen a 260RS specific manual. As GTSBoy said it will mostly be stagea other than the engine loom https://www.hgeconsulting.com.au/stageaservicemanual.pdf
 -
 You'lll likely have to make do with R33 GTR for engine/tranny stuff, and Stagea for the body. I don't know that there's even been an actual diagram seen in the wild.
 -
 Haha, i kow right? Could have bought so many cars for the same amount of money (or less) but driving Unicorn gives you at least +1mln to style 😅. Like wise man said "life's to short to drink cheap wine and drive boring cars" 😉
 -
 Newbie here, proud owner of an Autech 260RS. I'm on the hunt for wiring diagrams specific to the 260RS, particularly S1. I've ran my eyes through R33, R34 Diagrams, there are some similarities, however continue to find incorrect wire colours and pins on connectors in the 33,34 diagrams. I was hoping someone could point me in the right direction? I'd be happy to pay for the originals in Japanese. I can translate them, at least they would be accurate. Any help please would be greatly appreciated, never heard an RB26DETT before let alone driven one, and I've got a spaghetti monster of goodness to sort out. Cheers Benny
 -
 Hey all im wondering if you can help me please I have put a rb20 box in my r34 gtt as my auto packed up and a friend had a spare box I know it’s not ideal but it will get me up and running for now. we have done the conversation and everything is working great but my Speedo we got a s13 speed sensor but my Speedo reads double now and I bought a speed converter but still not having any luck. so I thought I’ll reach out and pick your brains any help would be appreciated please as I wanna drive my car again
-


Recommended Posts
Create an account or sign in to comment
You need to be a member in order to leave a comment
Create an account
Sign up for a new account in our community. It's easy!
Register a new accountSign in
Already have an account? Sign in here.
Sign In Now