Jump to content
SAU Community

Recommended Posts

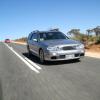
Hi all, considering selling my stagea,

1999Nissan Stagea WGNC34 25T RS-FOUR V

FactoryOptions

· RB25DET NEO (92,000Kms)

· 5-speed Manual (Exeddy 5PUK Button Clutch,Nismo Slave)

· Leather Seats

· Xanavi System (TV, GPRS, Climate)

· Twin Sunroof

· Tinted Windows (Darkest Legal)

· Tow Bar (2000Kg)

· Xenon Headlights

· Rear Cargo Blind

· Rear Cargo Net

· Rear Cargo Rubber Matt

· Dayz Kit (minus front bar)

· N/A Grille

· Nissan MOMO Steering Wheel

· 5 Piece Floor Matts

· 3 Keys/ 2 Alarm Remotes

· M35 Rear Window Wiper

After-MarketEngine Mods

· HKS 25/35 Turbo (Braided Lines, whole setup 10,000ks old)

· Head Porting/polishing

· 620CC Siemens Deka Injectors

· Z32 AFM

· Turbosmart Kompact BOV (Recirc)

· Apexi Power-Intake Pod (solid intake)

· R33 4pot (F) 2pot ® Brakes

· HEL Braided Brake Lines

· Tomei Short Shifter, Apexi leather knob

· G-Square White Dash background

· R32 GTR Front Seats (comes with stock leather seats also)

· Jap brand Rear Spoiler

· Drift Tek 17x9.5+15 (225/40/17s streched on with 90% tread)

· Tein Type CS Coilovers (height/damp adj)

· ISC Rear Camber/Toe Arms

· Apexi Front Strut Brace W Brake MasterStopper

· SUSTEC Gearbox Tunnel Brace

· GTR Rear Strut Brace

· Nismo 24MM Solid Front/Rear Swaybars (polyuthbushes throughout)

· Polyuth Steering Rack Bush

· Greddy Profec specb EBC

· Nisstune ECU

· 3" Turbo-Back Exhaust (with DECAT)

· Nismo clear Indicators

· Pioneer IPOD headunit

· ADVAN FMIC

· Splitfire Coilpacks

· Front and Rear Eye brow/lightcovers

· Walbro 255L/PH Fuel pump

· Big Alarm

· Autometer Cobalt Boost Gauge

Car was imported in 2009 instock form at 80,000kms (I am 1st Aus owner) Engine was Re-Built byLEWIS ENGINES late 2010 due to timing belt issue. Head was ported and polished,Manual Conversion (r32 GTR Gearbox),Timing belt was all done at the same time.

Motul Chrono 300V engine oil(changed at 5k intervals, with magnetic sump plug)

Car made 220AWKW and 260RWKWOn the turbotune dyno at 16psi (3000rpm)

Full inport papers/auctionreport

Fully Rego/complied

Many stock parts andreceipts come with car

might be keen on the following swaps, evo 9, v35, some form of thug Cube! (v35 would need to be manual, premium edition...)

asking 25,000 ONO seeing as ive spent a tad over 20 on her this year :'(.... will be willing to negotiate removal of certain mods to lower price

located in adelaide

email [email protected]

much more to say, ring for info.

Adam: 0400099986

post-47249-0-08911000-1298852917_thumb.jpg

post-47249-0-13745300-1298853337_thumb.jpg

post-47249-0-75872900-1298853658_thumb.jpg

post-47249-0-83900500-1298853690_thumb.jpg

post-47249-0-91736900-1298853855_thumb.jpg

post-47249-0-86959200-1298853904_thumb.jpg

post-47249-0-82751100-1298853941_thumb.jpg

post-47249-0-01233900-1298854056_thumb.jpg

post-47249-0-83451700-1298854172_thumb.jpg

post-47249-0-01531800-1298854224_thumb.jpg

post-47249-0-47495600-1298854267_thumb.jpg

post-47249-0-32041900-1298854336_thumb.jpg

post-47249-0-58484500-1298854498_thumb.jpg

post-47249-0-51929200-1298854531_thumb.jpg

Edited by chef_stagea
Link to comment
https://www.sau.com.au/forums/topic/355509-modded-dayz-manual-s2-stagea/
Share on other sites

Hi chef

can I interest you in a vr commy,terrible condition brown paint,badly worn brakes and the roof lining falling down?

I'd have to ask for some cash my way of course

you have my number,call me to discuss a deal

thanks

forgot to mention.... car has 330NM of torque... and fullboost is there as low at 3000rpm!. its a seriously zippy thing! will be willing to help out with interstate buyers if need be!

  • 2 weeks later...

gtr seats have been removed and replaced with the OEM stock leather electric seats...

also 4 brand spanker slotted RDA rotors are on there way along with new QFM brake pads! (just under $1000!!)

offers must be quick... or demod will begin

  • 2 weeks later...

wheels sold

rubber matt sold

rear strut brace sold

front brace sold

the new pads and rotors i had are also gone. (current ones still very meaty)

splitfire coilpacks sold

new price as is minus whats been mentioned above

$22750

21750 with no coil overs ??

Take off 2.2k and ill take off turbo, inj. Z32 and ecu and replace with stock bits!!

Take off swaybars for another 300!

Take off 400 for brakes!

Oh and offers on bits r welcome i

Guess!!

Good luck with the sale adam

One of the most Super clean,well maintained,tastefully modded and proper fast stagea for sale at the moment

If id have had these mods and the look of mine (rip) in one car id be a very Happy dude

Rodders xoxo

Guest
This topic is now closed to further replies.


  • Similar Content

  • Latest Posts

    • From there, it is really just test and assemble. Plug the adapter cables from the unit into the back of the screen, then the other side to the car harness. Don't forget all the other plugs too! Run the cables behind the unit and screw it back into place (4 screws) and you should now have 3 cables to run from the top screen to the android unit. I ran them along the DS of the other AV units in the gap between their backets and the console, and used some corrugated tubing on the sharp edges of the bracket so the wires were safe. Plug the centre console and lower screen in temporarily and turn the car to ACC, the AV should fire up as normal. Hold the back button for 3 sec and Android should appear on the top screen. You need to set the input to Aux for audio (more on that later). I put the unit under the AC duct in the centre console, with the wifi antenna on top of the AC duct near the shifter, the bluetooth antenna on the AC duct under the centre console The GPS unit on top of the DS to AC duct; they all seem to work OK there are are out of the way. Neat cable routing is a pain. For the drive recorder I mounted it near the rear view mirror and run the cable in the headlining, across the a pillar and then down the inside of the a pillar seal to the DS lower dash. From there it goes across and to one USB input for the unit. The second USB input is attached to the ECUtec OBD dongle and the 3rd goes to the USB bulkhead connected I added in the centre console. This is how the centre console looks "tidied" up Note I didn't install the provided speaker, didn't use the 2.5mm IPod in line or the piggyback loom for the Ipod or change any DIP switches; they seem to only be required if you need to use the Ipod input rather than the AUX input. That's it, install done, I'll follow up with a separate post on how the unit works, but in summary it retains all factory functions and inputs (so I still use my phone to the car for calls), reverse still works like factory etc.
    • Place the new daughterboard in the case and mount it using the 3 small black rivets provided, and reconnect the 3 factory ribbon cables to the new board Then, use the 3 piggyback cables from the daughterboard into the factory board on top (there are stand offs in the case to keep them apart. and remember to reconnect the antenna and rear cover fan wires. 1 screw to hold the motherboard in place. Before closing the case, make a hole in the sticker covering a hole in the case and run the cable for the android unit into the plug there. The video forgot this step, so did I, so will you probably. Then redo the 4 screws on back, 2 each top and bottom, 3 each side and put the 2 brackets back on.....all ready to go and not that tricky really.      
    • Onto the android unit. You need to remove the top screen because there is a daughterboard to put inside the case. Each side vent pops out from clips; start at the bottom and carefully remove upwards (use a trim remover tool to avoid breaking anything). Then the lower screen and controls come out, 4 screws, a couple of clips (including 3 flimsy ones at the top) and 3 plugs on the rear. Then the upper screen, 4 screws and a bunch of plugs and she is out. From there, remove the mounting brackets (2 screws each), 4 screws on the rear, 2 screws top and bottom and 3 screws holding in the small plates on each side. When you remove the back cover (tight fit), watch out for the power cable for the fan, I removed it so I could put the back aside. The mainboard is held in by 1 screw in the middle, 1 aerial at the top and 3 ribbon cables. If you've ever done any laptop stuff the ribbon cables are OK to work with, just pop up the retainer and they slide out. If you are not familiar just grab a 12 year old from an iphone factory, they will know how it works The case should now look like this:
    • Switching the console was tricky. First there were 6 screws to remove, and also the little adapter loom and its screws had to come out. Also don't forget to remove the 2 screws holding the central locking receiver. Then there are 4 clips on either side....these were very tight in this case and needed careful persuading with a long flat screw driver....some force required but not enough to break them...this was probably the fiddliest part of the whole job. In my case I needed both the wiring loom and the central locking receiver module to swap across to the new one. That was it for the console, so "assembly is the reverse of disassembly"
    • But first....while I was there, I also swapped across the centre console box for the other style where the AV inputs don't intrude into the (very limited !) space.  Part# was 96926-4GA0A, 284H3-4GA0B, 284H3-4GA0A. (I've already swapped the top 12v socket for a USB bulkhead in this pic, it fit the hole without modification:) Comparison of the 2: Basically to do the console you need to remove the DS and PS side console trim (they slide up and back, held in by clips only) Then remove the back half of the console top trim with the cupholders, pops up, all clips again but be careful at the front as it is pretty flimsy. Then slide the shifter boot down, remove the spring clip, loose it forever somewhere in the car the pull the shift knob off. Remove the tiny plastic piece on DS near "P" and use something thin and long (most screwdrivers won't fit) to push down the interlock and put the shifter down in D for space. There is one screw at the front, then the shifter surround and ashtray lift up. There are 3 or 4 plugs underneath and it is off. Next is the rear cover of the centre console; you need to open the console lid, pop off the trim covering the lid hinge and undo the 2rd screw from the driver's side (the rest all need to come out later so you can do them all now and remove the lid) Then the rear cover unclips (6 clips), start at the top with a trim tool pulling backwards. Once it is off there are 2 screws facing rearwards to remove (need a short phillips for these) and you are done with the rear of the console. There are 4 plugs at the A/V box to unclip Then there are 2 screws at the front of the console, and 2 clips (pull up and back) and the console will come out.
×
×
  • Create New...