

DeanR33
-
Posts
81 -
Joined
-
Last visited
-
Feedback
0%
Content Type
Profiles
Forums
Events
Gallery
Media Demo
Store
Everything posted by DeanR33
-
This Is The New Recipe Chat Thread...
DeanR33 replied to Houdini's topic in Four Door Family & Wagoneers
Welded a wideband sensor boss in my exhaust. Guess what I'm doing tomorrow ? -
QUOTE from Pipster11 "so you guys think that you just get your speed at a certain rpm and double it to get it at twice the rpm? say at 100 your doing 2000 rpm and at 3000 prm you are doing 130 (just for arguments sake) that means that for every 1000 rpm in 5th you do 30km/h so if your car redlines at 7k (for arguments sake again) that gives you 5000rpm onto of 2000 which means that your top speed would be 5x30+100 = 250 " QUOTE Is this really how you calculate speed vs rpm ? I always thought that in top gear there would always be a constant speed for rpm ratio ignoring drag etc. So taking the example given above if I'm doing 100m/h at 2000rpm in top gear that's 50m/h per 1000rpm throughout the rev range. How could that change to 30m/h per 1000rpm whilst remaining in the same gear even if the ratio is an overdrive ? EDIT. The more I think about this, the more I think you are wrong. The gear ratios are fixed so we are correct, you can just double up etc.
-
Just checked my Stagea. It is definately right around 2200 rpm at 60mph ( 96kmh ) and 2550rpm at 70mph (112 kmh ) I took the rpm readings from my Greddy infometer but my Tacho is reading the same, much more accurate than all my Skylines have been. I can't be bothered jacking it up and turning the shafts to check the diff ratios though.
-
I had considered doing the wiring mod, but I wasn't sure if it's really necessary, and I'm still not sure from reading the various posts ! But thanks for the advice.
-
Well of course I could be out on my RPM by 100 rpm or so, but not too far off. I must admit that I was surprised at the gearing. It is definately higher geared than my old R33 GTR. I've checked the speedo with GPS so I know that's accurate. I'm running 245/40/18 tyres so I think that I'm geared up a little there too. To be honest I haven't looked up the tiptronic gearbox and diff ratios and done the calculations. I just assumed that Nissan had geared things up a little to try to help fuel consumption and were less bothered about acceleration on the Stagea than the Skyline.
-
Hmm, is the fuel pump mounting set up different on a Series 1 then, more like a Skyline one ? The Walbro I used was more or less the same size as the original. I put my photos in a photobucket account and just copy and paste the links from the photobucket page into my post.
-
My Series two tiptronic does 60mph at about 2200rpm. Ignoring all the wind resistance problems etc, if I had enough horsepower in theory I could do around 170-180mph just before I hit the limiter. I've not had the opportunity to open mine up and see what it got up to, but I can safely say 140mph is no problem with plenty left to spare. Realistically I would expect it to top out at around 155-160, which isn't too bad for an old Datsun estate !
-
Apologies if this has been covered before, I did a search and couldn't find anything. As part of my on going mods and looking to the future I got myself a Walbro 255LPH fuel pump from Conceptua Tuning here in the UK. As usual it was shipped to my and arrived in less than 24 hours ! I've just fitted the fuel pump, no problems, dead easy actually. Lift up and remove centre load floor area covers. Remove right hand floor cover, there are two M6 nuts and one M6 bolt below the lashing eye. Remove four M6 bolts and lift off fuel pump cover, be careful with regard to the connectors underneath. Pic2 Disconnect two multi plugs on top of tank unit and put cover and wiring to one side.Pic3 Clean any dirt or dust from the top of the tank unit to prevent it falling in the tank. Start engine and run until it stops to de-pressurise fuel lines. Mark and note orientation of fuel lines, remove. Have rags ready to catch fuel spillage. Unscrew large plastic locking ring, it's tight, I use a piece of wood and knock ring round with hammer until loose then unscrew remainder by hand. Beware of sharp edges on metal floor panel. Carefully lift tank unit slightly use caution to avoid damaging the gauge sender unit. Disconnect wiring multi plug beneath sender, note two fuel pipes orientation and disconnect. Lift out tank unit. Pic4 The fuel pump is located in a plastic housing in the bottom of the tank, the lid of the housing has three clips. Squeeze the clips located at the left,front right and rear right (looking down into the tank from the rear of the car) lift off the cover and put aside. Pics5,6 and 7 Lift out the fuel pump to just above the top of the tank, the return fuel pipe prevents complete removal from the car at this point. Pic8 Remove the fuel pipe from the pump and disconnect the wiring multi plug, the fuel pump can now be completely removed. Fit the sock supplied onto the new fuel pump and fit the clip to prevent it falling off the pump. Pic 9 Re-connect the original wiring multi plug to the new fuel pump. Re-fit the pipe to the pump, it has a curve in it, this must be orientated so that the pipe curves straight upwards or the wiring is pulled out of position and won't reach to re-connect to the underside of the tank unit. Fit the pump into the housing in the bottom of the tank, the pump fits directly into the original mounting points and refit the cover ensuring that the clips snap into place correctly Place the tank unit back into the top of the tank and re-connect the two fuel pipes in the correct orientation and pump wiring multi plug to the underside of the tank unit. Refit the tank unit using the seal and locking ring, refit the fuel pipes in the correct orientation and tighten the clips. Re-connect the pump and sender multi plugs but leave the cover loose. Turn the ignition on and listen for the pump priming for a few seconds, turn the ignition off and on again two or three times to ensure the pump has primed properly, now start the engine and check for leaks on the top of the tank unit. If all is well, stop the engine and refit the tank unit cover and floor covers. Test drive. Tools required. 10mm socket and ratchet, Screwdrivers, Pliers, Hammer and piece of wood, Rags Time required 60-90 minutes. The clips,hose,wiring sleeve and mounting in the kit are not required. Dean
-
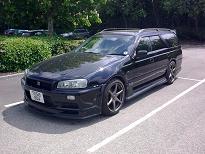
FMIC kit off Ebay. It didn't fit very well, but I don't know if that was because it was a cheap kit or because it was for an R34 GTT. Though from what I've researched, R33 and R34 kits should fit a Stagea fine. Of course my Stagea has an R34GTR front end so it's all a mix n match. First off, remove front bumper and side mount intercooler. All the mounting positions are plain to see so I won't go into more detail. All Fmic kits require some cutting of the bumper bar.Using an angle grinder I just cut out the bottom, preferring to retain the front face for strength. Not a great deal of the top of the fmic is obscured and due to the angle I'm sure air will still be forced through the top of the fmic too. Here you can see where I cut out the bottom of the bumper bar. Next, you will notice that the ambient air temp sensor and one of the horns will be in the way of the new fmic. I removed both and fixed them in slightly different positions. I drilled 2 holes 500mm apart to match the mounting bosses on the top of the fmic in the rear edges of the bumper. Due to the angle of the top surfaces of the bumper, this also angles the fmic backwards which I needed to clear the oil cooler,aircon fan etc at the top and the inside of the front bumper at the bottom, your bumper may have more clearance here. In this pic you can see the top mounting bolts and the new positions of the air temp sensor and n/s horn. Test fitting the first pipe and it lines up pretty good. Notice, I haven't fitted any bottom mounts to the fmic yet. That's deliberate, so that I can ensure all the pipework lines up before final mounting. Now that was the easy bit. Onto the driver's side pipework. On Stageas and R34's the washer bottle is under the wing right where we need to position the pipe for the ic return. On the inside, below the battery carrier is a large wiring harness junction, this needs to be unplugged and moved out the way because this is where we will be cutting the hole for the pipework. It will plug back in later, there's enough extra wiring. Now unbolt and disconnect the washer bottle and remove it. We'll come back to that awkward bit later. Next I measured the driver's side pipe from centre to centre at the point it would enter the inner wing and after carefully checking several times that I would not hit any mounts,wiring or unneccessary metalwork, I cut the hole using a 79mm Starrett hole saw from my toolkit. Here's the waste piece to give you an idea of positioning from the mounting holes that are in it. Next I cleaned up the edges and painted them and added some vacuum hose slit down the middle to protect the edge and the piping. Now comes more fun. As can be seen from the next 3 pics, the top pipe and the bottom driver's side pipe were never going to meet up. This is something that there is no way to tell before you have cut the hole in the inner wing and put the bottom pipe through. Now I had a choice. I could try to move the bottom of the fmic back and open the hole in the inner wing backwards, or modify the pipework. Moving the fmic backwards would have meant re-positioning the oil cooler,air con fan and nearside pipework and that would have been a real nightmare, so I decided to mod the driver's side bottom pipe. I removed the fan and fitted the top pipe to give me a good idea of what was required. Then I cut the bottom driver's side pipe just after where it enters the inner wing, turned it slightly, bellowed out the ends to stop it blowing off and used the silicone hose that comes in the kit for the top pipe to join the modded parts. I just re-used the original perfectly good top pipe hose as it would have been spare anyway. Now onto the fan. I know with this style of kit, the fan blades have to be trimmed slightly. I wanted to trim tham as little as possible, so after a look through my spares box I found four gearbox dowels and I used these between the viscous fan unit and the fan with longer bolts to move the fan forwards. There's masses of room and no problem doing this except that it's a tight fit replacing the fan. Next I still had to trim a little of each blade. I cut the corner off one blade with my Dremel and then used the offcut to mark off each other blade for cutting to ensure the same amount was removed and preserve the fan balance. Now I could refit the top pipe With everything positioned and the hoses adjusted and clamped up, I checked that nothing on the fmic would rub or vibrate against anything and I turned to the bottom fmic mountings. Using the plates that came with the kit, I lined them up with existing captive nuts and bent them up to match. Now the washer bottle. I turned it though about 80 degrees and made new mounting brackets from various bits of aluminium and old induction kit brackets that I had hoarded away. The biggest problem was when I cut the mounting off the bottle. I didn't realise it was hollow and all the water poured out, d'oh Anyway a little bit of ally plate and some epoxy resin and that was sorted. The hoses were long enough to remain in position, but I had to extend the wiring for the rear washer pump. No problem, but this bit of the job had been a bit of a nuisance and had added a couple of hours in time. Before I refitted the bumper I ran the engine to check for leaks, cable tied a couple of bits and sprayed anti corrosion wax in and around the front end. The bumper only just went back in place with limited clearance especially around the driver's side bottom pipe. I also had to modify a couple of bumper mounts to make them use captive nuts instead of nuts and bolts because there would have been no access with a spanner due to the Fmic. All in all, would I do it this way again ? Yes, because I saved quite a bit of money even though it was awkward and time consuming. If you aren't quite so confident with your own fabrication skills then I would suggest a kit that uses the original smic pipes and runs the fmic return back to the nearside, but that's probably going to cost you at least 3 times what I paid for my kit on a lucky ebay auction.
-
Cheers for that.
-
My S2 Stagea has an R34 GTT NEO engine. What's the small bore hose from the metal boost pipe to the valve above the power steering pump for please ? I've just fitted a FMIC and the new pipe doesn't have a 'T' off it so I've blocked off the small hose temporarily.
-
Sorry I don't have any CAD software, but I'm sure I can sort something out for a drawing. The R33 calipers will fit, they are the same fittings.The only difference between my R32 GTR calipers and R33GTST ones dimensionally is possibly the width because R32GTR are for 32mm thick discs and R33 are 30mm thick iirc. The mounting brackets are 15mm thick and the spacers are 25mm thick. All steel I think. I measured up when I was fitting and the biggest rotor/disc that would fit my setup would be 330mm, in fact I suspect that it is a 330mm setup because I have a little overhang of the pads on the 324mm discs I have.
-
It was a used kit on ebay. From measuring the discs, I am almost certain they are 324mm GTR ones. I've seen similar kits, pretty certain one was on Uniques site, nismo.com.au I did take a template of the bracket and I measured the spacers too. I could measure the bracket up and do some drawings when I get time. Dean
-
I went ahead and upgraded the front brakes on my Series 2 today. I actually didn't think the brakes were bad at all to begin with, but I had access to a kit of parts at a decent price and thought it was worth a go. The kit uses R32GTR calipers, 324mm discs (though 330 would fit too I think) and some brackets and spacers. I've used DS2500 pads. Here's the calipers after cleaning up. I decided I wanted something a bit different for the colour. So I went for dark blue smooth hammerite aerosol. I don't believe in these fancy heat resistant brake calipers paints, I just think they are unnecessary. The S2 brake mounts are M14 as per R34 and because all other prior models are M12, I had ordered some 14mm O/D 1mm wall stainless tube. This just needed cutting to the correct length to use as sleeves inside the caliper mounting holes on the hub carrier. Here you can see those bits and the old 290mm original disc with the new disc. The original caliper unbolted and disc removed, so that I could weigh up fitment. It turned out that I needed to cut just a little of the bottom leading edge of the disc shield to clear the new caliper. Here's the adapter bracket fitted ( this is the O/S because I forgot to take a pic of the N/S ) I used R32 GTR flexy hoses and slightly longer hard pipes into the calipers because the Stagea ones would have been too short and also it just seemed sensible to avoid the well known banjo bolt issues. I will be able to braided lines much easier too. A quick bleed up and the finished article I took my motor out for a run to bed them in and there is a definate improvement in stopping power, but possibly a little loss of feel, though that may improve with a few more miles. It took me about 4 and half hours to do the job, but I was slow because I'm still recovering from a broken ankle and I have to keep taking a break. Overall I think it's worth it, but I'm glad I didn't pay the £400 or so that this sort of kit would normally be because the improvement wouldn't be worth that to me. Though it might be a bigger improvement over S1 brakes. One other advantage is that the R32 alloy calipers are much lighter than the original iron ones.
-
I can't remember where I got this info and it may have been posted on here, but might be useful to people. Front discs Model Diameter Thickness Center hole height S15 SR20DET 280mm 30mm 68mm 54mm R32 M-Spec 280mm 30mm 68mm 54mm 300zx Turbo 280mm 30mm 68mm 54mm R33 GTST 296mm 30mm 68mm 53.75mm R34 GTT 310mm 30mm 68mm 53.75 R32 GTR - non V-Spec 296mm 32mm 68mm 54mm R33-R34 GTR - Brembo 324mm 30mm 68mm 53.75mm Rear discs Model Diameter Thickness Center hole height S15 SR20DE/DET 258mm 9mm 68mm 47mm Skyline R32-R34 297mm 18mm 68mm 63mm Front calipers Model Weight Material Thread Pad Piston area S15 SR20DET 4.8kg Cast Iron 12mm DB1170 40.4mm x 4 R32 M-Spec 3.3kg Alloy 12mm DB1170 40.4mm x 4 300zx Turbo* 3.3kg Alloy 12mm DB1170 40.4mm x 4 R33 GTST 3.3kg Alloy 12mm DB1170 40.4mm x 4 R34 GTT 3.3kg Alloy 14mm DB1170 40.4mm x 4 R32 GTR ? Cast Iron 12mm DB1170 40.4mm x 4 R32/33 Brembo ? Alloy 12mm DB1520 44+38mm x 2 R34 Brembo ? Alloy 14mm DB1520 44+38mm x 2 Master cylinder Model Type Master Cylibnder Diameter S15 Spec R BM50 25.4mm 300zx turbo BM50/57 25.4 and 26.9mm used R32 GT-T M-spec BM50 25.4mm R33 GTST BM44 23.8mm R32 GTR non Brembo BM50 25.4mm R34 GTT ? ? R32/33/34 Brembo* BM57 26.9mm S2 Stag BM50 master cyl R32 GTST Master Cylinder diam (mm) - 25.4 area 506.71mm^2Front Caliper Piston(diam x qty) - 40.4 ×4 = 5127.58mm^2 Front rotors (diam x thk) - 280×30 Rear Caliper Piston(diam x qty) - 38.18×2 = 2289.78mm^2 ratio FR = 2.239 Rear Rotors (diam x thk) - 297×18 total 7417.36 brake to master ratio 14.63 R33 GTST Master Cylinder diam (mm) - 23.8 444.88mm^2Front Caliper Piston(diam x qty) - 40.4 ×4 = 5127.58mm^2 Front rotors (diam x thk) - 296×30 Rear Caliper Piston(diam x qty) - 38.18×2 = 2289.78mm^2 ratio FR = 2.239 Rear Rotors (diam x thk) - 297×18 Total area 7417.36mm^2 brake to master ratio 16.67 R32 GTR (Non V-Spec,) Master Cylinder diam (mm) - 25.4 Front Caliper Piston(diam x qty) - 40.4 ×4 Front rotors (diam x thk) - 296×32 Rear Caliper Piston(diam x qty) - 38.18×2 Rear Rotors (diam x thk) - 297×18 R32 GTR V-Spec / R33 / 34 GTR with Brembos Master Cylinder diam (mm) - 26.9 568.32mm^2Front Caliper Piston(diam x qty) - (44+3Cool×2 ... leading pistons smaller then trailing 5309.29mm^2 Front rotors (diam x thk) - 324×30 Rear Caliper Piston(diam x qty) - 40×2 2513.27mm^2 ratio FR = 2.1125 Rear Rotors (diam x thk) - 300×22 total 7822.56 brake to master ratio 13.76 This is the ratio of master piston movement to overall brake pad movement R32/GTR calliper ratio 15.43 R33/GTR calliper ratio 17.58 So there isn’t much difference between the Brembos and the std Nissan R32/33 GTST calipers and R32 GTR callipers
-
Almost everybody here in the UK seems to believe that Mines ECUs are all mapped on super 100 octane fuel and that the ignition map is way too harsh, so nobody likes them. Personally I suspect it's just another internet myth, but I've yet to uncover any hard evidence either way. It's good to here from somebody who is actually running one and has no problems.
-
I looked into this. On my S2 I have a BM50 master cylinder, so will you probably. That's the same as R32 GTR non Brembo cars and is actually a bigger bore than R33GTST, so should be ok to stay with it
-
I looked into this. On my S2 I have a BM50 master cylinder, so will you probably. That's the same as R32 GTR non Brembo cars and is actually a bigger bore than R33GTST, so should be ok to stay with it
-
Anyone who has a Series 2 RS4V that has gone to R34GTT front calipers and discs, what did you think of pedal feel etc afterwards? I'm thinking of upgrading my brakes but to be honest I find that they are pretty good as standard and if anything they feel better than my old R34GTT and that had decent road pads and a brake stopper. I'd just like an honest and objective opinion please. I know there has been a lot said about what fits various models, but I can't find much actual feedback on the results. I'm aware that it's human nature do an "upgrade" and convince yourself it's better, but is there any real evidence to show that ? Summer is coming over here (hopefully) and I will be driving harder and faster and I want to make sure my brakes are up to it.
-
Rb25 Det Neo Ignition Timing Marks ?
DeanR33 replied to DeanR33's topic in Four Door Family & Wagoneers
Thanks for all the replies. I guess it will remain a bit of a mystery. Here's a pic of the marks. -
Rb25 Det Neo Ignition Timing Marks ?
DeanR33 replied to DeanR33's topic in Four Door Family & Wagoneers
Thanks for that. I'm wondering if I have some kinda different pulley as you say, or even an aftermarket one. I've used my Greddy informeter to read the timing with the tps disconnected, but I'm not entirely sure if the reading is the true timing or the output from the ecu target timing. If I put a timing light on it, it's set just about on the second mark on my pulley and both the second and third marks are white. I'm not having any running probs and the car goes well, but I wanted to check it because there is evidence on the cas that someone has retarded the timing a little. Possibly in preparation to run on regular unleaded, which I never do. -
I've searched all over and can't find any reference except to the non neo engines, even the R34 workshop manual shows the marks in 5* increments like the earlier engines. I have 3 marks on my crank pulley. 1 mark then a big gap and 2 marks with a smaller gap between them. I'm guessing that the first mark is TDC and the second is probably the 15* I'm aiming for. Can anyone confirm please? My car is a 1999 Stagea S2 Tiptronic.
-
Got red Leds in my S2 instruments, they look great, no dim spots. I can't tell you what make they are, since they were in the car when I bought it, but they are the type with 3 or 4 leds in each lamp.
-
Will R32gtr Tein Superstreets Fit Front ?
DeanR33 replied to DeanR33's topic in Four Door Family & Wagoneers
Thanks for that.
