

ajrichar
-
Posts
90 -
Joined
-
Last visited
-
Feedback
0%
Content Type
Profiles
Forums
Events
Gallery
Media Demo
Store
Everything posted by ajrichar
-
Thanks for adding those details Gavin - even for only 5 cars, there has been a bit of discussion over which chassis were used for which driver at which time. I take it that despite the Asian owner/drivers being out of their depths that neither Jim nor Mark gave them specific tuition on how to drive them?
-
I agree. The notion that Gibson developed the cars and fed all their info back to the Japanese is ludicrous. They developed their own parts and their own cars, and where both sides found that a particular part was superior, or offered better durability or performance, they would have used that part. So much of the time it would have bene from Japan to Australia, and it would also have been from Australia to Japan. I think that is common sense.
-
Well at least that character on the gtr.co.uk forums has kick started this thread again. But there is no way a Gibson built car, no longer run by Gibson, his team or any of his drivers, can still be considered a 'Gibson' car - even if he claims a few Gibson engineers were on the ground at the race. It's like saying that a former Perkins Commodore V8 Supercar running in the Konica series is still a 'Perkins' car with the implication that it would have its same performance etc that it had when run and engineered by the team that built it. Ludicrous. I did like his post where he said this: "Actually, I was lucky enough to speak to Anders Oloffson twice when he was running in Japanese Gr.A. The big, quiet and unassuming, spectacle-wearing guy was something of a hero to me and he commanded huge respect amongst the teams and mechanics. I was more in awe of his WEC and Gr.C races for Nissan during the late Eighties and early Nineties, but I know he put in a lot of miles developing the BNR32 and had a lot of input with it before it debuted. I'm sure that - could we ask him now, although it is sadly too late - he would point out that the two championships were vastly different, and demanded a different approach in car build as well as race tactics. I don't know what he said on those 1992 Bathurst videos ( I'll have to go and watch ) but I'd honestly take anything said on camera at the time with a little pinch of salt, bearing in mind that 'politics', and everything that goes with that, would always be in a driver's mind. In just the same way, Fred Gibson can be excused for promoting Fred Gibson whenever the subject of these cars comes up. It's business to people like him. People like me ( and I presume you ) are just sitting up here in the peanut gallery watching.........." I like how he is trying to pull apart the information/quotes we take as face value in various magazines and news reports and questioning the motive behind it. I think that's great and the only way to get a proper understanding about what went on. It is just that his tone manages to rub people the wrong way. You can gently bring people around to your way of thinking or arguing without having to act as superior as he unfortunataly manages to do. I think that the Gibson cars were magnificent machines that were built to do the job they had to do in Australia. By all accounts, the Australian Group A championship was far more competitive than elsewhere so the cars here were pushed harder. However, any direct and fair comparison between the Gibson and Japanese Group A GT-Rs will always remain speculative because neither of them ran against each other at full cry, on the same track, same conditions, with top engineering and drivers, in anger.
-
I have an old OLD Best Motoring VHS that has a yellow R32 GT-R rally car - as in full dirt rally car. It sounds.....AMAZING. There is in-car and outside footage of it sliding around a small dirt test area.
-
Thanks mate!
-
What a brilliant shot. Thanks for the pic. If it was a little larger it would work as my new desktop background. Was this at the Skyline Nationals? Any other pics? Thanks again for what I class as a classic shot.
-
Thanks guys for the kind words. I was so excited that I managed to work something out that looked kinda cool. I draw the line at warping bodyshapes and turning wheels - that's just out of my league I'm afraid. I only do the simple stuff!
-
Thanks RusH!
-
How do you guys make those drawings in PS?
-
I wrote one of these 'how-tos' because no-one showed me and I wanted to share it with others. It's actually very easy (as long as you have Photoshop). I think RusH does his a little differently to me because he adds camber to wheels whereas I do not. I posted these how-to's on both the Biante Model car forum and DiecastXchange model car forums, but I'll post it here too with your indulgence. I set out below a step-by-step process at how to create one of the small ‘Mini’ cars I have made. Start with the best quality picture of your chosen car as you can. It is best (and easier) to also have a picture where the camera was about the same level as the car. If you have a shot looking down, it is so much harder to meld the wheels and arches to the car as the angles are all out. We will start with a picture of the McLaren F1 longtail racecar in Fina sponsorship from the Goodwood Festival of Speed. The picture is a good one to start with because the angle of the camera is at approximately the same height as the car itself. In addition, race cars tend to look better as finished products than road cars when you give them the ‘Mini’ car treatment. This first picture below is the standard picture opened in Photoshop (in this case Photoshop CS3). Using the ‘Polygonal Lasso Tool’ (see red line identifying it) carefully cut out around the wheels arches and the wheels. It works best if you have just the slightest bit of wheel arch with it as you cut it out. See image below. Once you have done this, copy the cut out wheel and wheel arch into a new Photoshop window (ie. Press Ctrl+C, then press Ctrl+N, then in the new window press Ctrl+V). Do the same with the rear wheel. Ensure that a very fine section of the wheel arch is removed with the ‘Polygonal Lasso Tool’. Copy and paste the rear wheel into its own window. I have hidden the wheels behind the main image so they can’t be seen here. With the normal image in front of you, Click the ‘Edit’ menu tile, then scroll down and click on ‘Free Transform’. 'Free Transform’ allows you to manipulate the image by ‘squeezing’ it as we will do, or spinning it. In the image below, locate the small section (circled), then click and drag it right. This will start squeezing the image together. Once you have dragged it a little to the right (how far you ‘squeeze’ it is up to you and takes some trial and error), you do the same from the other side and ‘squeeze’ the image the same amount. Once you are happy with how far the image has been squeezed from both sides, click the ‘Rectangular Marquee Tool’ (identified by the red arrow). This will prompt you to save the image in the new dimensions. Click ‘Apply’. ***Note, if you are unhappy at how far you have squeezed the image and wish to change it, click Ctrl+Z to undo. This easy shortcut works with anything on Photoshop. With the image now ‘saved’, bring back the windows for the front and rear wheels. We are going to apply the ‘unsqueezed’ wheels to the squeezed image, which is what gives it the ‘Mini’ look. Copy the first wheel and paste it onto the main image. Using the ‘Move Tool’ (identified by the big red arrow), drag the wheel over the approximate space where the wheel arch should be. This can be tricky because the whole car is now out of proportion so you have to get it sitting as accurately as possible. There will invariably be overlaps and missing sections where the pasted normal sized wheel doesn’t cover the whole of the new area in some places, but completely obscures other places. The trick to making the car look as real as possible is to minimise these issues and meld it all together. The image above shows the gap between the wheel arch on the new squeezed image and the wheel from the old normal sized car. Use the ‘Eyedropper Tool’ to get the closest colour and fill it in very carefully. It helps me by increasing the size of the image to either 200% or 300% so I can work more carefully. Do the same for the rear wheel. The image below shows the gaps that have to be fixed when the rear wheel went on. The rear wheel, as you can see, requires more fixing than the front to meld it nicely to the bodywork. How much work you have to do to the bodywork and wheels depends on the car, but becomes even more difficult when you choose an image from a different angle, like looking down on the car. With the bodywork filled in and patched up, the car is now essentially ready to go. Save the image as a jpeg or bmp or gif and close it down, then reopen it to crop out unnecessary sections – remember, the image will now have large sections above and below the car in the middle where the image was squeezed. I usually crop these out. Below is the final picture of the ‘Mini’ car. It may not be the best or easiest way of doing things but this process works for me! Cheers, Andrew
-
Do you have pictures from the Historic race meeting? I am very interested in the R33 Clarion and the Mazda 787B! Plus, take plenty of pics of the Nismo Festival and the Toyta Motorsports Festival!
-
That R32 road car.... phwoar........ Thanks so much for the piccies! Are you heading to the Nismo Festival this year?
-
Great pictures!!! Thanks for posting them up here. No pics of an R32 GT-R roadcar? Are there are other Group A cars in there apart from the Calsonic?
-
Rare Skyline Register
ajrichar replied to glenndrayton's topic in R Series (R30, R31, R32, R33, R34)
Dazmo, thanks for this additional info. I was under the impression that about 103-4 cars were brought in - split between sale, press use and the remainder (5 cars) stripped and turned into the race cars. -
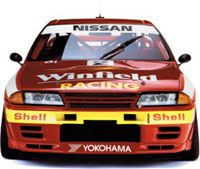
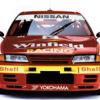
I scanned the front and back cover of the Australian Motor Racing Year 1992/93 (Volume 22). The shot on the back is a good one of the Winfield girls, the banner and the car. Shows just how polished and professional the Winfield team were (not that any of us on these forums had any doubt). Also a good opportunity to kick this thread going again. It is my favourite on the entire board.
-
AGE, that's great!!!! Thanks so much for that!
-
RIP Ashley. This is horrible. Sincere condolences to his wife, friends and family.
-
Glad you enjoyed it. If I find any others I'll post them up.
-
I finally got to a scanner. Here is the article of Paul Gover driving a Gibson Motorsport R31 Skyline from CAR Australia, August 1989 that I promised waaaaay back.
-
Infamous - great collection you have there mate! Top Stuff!!!! Some more pics of some of my diecast:
-
Nice collection! I have most of your Ebbro cars (stayed within R32-R33-R34) but I am missing the AUTOart red R34 in red with BBS wheels (limited to 1,000) , the Nismo S and R Tune cars, and the 1:64 Beads Collection range you have. They are very nice indeed. I've got a few in diecast: And a heap others that I haven't posted here. I also have all of the new AUTOart R32 GT-R Group A cars in 1:18 released thus far (Calsonic, STP Taisan, Kyoseki, HKS). I love them but the car I am really after is the AUTOart 1:18 R34 Gt-R Nur spec. This was limited to 1,000 pieces in Japan with certificate. I refule to pay what they go for.
-
Unfortunately, no. I stumbled across this pic and 2 others that are similar from a Photography website and they were selling prints of these images. I wish I could remember where they were sourced from because a) I'd like to buy a print, and; b) I'd like to be able to credit their website for the photo in the sig. It would have been an exciting time having both the #1 and #2 Winfield cars together.
-
If I could do 3D I would.... But I ran out of talent doing these 2D ones!!! LOL!!!! :laughing-smiley-014:
-
Lotus, thanks for the update. I am really interested in following your progress.
-
http://www.skylinesaustralia.com/forums/Ph...l&hl=Gibson There should be plenty in here. I have a few that I have collected from perusing the net but being on dial-up somewhat prohibits my ability to upload pics.... Hell, even loading this screen to reply gave me enough time to go and have a cup of tea and a lie down.....
