Jump to content
SAU Community

Recommended Posts

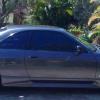
make, model - 1988 SERIES 4 RX7 CONVERTABLE, 13B, 5SPEED lotsa $$$ spent

miles - body 140 000 EVERYTHNG ELSE 20HOURS

Location: LOGAN

Reason for Selling: gone as far as i can go without havin to shell out thousands more jus 2 go a lil faster n also I want a r32 gtr skyline....

Price: $$$ 22 000 HELL IL B HAPPY WITH ANYTHIN ...........WATCH-YA GOT

complied- yes

rwc- yes

rego- yes

mods:

Motor -

Series 5 13b,

Extend port,

Doweled,

Shaved intake n exhaust,

2mm apex seals,

Motor built by dyson rotary,

2x 550cc primary’s n 2x 1600cc secondary,

Brand new t70,

Custom stainless turbo manifold from KP performance,

50mm hks external waste gate with 5inch stainless screamer,

Custom full 3.5inch stainless heat raped exhaust with hiflow metal cat made by 999 autos,

Stainless braided oil lines 4 turbo,

Custom pwr fmic full 2.3/4 inch chrome stainless pipe work made by mazfix,

V-port turbosmart bov,

3 core v8 radiator,

k+n filter,

Strut brace,

Twin 14inch Davis Craig thermo fans,

Oil cooler

Fully synthetic penrite hpr 15 engine oil

New engine mounts

Gear box -

5speed manual,

Brass button clutch,

Machined n lightened flywheel,

Completely rebuilt gearbox by taz motor sport,

Royal purple gearbox oil

New gearbox mounts

All receipts

Diff -

Stock,

New diff mount,

Recent diff freshen up n check over from mazfix

Royal purple gear oil

Receipts

Fuel -

Custom fuel rails to flow smoother n faster,

Blue anodized fittings everywhere,

Z1 rising rate adjustable fuel press reg,

Bosch motor sport 044 pump,

1.8l surge tank,

Efi fuel filter,

All 3/8 lines,

All in boot,

Everything mounted n hoses run by predator motor sport

Got receipts

Management -

4 Bosch coil pacs, 4 iridium plugs

Ltx10 mictotec engine management unit,

Microtec hand controller,

Profec b spec 2 greedy electronic boost controller

Power -

on mazfix dyno car made 294.2rwhp only on 12psi but was starving for fuel since then 044 pump + fuel reg was installed now running 17 psi Archie (mazfix owner) says " will easy make 350 360 rwhp" but due to having no money the car is still yet to return to the dyno

EVERY PART OF MOTOR, TURBO, COOLER, GEARBOX, DIFF, EXHAUST, RAIDATOR IS ONLY 20HRS RUNNING TIME OLD, the hour meter i installed in the dash proves it .....

Outside -

Rx8 red with a ghost purple tint, gloss black custom front bumper n bonnet scoop,

18inch 5 spoke hp design racing wheels with brand new toyo tyers,

Front 225/40/18 rear 245/40/18

Lowered on king springs + shocks,

Auto watch full mobilized car alarm

Inside -

Retimed custom racing seats with matching door cards, red n black,

Auto meter water temp, boost n monster tacho gauges,

Vdo volt meter and hour meter,

Aj motor sport steering wheel,

Elec windows, mirrors and roof,

+ Other little touches to make it mi baby

Car is also a member of seven of clubs rotary club n has been in their mag twice, jus pics of mi baby out on the town :P:)

I no ive forgotten heaps bout this car but wen i think of them i post them asap.....

Pictures: yepa got heaps

Contact Details: Anthony.. 0409095818 call, txt anytime

Dont b afraid to ask any questions

Edited by DK (DRIFT KING) JENKYNS
Link to comment
https://www.sau.com.au/forums/topic/200190-s4-rx7-convertable/
Share on other sites

  • Replies 49
  • Created
  • Last Reply

Top Posters In This Topic

dont mean to jump to the top but how the hell do u post pictures on this site ....

if u wana check the car out i hav all the picks here ----

http://www.boostcruising.com/forums/index....howtopic=261388

wat if i swaped tha badges ???

ahahahaha .. Ive always had a thing for rotors my cousin is running his at Eastern creek tomorrow hes hoping to get into the 10s Its his first time There .. Good luck with your Sale.... Looks Good..

yea man that was me round 1ish aye jus spending tym with the misso had to go put sum fuel inher and i was wit mi girl friend..... u live out that way ?????....

Create an account or sign in to comment

You need to be a member in order to leave a comment

Create an account

Sign up for a new account in our community. It's easy!

Register a new account

Sign in

Already have an account? Sign in here.

Sign In Now


  • Similar Content

  • Latest Posts

    • Hi, is the HKS  Tower Bar still available ? negotiable ? 🤔
    • From there, it is really just test and assemble. Plug the adapter cables from the unit into the back of the screen, then the other side to the car harness. Don't forget all the other plugs too! Run the cables behind the unit and screw it back into place (4 screws) and you should now have 3 cables to run from the top screen to the android unit. I ran them along the DS of the other AV units in the gap between their backets and the console, and used some corrugated tubing on the sharp edges of the bracket so the wires were safe. Plug the centre console and lower screen in temporarily and turn the car to ACC, the AV should fire up as normal. Hold the back button for 3 sec and Android should appear on the top screen. You need to set the input to Aux for audio (more on that later). I put the unit under the AC duct in the centre console, with the wifi antenna on top of the AC duct near the shifter, the bluetooth antenna on the AC duct under the centre console The GPS unit on top of the DS to AC duct; they all seem to work OK there are are out of the way. Neat cable routing is a pain. For the drive recorder I mounted it near the rear view mirror and run the cable in the headlining, across the a pillar and then down the inside of the a pillar seal to the DS lower dash. From there it goes across and to one USB input for the unit. The second USB input is attached to the ECUtec OBD dongle and the 3rd goes to the USB bulkhead connected I added in the centre console. This is how the centre console looks "tidied" up Note I didn't install the provided speaker, didn't use the 2.5mm IPod in line or the piggyback loom for the Ipod or change any DIP switches; they seem to only be required if you need to use the Ipod input rather than the AUX input. That's it, install done, I'll follow up with a separate post on how the unit works, but in summary it retains all factory functions and inputs (so I still use my phone to the car for calls), reverse still works like factory etc.
    • Place the new daughterboard in the case and mount it using the 3 small black rivets provided, and reconnect the 3 factory ribbon cables to the new board Then, use the 3 piggyback cables from the daughterboard into the factory board on top (there are stand offs in the case to keep them apart. and remember to reconnect the antenna and rear cover fan wires. 1 screw to hold the motherboard in place. Before closing the case, make a hole in the sticker covering a hole in the case and run the cable for the android unit into the plug there. The video forgot this step, so did I, so will you probably. Then redo the 4 screws on back, 2 each top and bottom, 3 each side and put the 2 brackets back on.....all ready to go and not that tricky really.      
    • Onto the android unit. You need to remove the top screen because there is a daughterboard to put inside the case. Each side vent pops out from clips; start at the bottom and carefully remove upwards (use a trim remover tool to avoid breaking anything). Then the lower screen and controls come out, 4 screws, a couple of clips (including 3 flimsy ones at the top) and 3 plugs on the rear. Then the upper screen, 4 screws and a bunch of plugs and she is out. From there, remove the mounting brackets (2 screws each), 4 screws on the rear, 2 screws top and bottom and 3 screws holding in the small plates on each side. When you remove the back cover (tight fit), watch out for the power cable for the fan, I removed it so I could put the back aside. The mainboard is held in by 1 screw in the middle, 1 aerial at the top and 3 ribbon cables. If you've ever done any laptop stuff the ribbon cables are OK to work with, just pop up the retainer and they slide out. If you are not familiar just grab a 12 year old from an iphone factory, they will know how it works The case should now look like this:
    • Switching the console was tricky. First there were 6 screws to remove, and also the little adapter loom and its screws had to come out. Also don't forget to remove the 2 screws holding the central locking receiver. Then there are 4 clips on either side....these were very tight in this case and needed careful persuading with a long flat screw driver....some force required but not enough to break them...this was probably the fiddliest part of the whole job. In my case I needed both the wiring loom and the central locking receiver module to swap across to the new one. That was it for the console, so "assembly is the reverse of disassembly"
×
×
  • Create New...