
Hks,cusco, Bride Yada Yada

Announcements
-
Similar Content
-
Latest Posts
-
 Buy whichever one makes you happiest when you sit in it. After all, that's where you'll be experiencing it.
 -
 Looks great lifted, offset and wheel size are nigh on perfect as well by the looks. Any pics of it with the lower ride height?
 -
Those are nice! I was looking at a BL wagon GTB but was already decided on a BE/BH if there was one available. Parts are easier to get too by a long shot... I'll add some B4 and after pics 😅
-
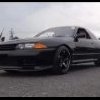
Give me this classic late 90's sports sedan style any day instead of the current LED and screens laden interiors
-

-


Recommended Posts
Create an account or sign in to comment
You need to be a member in order to leave a comment
Create an account
Sign up for a new account in our community. It's easy!
Register a new accountSign in
Already have an account? Sign in here.
Sign In Now