Jump to content
SAU Community

Recommended Posts

Well as some of you may or may not know... a month or two ago my R33 was hit in the ass while i was parked at a red light.

after that incident the car ended up like this:

post-39016-1250761162_thumb.jpg

post-39016-1250761195_thumb.jpg

I then sold the car onto a friend who has taken to attempting to fix it up to use as a drift/track car or even re register it and drive it.

His progress so far:

1. Cut into bits

post-39016-1250761283_thumb.jpg

2. bent up boot floorpan replaced

post-39016-1250761334_thumb.jpg

3. Shell re-attached and taced on

post-39016-1250761409_thumb.jpg

post-39016-1250761446_thumb.jpg

Still alot of work to go yet obviously, but its coming along nicely

I was estimated $8000 - $11000 to have this repaired at a body shop.

So far he has spent $500 on a quarter cut from a wreckers and a fair few days of his time.

Next step is full weld up, grind back, then a million hours of sanding.

Just thought some of you guys might be interested as i think he's done a top job so far. (he has never attempted any body work bar flaring guards with a guard roller before)

Cheers

Steve

Link to comment
https://www.sau.com.au/forums/topic/284301-the-restoration/
Share on other sites

real nice job he's doing there

only suggestion i can make is to take more paint off around the joins before welding, dont want any weaknesses introducted through impurities in the weld

that and the normal tack move tack move process for panel welding.

hope it all works out clean

Link to comment
https://www.sau.com.au/forums/topic/284301-the-restoration/#findComment-4779668
Share on other sites

I did this to my silvia when i crashed it in the hills. joins between the rear taillights and half way down the left qtr panel... Like said above make sure you take your time with the welding... .8 sheet is too easy to warp... if you have a tig it's much easier... when your done make sure you seal the inside with zinc fortified paint or alike (and any panels that are to be spot welded back at the seams must be painted before they are joined..)

It's really not all that hard if you use common sense. best for me was finding a silvia at U-pull it. so got the whole qtr for $88 :P . cost me les than $130 all done with spray can paint (still needs a proper paint job but...)

Good that you can take some time over it, i had to get mine done in one sunday!!

Link to comment
https://www.sau.com.au/forums/topic/284301-the-restoration/#findComment-4781651
Share on other sites

no idea man haha, he seems to be doing alright though.

I'll ask him about it when i see him next though.

im pretty sure he's using it with gas but im not 100%

Wow, good shiz!

How good is your friend finding the CigWeld mig for welding body panels? I'm assuming you are using it with gas?

They are quite good value units, I am curious to see how good they are!

he's also looking for a rear windscreen, so if anyones got one let me know! cheers

Edited by stenve
Link to comment
https://www.sau.com.au/forums/topic/284301-the-restoration/#findComment-4804085
Share on other sites

  • 1 month later...

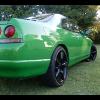
been a while since i've thrown up an update so heres where it's at now:

its all sanded back smooth and joined and aligned and in undercoat

post-39016-1254824504_thumb.jpg

front bar got a redoing as well

post-39016-1254824555_thumb.jpg

it cost him something like $400 for 2 litres of paint or something insane

Its a 3 step system which involves a silver base coat

then a diluted layer of green so it isnt so opaque and the silver shines through to create the gold pearl.

then the clear coat.

He's a bit scared to paint it now because he has to blend and somehow try to replicate the same green colour with his mixture.

any tips?

Link to comment
https://www.sau.com.au/forums/topic/284301-the-restoration/#findComment-4865220
Share on other sites

  • 2 months later...

Create an account or sign in to comment

You need to be a member in order to leave a comment

Create an account

Sign up for a new account in our community. It's easy!

Register a new account

Sign in

Already have an account? Sign in here.

Sign In Now


  • Similar Content

  • Latest Posts

    • Hi...so a "development" here aswell The swap is "done" and car went "test drive" BUT it seems the clutch(maybe gearbox?) is a little bit sad? I bought this clutch kit https://justjap.com/products/xtreme-heavy-duty-organic-clutch-flywheel-kit-nissan-skyline-r31-r32-r33-push-type "Problem" is that the first gear is hard to put into and it seems that the clutch is not disengaged. It was not the problem with the old clutch...(or like sometime the first gear would not get as easy specialy when the fluid was cold) So? Can it be like...bad "install" or is the clutch wrong ((it should not have been) i done research to get the right one) Or is this "normal" with new clutch and needs to be break in? 
    • @Duncan I can try  and thanks i did not thought about VIN and part numbers for 33/34. @GTSBoy yeah it looks like iam gonna do that  
    • Forgot to include this but this is the mid section of my steering rack that looks like it has a thread/can be turned with that notch mentioned in the post:
    • Hey everyone, Wanted to pick some brains about this issue I'm having with rebuilding my 33 rack (PN is 49001-19U05). All of the tutorials/videos I've seen online are either R34 or S Chassis racks which seem to be pretty straightforward to disassemble but this process doesnt carry over to my rack. Few of the key differences that I've noted The pinion shaft on the other racks bolt on with 3 torx bolts: Whereas my rack bolts on with 2 allen head bolts: These changes are pretty inconsequential but the main difference is how you pull the actual rack out of the housing. The other skyline/s chassis racks can be taken out by tapping the rack out of the body with a socket and it just slides right out. I'm unable to do that with my rack because there's a hard stop at the end that doesn't let the seal/shaft be tapped out. Can also see a difference in the other end of the rack where mine has a notch that looks like you're able to use a big wrench to unthread 2 halves of the rack whereas the other racks are just kinda set in with a punch. My rack: Other racks: TLDR; Wanted to know if anyone has rebuilt this specific model of steering rack for the R33 and if there were any steps to getting it done easier or if I should just give this to a professional to get done. Sorry if this post is a bit messy, first one I've done.
    • I would just put EBC back on the "I would not use their stuff" pile and move on.
×
×
  • Create New...