Jump to content
SAU Community

1990 Nissan Skyline R32 Gtr With A Fully Forged Rb26/30 Making 880Hp At The Wheels On C16, Street Registered And Engineered


Recommended Posts

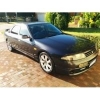
For sale is a 1990 Nissan Skyline R32 GTR with a fully forged RB26/30 making 880hp at the wheels on C16, street registered and engineered (engineers certificate), import papers and original log book from Japan.

Details are;

The engine consists of a RB30 bottom end, Rev Rods(ARP2000 Bolts), Arias pistions (9.2:1), Kings bearings & ARP Main studs. The RB26 Head has been ported with JUN 272 in. and ex. Cams , adjustable cam gears all new components from Supertech in the USA (Double Springs,retainer,1mm oversized valves both in. and ex., bronze guides). LS2 truck coils on custom bracket with custom MSD leads. New hi-torque starter motor from UK and new 120amp Bosch alternator.

The orginal oil pump has been replaced by an external peterson vacuum pump driven off a Ross custom balancer and going through a remote system1 oil filter. There's an Earls scavenge filter before the external pump and an oil cooler (hoses need to be connected, -12 braided hose and fittings supplied) with electric fan wired to an output from the ecu.

On the exhaust side it has a high mount stainless manifold (completely wrapped in exhaust heat wrap) with a Borg Warner custom made turbo (similar to a T88) and a turbo beanie around the exhaust housing, tial wastegate and a 4" exhaust (the dump pump has been heat wrapped).

The inlet has a 2 piece inlet plenum (replica of Greddy), 180mm Apexi Intercooler with twin Turbosmart BOV.

On the fuel side 1000cc inj, aeromotive reg, twin entry billet custom fuel rail, twin Walbro external fuel pumps with reusable Procomp billet 100 micron stainless mesh filter and surge tank. Main fuel line is run in -10 braided hose

The car is controlled by an EMS 8860 motorsport ecu with hand controller and latest firmware for automatic ethanol content adjustment (currently has duel maps, one for 98 and another for E85 via a dash switch), ethanol content sensor is installed but needs to be activated via ecu. Engine wiring harness is new and custom made with heat shield wrapping and protection. Boost is controlled by an E-Boost 2 controller.

The drivetrain consists of a 4speed (transbraked engine & braking) 4wd manualised auto with B&M shifter, transmission oil cooler with twin electric fans and 6500rpm stall converter built and fitted by Wollongong Automatics (same gearbox that's in their 8 second skyline). Explosion proof flex plate, tail shaft loop.

Rota 18x9.5 wheels 265/35 rubber rear 245/40 front and ARP wheel studs front and rear. 8spot calipers front with 365mm rotors and braided lines

Interior has new retrimed black leather seats and door inserts and grey velour roof lineing, parcel shelf, boot trim and GTR floor mats. 7" display head unit with android, i-go navigation gps, dvd, cd, Bluetooth, wifi internet and more functions. 2wd switch. A half cage with removable intrusion bars and harnesses (ANDRA Teched) inside the car. It also has working climated control and aircon, needs re gasing. Custom HID headlights with halo rings made in Japan. Rego till July 2013.

This car has been built mostly by reputable automotive workshops (V&E Rigoli, Miller Chasis, Apollo Triming, Detail FX,National Automotive,Jakes Performance,TCE Converters,Wollongong Automatics,Fyshwick Head Services,Fitzpatrick Speed Works), fully engineered and body is in great condition. Price is $35000

Would consider a swap for a clean standard Mazda 1300 wagon in white with cash my way.

John 0410467102

Melbourne

post-96172-0-99798300-1360128519_thumb.jpg

post-96172-0-81299000-1360128568_thumb.jpg

post-96172-0-77114000-1360128620_thumb.jpg

post-96172-0-20776300-1360128671_thumb.jpg

post-96172-0-21919800-1360127911_thumb.jpg

post-96172-0-58383100-1360128006_thumb.jpg

post-96172-0-63209200-1360128106_thumb.jpg

post-96172-0-70399300-1360128942_thumb.jpg

post-96172-0-82286000-1360128995_thumb.jpg

post-96172-0-83135000-1360129053_thumb.jpg

post-96172-0-77429200-1360129098_thumb.jpg

post-96172-0-34555700-1360129164_thumb.jpg

As for the swap, I'm willing to consider a 2005 and onwards Toyota Corolla wagon in white and automatic.

I'm not interested in any other car for swap.

Some things I forgot to mention;

Custom made bonnet to clear the taller RB30, coils and turbo.

New door jam rubbers, door rubbers, inner and outer weather strips

Standard ABS

Full exhaust system from dump pipe that passes EPA

Side mirrors with de-fogger heaters.

This is one of the most tidy and powerful road registered R32's out there.

  • 2 weeks later...
  • 2 weeks later...
  • 4 weeks later...
  • 6 months later...

Create an account or sign in to comment

You need to be a member in order to leave a comment

Create an account

Sign up for a new account in our community. It's easy!

Register a new account

Sign in

Already have an account? Sign in here.

Sign In Now


  • Similar Content

  • Latest Posts

    • OK, Step 3, if you need to remove the valve body, either to replace it, the TCM, or to do a more complete drain.  First, you need to disconnect the TCM input wires, they are about half way up the transmission on the drivers side. One plug and the wires are out of the way, but there is also a spring clip that stops the socket from sliding back into the transmission. On my car the spring clip was easy to get, but the socket was really stuck in the o-ring of the transmission housing and took some.....persuasion. You can see both the plug to remove (first) and the spring clip (second) in this pic Incidentally, right next to the plug, you can see where the casting has allowance for a dispstick/filler which Nissan decided not to provide. there is a cap held on with a 6mm head bolt that you can remove to overfill it (AMS recommend a 1.5l overfill). Final step before the big mess, remove the speed sensor that is clipped to the valve body at the rear of the box.  Then removal of the Valve Body. For this the USDM Q50 workshop manual has a critical diagram: There are a billion bolts visible. Almost all of them do not need to be removed, just the 14 shown on the diagram. Even so, I both removed one extra, and didn't check which length bolt came from which location (more on that later....). Again it is worth undoing the 4 corners first, but leaving them a couple of turns in to hold the unit up....gravity is not your friend here and trans oil will be going everywhere. Once the corners are loose but still in remove all the other 10 bolts, then hold the valve body up with 1 hand while removing the final 4. Then, everything just comes free easily, or like in my case you start swearing because that plug is stuck in the casing. Done, the valve body and TCM are out
    • OK, so if you are either going for the bigger fluid change or are changing the valve body which includes the Transmission Control Module (TCM), first you should have both a new gasket 31397-1XJ0A and a torque wrench that can work down to 8Nm (very low, probably a 1/4 drive one). You can probably get by without either, but I really didn't want to pull it all apart together due to a leak. First, you now need that big oil pan. The transmission pan is 450 long x 350 wide, and it will probably leak on all sides, so get ready for a mess. There are 24x 6mm headed bolts holding the pan on. I undid the 2 rear corners, then screwed those bolts back in a couple of turns to let the pan go low at that end, then removed all the middle bolts on each side. Then, undo the front corner bolts slowly while holding the pan up, and 80% of the fluid will head out the rear. From there, remove the remaining bolts and the pan is off. You can see it is still dripping oil absolutely everywhere...it dripped all night.... I got another couple of litres when I removed the pan, and then another few when I removed the valve body - all up another 4l on top of the 3 already dropped in step 1.
    • Yeh I think i'll message an old contact i had for ages that manages his own tyre shop now.. n tell him what i want n work with him before ordering..  Got this 17x9 +30 Driftteks on 245/45/17 PSR Drag Radials on the rear.. They fit well - for your reference in future - Rear guards  have been lipped in & minimal to non flaring of the rear Gaurds.    
    • If only it were that easy! I also needed to remove seats, shocks, brake calipers, send my car through a fence, and use measuring and ended up guessing because I didn't remove seats, shocks and brake calipers. It can be hard sometimes Can be a little more complex than 'just measure' if you want to truly measure the entire wheel through all of it's suspension travel. But if you aren't going for every last mm then yeah, you can check the space you currently have and guesstimate.
    • If you own a car, and it has wheels on it, and you know the offset of those wheels, and you have a measuring device, you have everything you need to work out if other wheels will fit.
×
×
  • Create New...