allankt86
-
Posts
17 -
Joined
-
Last visited
-
Feedback
0%
allankt86's Achievements
")


-
(Sorry in Japanese again...)You can see at the beginning of this video this car running. Also, from around 25:00 to 27:30 you can see this test car.
-
According the the article on the link, this test car is using the same/similar AWD system as in the GTR. And yes, this was just going to be a test car before they finalised making the body of the GTR so they never planned to make a GTR version of the CPV35. After they were done with the body design of the GTR, Nissan started developing it on the Nurburgring and pretty much never touched this CPV35-GTR test car again.
-
The steering wheel on the left I don't know... Just used a G35 that they got from Germany to test in the Nurburgring? Not sure.. This is not the concept car but the test car even before then made the concept car. I assume Nissan developed the Premium Midship Platform from these testing with the CPV35 and created the concept car that they launched. Just speculation sorry..
-
Finally installed the rims that I brought from Japan as check-in luggage haha My Rays Volk TE37 are lighter but the SSRs are not bad too! Before & After Finally installed the rims that I brought from Japan as check-in luggage haha My Rays Volk TE37 are lighter but the SSRs are not bad too! Before & After SSR GTV03 Matte Black Front 8.5J 18 inch +22 Offset 11.00Kg Rear 9.5J 18 inch +22 Offset 11.20Kg New rear tyres: Achilles 123S 265/35/18
-
https://www.youtube.com/watch?v=RatTysFX1wQ At 10:55-11:05 one of the producer describing the GTR as male haha
-
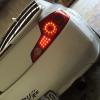
Hi guys! I hope you are doing well ;] Just found an interesting article when I was doing some reading on a Japanese discussion forum (2ch) about Skyline Coupe V35. Some guy posted a link where a journalist took some pictures of one of the first test car of the R35 GTR in one of Nissan's service centre in Japan. The car is pretty much a GTR, but with the looks of the CPV35. Some of the parts on the concept car such as the brakes, exhaust and sound system was used in the finalised version of the GTR. I wish Nissan produced a slightly tuned up version of the CPV35 and make a "female" (one of the designer of the GTR described it as a muscular male) version of the GTR! haha Source of the pics (sorry in Japanese): http://car.watch.impress.co.jp/docs/news/20130205_585419.html "Female" GTR haha Air duct on the bonnet to cool down the turbo system. Exhaust and diffuser pretty hot! Side fender a bit wider. Front brakes with 6 piston caliper also used on the final version of the GTR. Rear brakes with 4 piston caliper also used on the final version of the GTR. Inside the engine bay is pretty similar to the GTR. Sound system and sub woofer like in the GTR.
-
bluenoir - I see, yeah please let me know whether the trick will work. Thanks for the work of advice ;] As per my previous post, my car has the stock seats back due to comfort issues with the bucket seat. I know you never know when accidents will happen but since it is so easy to change them over, it is nice to have them in once in a while. camr33 - maybe because they are reclinable.. full buckets are much lighter, like 8-10Kg. That's of course genuine recaros or sparcos.
-
Hey Trevor I know that haha in fact my car is back with stock seats at the moment (gf said stock are more confy lol). But what I wanted to show is how to do it on our cars. Next time I go Japan I'll try find some decent real Recaros ;D
-
Ben, yes you are right. The new seats needs to have ADR certificate and an engineer needs to inspect it and give me a mod plate? certificate? or whatever they call it. But I'm still young and stupid :]
-
Thanks bluenoir! Humm... I think the other airbags will work because the system kind of thinks the seat has airbags.. I did the resistor trick on both sides so I guess if you are only planning to do one side, then it will be no problem and the other seat's airbag, pass and drivers airbag will deploy without any problem. Where can you find a wrecker with V35s? I've never seem a coupe around in VIC eastern suburbs.. saw only one sedan but the seats are pretty crappy haha
-
Installing New Seats DIY on installing replica SRIII Recaro Seats on Skyline 350GT Coupe (CPV35) Tools Needed: 14mm socket wrench Flat heat screw driver Plier (Needle nose) Set of Allen Key (Optional) 0.5W or 1W 2R2 2.2 Ohm (NOT 2.2 k Ohm) Resistor (RED RED GOLD GOLD) to cancel the airbag light on dash (A pair can be bought from Jaycar for 45 cents) Wiring tape (Nitto tape) Scissors Cable ties (Optional) Hacksaw or metal cutting circular saw (Very very very optional) A few M10 x 1.25 (length depends on your seat rails) bolts and washers (Optional) A friend (Optional) Google (Optional) Stock Seats Weight (Including Rails etc.): Drivers Side 26.75Kg Passenger Side 23.45Kg Recaro Replica Seats Weight (Including Rails etc.): Drivers Side 18.30Kg Passenger Side 17.90Kg 1. Removing the stock seats (If you know what you are doing, it takes no more than 10 minutes): Remove the rail/screw covers by pulling them up. The rail cover for the rear bolts needs to be pressed in the centre and then slide it out. Shaking it a bit might help remove them. 2. Use a 14mm socket and remove all 4 bolts. 3. Tilt the seat back to remove the harness under it. 4. Carefully remove the seat. For the driver side, moving up the steering wheel will give you more room to remove the seat. This can be done by yourself but having a friend will help. Folding the seat will also help removing it but luckily the coupe’s door is large so there will be no problem. The passenger seat is much easier to remove. 5. Remove the seat belt socket. Good vacuum clean inside as you can reach places where you cannot when the seat is there. You may also find some money! I found around $3 in coins lol 2. Making SRS airbag canceller (do this before installing the new seats!) When you unplug all the wiring harness for the stock seats, you will have the SRS airbag error light flashing on your dash board. This is because you unplugged the airbag sensor. You may need to do step no. 4 even if your new seats have airbags. If they don’t then follow the following instructions: Resistor Package Using a plier, bend both ends of the resistor so it becomes thicker Insert (the side does not matter) it into the airbag wiring Make sure it is firmly in place and touching the terminals inside of it 4. Run the airbag diagnostics/resetting. To reset the light simply turn the ignition to the on position, (you don’t need to start it). All the lights should stay on for their diagnostic check. As soon as the airbag light goes off, before it starts flashing, immediately turn the car off. Repeat this 3 or 4 times (turning to on then off) and the light should go away. 5. Wrap the resistor with wiring tape 6. You may want to organise the wires under the seats with some cable ties 3. Installing New Seats: This will vary depending on what kind of seat and rails you get, but most of the part should be fairly similar. I got my seats from China (brought them with me as check-in luggage on the airplane lol). I had to dissemble the back part and seat part so I could pack it within accepted luggage size. The main problem that you may have is with the seat rails… The seller in China did not have the rails for the CPV35, so I got for the 350Z as the measurements are the same. However, I needed to do some modifications to use these rails. I had to cut the rails “cross bars” as there are a small “bump” on the floor on both sides. Took 4 hours to cut them using a hacksaw (wish I had a circular saw lol). Flip the seats and install the seat brackets that move back and forth. You will need to press the place I circulated and move it back and forth to put the screws. For mine I used a 6mm Allen Key. 2. Install the seat rails (if you purchased one specifically for the CPV35, then you may not need modification). 3. Install the seat belt socket on the side of the seat rail. You may need a new bolt and washer to secure it in place. 4. Put the seat into position and tighten the bolts (stock bolts). PS.: You will note that the driver side floor for the rails is not even. The left side is higher than the right. What I did was to buy a longer bolt and a few washers/bolt spacers to fill the gap on the right side as my rails were for the 350Z. The seat position ended up being a bit higher than stock ;( I bought a second hand seat rail for the CPV35 from Japan so hopefully it will be on a similar height as the stock. I am waiting my aunt to send it to me so this solution is temporary. It took me quite me around 12-15 hours across 3 days to finish this project. If I do it now, with the correct direct bolt on parts, I think I can finish it in less than 3 hours. I noticed that the quality of the seat is not as good as the stock, in terms of back strength. When I accelerate, I can feel my back tilting back a bit (like you can do in an office chair for eg) but lateral hold is quite good. The seating position is a bit too high too. But considering the price of them, I cannot complain at all! It was $100 per seat and $50 each rail. I had to buy another rail for the driver’s side from Japan but it was still around $85. I got 4 point racing seat belts too but could not install it (didn't bother trying too hard). I consider this mod purely for looks rather than performance because the stock seats were not as heavy as I expected and the back support is only fair. I hope this helps you if you would like to install new seats!
-
DIY Painting Front Grill Hi all I painted my front grill matte black and it looks quite nice on white skylines. If you want to try it out, I hope this DIY guide helps you out! Tools needed: 12-15cm flat head screw driver Some newspaper or cardboard Dish wash liquid Sponge Paint (I used 1/3 or less can of plasti dip) Step 1: Removing the front grill You will need to remove all the pins holding the grill using a flat head screw driver. To remove the side lock pins (circled in red in the picture), insert the flat head screw driver and turn the lock pin inside clockwise to release it. This video is very helpful too. You do not need to remove the pin circled in green. Please refer to pictures for further details. Step 2: Remove Nissan badge and wash grill Even if you want to paint the badge, I still recommend removing it so you can paint the curvy parts better. Using dish washing soap and a sponge, wash the grill. If you have a bath tub, it is every better. I used warm water. Note that I put the plasti dip can inside the warm water too. This is to melt the rubber inside or make it softer so when you spray it, it is much finer and the finish is better. Dry it using a microfiber cloth. If you want, you can use hair dryer to dry hard to reach corners. Step 3: Painting Put the grill on top of some newspapers or a cardboard like I did so you do not mess your floor (I over sprayed a bit lol). When you paint, spray around 20cm from the grill and start and finish each spray out of the grill. I applied 4 times in an interval of 25 minutes. Let it dry overnight and put the badge back on. Step 4: Put the grill back Seems straight forward but I struggled 3 minutes to figure out how to put it back. You will need to take the lock pin out from the hole and attach to the grill first. Then you can slide the grill back and put back all the lock pins and you are done! Next project is restoring headlights!
- 2 replies
-
- 1
-

-
- DIY
- Plasti Dip
- (and 6 more)
-
@ sonicii Thanks mate! Not a problem, I can read Japanese so not a big issue hehe Wow didn't know the fuel tank filter was "easy" to access.. Might included on my servicing project list..
-
@sonicii So the tank size is 80L yeah? Cze I have a friend who has a 2005 V35 coupe and he keeps saying that his car does not have a 80L tank.. is it different from series 1 to 2 in terms of fuel tank size?
-
@ Paul WTH over 1000KM!!! That is for sure extreme! haha Didn't try full freeway drive yet as never travelled more than 350Km with the car. but confident mine can make 900Km easily. We do not need a hybrid car haha