

V28VX37
-
Posts
2,058 -
Joined
-
Last visited
-
Days Won
1 -
Feedback
0%
Content Type
Profiles
Forums
Events
Gallery
Media Demo
Store
Everything posted by V28VX37
-
R34 Gtt Front Mount Intercooler Installation
V28VX37 replied to V28VX37's topic in Engines & Forced Induction
Interesting, I never realised the new GT-R uses a vertical flow intercooler design too, must be something in it. The following photos are shamelessly borrowed from 09GTR's 09gtr Lives Again thread. Stock intercoolers: HKS intercoolers: I wonder why vertical flow units are not more popular for the R32/33/34's? -
Yep 21 is ignition signal i.e. coil packs. I had a stuffed CAS with similar issues as to what you describe above. Mine cost around $500 from memory (parts and labour), they rebuilt it with parts from another CAS. I'd certainly get it fixed, it's no good for the engine driving around with a malfunctioning CAS.
-
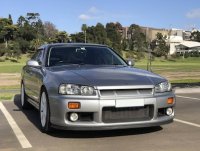
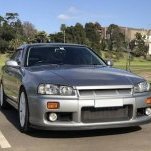
Hi all, I just spent the past couple of days installing a front mount intercooler kit on my R34 GTT and I thought I'd share some of my experiences. Picking the kit I spent ages looking for a decent second hand kit. I specifically wanted a return flow type to avoid cutting the battery tray and running silly piping over the engine - it's a skyline not a wrx. I almost gave up and bought a Cooling Pro Stealth kit from Just Jap when another forum member put their Trust turnflow kit up for sale. These are pretty rare units and it was hard to find decent information but SAU came to the rescue once again (see here and here.) I did some numbers before buying the kit, here's a list of core volumes: Stock SMIC: 3.6 litres (~3,600 cm3) Cooling Pro: 8.6 l Trust turnflow. 9.2 l Blitz CS: 12.5 l (about 30% larger than Cooling Pro) So even though the Trust looks a lot smaller than the Cooling Pro it's in fact larger thanks to that extra 1 cm of depth! It's about 2.5 times the size of the stock SMIC so should be a good upgrade from that perspective, too. Another interesting thing about the Trust is that the end tanks are on the top and bottom rather than at the ends - hence the "turnflow" or "vertical flow" name. It looks funny compared to the standard horizontal coolers but one of the benefits is greatly reduced distance the air has to travel through the cooler and the piping. It's probably around half of something like the Blitz kit. Being narrow it also appears to obstruct radiator airflow less - the guy I bought it from reported increased engine temps under comparable conditions after upgrading to an ARC cooler. Installation I decided to do the installation myself and found these two DIY's invaluable: - Taking Off Gtt R34 Front Bumper With Pictures - Installing Return Flow Fmic on R34 GTT I was a bit worried about the kit as it's designed for an R33 but it fitted the 34 without a hitch. The installation was straightforward enough but very time-consuming. I haven't done anything like this before and it took me the best part of three days. I used some very basic tools for tidying up the cooler: tweezers for straightening the fins and a cable tie to clean between them. Have a look at the before and after photos below. There's a good summary on the process here. I also did a final sweep with an air compressor. The Trust cooler has three mounting brackets: top, bottom and right hand side (from driver's seat) of the cooler. Top and bottom lined up perfectly but bolting up the bottom was an issue. There's a hole in the chassis down there but no nut, and since it's a boxed in section getting a bolt in was a major PITA. There is a larger hole on the front side of the chassis bar and I finally managed to get a bolt through after some serious fiddling with line and cable ties. I also had to grind the bolt beforehand, as the base wouldn't fit through otherwise. Since the bottom tanks sits fairly low I cut a hole for it in the plastic under tray (dremel FTW). The intercooler piping lined up perfectly with the stock SMIC joiners under the airbox. I also didn't have to fiddle with the power steering pump nipple as it's part of the stock piping next to the airbox. I did need to relocate the horns and also adjust the little (temperature?) sensor in front of the small cooler on the bottom right. Cutting the reo bar wasn't as bad as I expected either. It seems that with the horizontal flow kits you need to shave off a bit all along the reo bar, however with this kit I only had to make some space for the top corner of the cooler & piping on the driver's side (see pics below.) Most of this can be reverted too just by bending the flaps back up and spot welding. Trimming the front bar was hard, I probably spent half a day just on that. I removed the whole mid section of the bar and had to trim back the surround half a dozen times before it fit on properly. I also had to make some space for the piping. I first used a dremel but the cutting discs seem to heat up and break very quickly when working on plastic. Once out of those I pulled out the angle grinder and instantly wished I'd done that sooner - so much quicker and easier to do longer runs, too. A flap disc (for metal) worked a treat. The last bit was the mesh, I used the basic stuff you can buy from Supercheap. I just folded suitable sizes around the inside edges of the front bar and used cable ties to attach them. On the bottom side I ran the ties through holes I drilled in the underside of the front bar so they're not visible. It was all good until I ran out of light at sunset.. Some specific tips All the tools are pretty basic but you'll need plenty of them. Try to gather them beforehand so you don't have to run off to get missing stuff in the heat of the battle. Loosen or remove the plastic inner guards around the front tyres before you start, this makes it heaps easier to get the two front bar side bolts out. Tape up all corners of the front bar as soon as you pull it out. You'll be shuffling it around a fair bit and scuffs are highly likely otherwise. Make sure the (hard) intercooler piping doesn't scuff where it goes through the metal under the airbox. Add rubber/padding/duct tape if necessary. Painting or rust proofing any bare metal is good idea. Test the basics before you put everything back together (ic piping leaks, lights, indicators, foggies etc.) Take photos as you go so you remember what goes where when you start reassembling the front. Don't do this in a rush. There's nothing worse than having to work until midnight because you need to be somewhere at 8 am the following morning... Photos I've included some photos below. The car is absolutely filthy here thanks to some country driving, and the headlights need some serious polishing. Scuffs on the front bar are courtesy of the previous owner 1. Stock front bar with old plates 2. Trust vertical flow intercooler kit 3. Intercooler before tidying up 4. Intercooler after tidying up 5. Tools for tidying intercooler 6. Box-o-nuts 7. Trial mount, compare FMIC size to stock SMIC on the right 8. Trial mount of piping 9. Need clearance 10. Tools of the trade 11. Trimming the reo bar 12. Got clearance! 13. Trimmed reo bar 14. Hard piping, straight bolt-on 15. Reinstalled reo bar 16. Front bar before cutting 17. Front bar inside, the whole boxed section in the middle was removed 18. Almost done 19. The finished product. Needs a good clean though! Cheers!
-
Thanks heaps for the tutorial viet_boi! Clear and easy to follow, just take your time if you haven't done it before. I definitely recommend loosening the plastic guards first, getting to the two front bar side bolts is heaps easier then. Just pop out the plastic clip in the middle of the guard and that should allow you to get through to the bolts. If not, there's another clip further back down low that you can remove, too. I also had to turns the front wheels away from the side I was undoing to get some clearance. Be careful with these, I had a rusted one that I tried to force, which ripped the whole metal clip with the nut off the front bar... Get the easy ones off first and then put a spanner through to hold on to the nut for the tough ones. And remember, this is the easy part of the intercooler install
-
R34 Hesitation & Cut Out On Start Up
V28VX37 replied to so_tred's topic in Engines & Forced Induction
Engine light + SLIP is typically caused by busted coil packs. Next time they light up have a look at the ECU fault codes - the paperclip method is easy to follow. If you get 21 (ignition signal) it's 99% certain it's the coil packs. 50-60k they should still be good but you never know. Here's a list of other things you can try: Resolved Misfire In R34 Gtt - Rb25det Neo Checklist and links to other misfire threads. Good luck. -
Yeah the whole coil pack setup is definitely a weak link of the RB design. In the past 6 months I've been tearing out coil packs (and my hair) from my NEO like there's no tomorrow. In 4+ years with the LS1 I never even knew it had coil packs
-
I bought a fresh set of Yellow Jackets about a month ago for my RB25DET Neo and they're going great. Very quick delivery too. For long term performance ask me again in a year's time I reckon a new set of pretty much any coils should be fine. Whatever you do don't buy any second hand OEMs, the only place they should go in is the bin...
-
Hey mate have a look at this thread: Body Kits For A Four Door R33Gtst What is possible? I realise it's for 33's but most of the discussion is relevant. Both Vivagarage and Final Konnexion mentioned there offer kits for the 4 door 34's. If you're looking for inspiration have a look through the Tough Cefiros & Other 4drs Post up your best pictures thread. Good luck
-
Hey mate, I'm afraid that'd be pretty tough. For the occasional weekend trip maybe, but I reckon for daily use you can pretty much forget it unfortunately. I also doubt you could physically fit two boosters plus a proper baby seat in at the same time, width wise. I've got a rear facing baby seat in the back behind the passenger and the front seat is still usable, but only just. I have had 2 adults in the back at the same time but it's definitely a squeeze, and I wouldn't do any long distance travel that way... I'm also not too keen on putting the baby seat in the middle as it would be hard securing it tight enough to avoid sideways movement, due to the raised middle bit. For normal driving with the missus and the bub the R34 sedan is great though! And the boot's easily big enough for a long weekend away with the family Ps. Forgot to add that mine had 3 anchor points already in place on the parcel shelf, probably done originally for compliance.
-
Body Kits For A Four Door R33Gtst
V28VX37 replied to senilykSkylines's topic in Exterior & Interior Styling
I'm pretty sure Vivagarage have kits for R33 sedans. If R33 is anything like the R34 the whole front is shared between coupe and sedan but sides and rear are all different, so modding a coupe kit would be a major PITA. -
That's brilliant, thanks for sharing! Reminds me of some very basic motorkhana stuff I tried a couple of years ago. Heaps of guys in their modded big power cars, all beaten with ease by this one dude in a bog stock s___box V6 commodore - he just knew how to drive. "It's not the equipment, it's how you use it"
-
BCPR6ES-8 is 0.8, -11 is 1.1mm. That's the heat range, and 6 will be fine on a stock car. Have a look at this and this.
-
Converting My R33 To Manual
V28VX37 replied to SECURITY's topic in Suspension, braking, tyres and drivetrain
I'm pretty sure that parts list would be very similar to the Diy R34 Manual Conversion. Some good photos in there too. -
Hey there, I thought most people change their plugs because the car is misfiring, not the other way around? NGK BCPR6E-11 (or -8) copper plugs have been mentioned heaps of times and a lot of people are running them successfully in RB's of various level of modification. I just put in another set gapped to 0.9mm (bog stock except for full exhaust) along with brand new coil packs and the car runs great. I think the plugs were $27 for the set a Supercheap. I think this is roughly half the cost of the iridiums. Btw. BCPR6E is the "v-groove" version and BCPR6ES the standard one, both should be fine.
-
Seen wheels only for as low as $200 for a set of 4 (rashed). Wheels with tyres between $300 and $400. Any decent tyre is bound to be worth more than the rim
-
Hey mate I was struggling with this too earlier this year, it was driving me nuts. Try the things listed in this thread: Resolved Misfire In R34 Gtt - Rb25det Neo Checklist and links to other misfire threads For the high RPM issue check your CAS and make sure it's working properly. For the fuel consumption issue check your O2 sensor. Also check for vacuum leaks, just in case. Good luck.
-
An update on that pesky little misfire on idle that I had for the past couple of months. I bought and tried 2 cheap sets of second hand OEM coil packs, on each occasion I thought they helped at first, but really don't even bother. OEM coil packs aren pulled out for a reason. The car also started throwing the classic TCS+slip+engine light combo, too (ignition circuit). As the penultime try I cleaned up the AAC valve just to confirm it wasn't that. Affirmative. So I finally bit the bullet and replaced the original coils with brand new Yellow Jackets and put in a fresh set of BCPR6E-11's gapped to 0.9mm. The misfire on idle IS GONE. About friggin time too!!
-
Well how's that for a rare unit, don't tell me it's a manual too? I had similar trouble trying to work out how to chop an R33 catback system for my R34 GTT sedan. It's got different engine and transmission setup of course, but perhaps there's something useful in these two threads: Exhaust System Lengths On R34 Gtt Sedan? Modifying R34 GTT Coupe or R33 GTSt system to suit Installing Jjr Bellmouth Front/dump Pipe On R34 Who's done it, any advice or tips? Good luck.
-
Interesting, can anyone recommend a shop in Melbourne who could do this for similar money? I'm looking at doing a manual conversion at some stage but at $3k+ it's a bit steep, and it would be nice to have a bit less sleepy auto 'box in the meantime.
-
No worries. Still, make sure you drive at least one R34 before buying (unless you have already), who knows maybe you don't like it in the first place? Might even be worth asking a fellow SAUer in north west VIC to take you for a spin in theirs? Just a thought.
-
Umm, yes. Admittedly I've only driven R32 manuals but the Tiptronic box in my R34 GTT is a dog. Upshifts can take up 1-2 seconds, you can brew a coffee whilst waiting, and the tiptronic mode is pretty much useless because of this, I never use it. That said it's ok for puttering around the city in bumper to bumper traffic. But for any kind of performance driving I'll take my weekender's agricultural T56 6-speed + Billet Pro short shifter any day, thank you very much. It's a buyer's market out there so don't rush it. If you're planning on modding the car buy one that someone else has done all the basics to and you'll save big $$. Write down your requirements, drive a few different cars, don't buy the first one you have a look at, and get a second opinion on the one you're set on buying (by a workshop or State Roads etc.) Good luck.
-
It's an interesting idea but probably worth doing a fair bit of research and running some figures before getting stuck into it. It'll most likely cost X times as much and take Y times as long as you originally budgeted for... Some potentially helpful threads: SAU: BezerkR32's R32 Ls1 Conversion LS1: Walt's FD RX7 V8 L98 6 Litre circuit race car LS1: 1971 LS1 240Z aka 570Z Mad machines, the lot of them! R31Nismoid, the 240Z is mod plated and street legal in QLD ... good luck trying to get that done in VIC
-
Need Help Deciding What Colour For Rims
V28VX37 replied to Jay11's topic in Exterior & Interior Styling
+1, they look great as they are! I painted my stockies white, sandblasted them first etc. etc. took the whole bloody weekend. They turned out alright but it's not worth the hassle really... Before: After: -
Why not get a new one directly from PLMS?
-
+1 for this. Great work on the upgrade guys, not a walk in the park I would've thought given the member count and volume of content! Feel free to publish some database stats if you like Cheers

