

turbo76lx
-
Posts
179 -
Joined
-
Last visited
-
Days Won
13 -
Feedback
100%
Content Type
Profiles
Forums
Events
Gallery
Media Demo
Store
Everything posted by turbo76lx
-
 Got the sill back on and a coat of epoxy on it and the rest of the engine bay.
 -
The KBS is just sealer will be using some Dynamat.
-
I have had to strip and clean and sand every part of the shell so finally got the inside and underneath painted with KBS. One coat of silver KBS, still need to seam seal then a coat of black KBS.
-
Update time. Having the shell dipped has turned out to be more work than I thought. About 14 holes have been drilled in the shell that they never told me they were going to do so these had to be welded up. Yes that is a hole drilled in the middle of the roof skin. I was surprised at the amount of rust that started to form under panels, I had tack welded the sill panel and two extra roof braces on to the shell and removed them when I got the shell home. There are also spots where it looks like acid is still leaching out of the seams. I was also surprised at the amount of body deaden-er and seam sealer that was still in the shell. The black shape in the middle of the photo is one of the many big of body deaden-er.
-
Not local unless you want to drive to Shepparton.
-
Yes had it dipped at Recoat paint stripping, they work out of their shed behind their house. I don't think Recoat smash repair are going anymore after the death of a worker the other year.
-
The motor has been dropped off at JPC and the seats are at the trimmers. Cut off the sill to repair the damage. Had the shell dipped at Recoat paint stripping and have now started spraying the epoxy/prime.
-
Bit of an update, got the front flares to a point I am happy with. Started on the rear flares, cut the bottoms back off and started again. Wasn't happy with the bonnet hinges I made so decided to use VE commodore boot hinges, had to create a pocket each side for the hinges to sit in. Also welded up some holes and seams in the engine bay.
-
Still playing with the front flares.
-
Playing around with extending the front of the front flares to the spoiler.
-
Gave the starter and alternator a clean up and some new bearings.
-
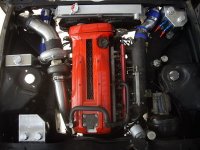
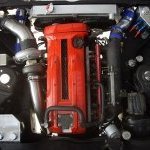
Started on the gaps and sort out which is the best nose cone to use, then need to modify the front section of the front flares and front spoiler. Also gave the engine covers a better polish and fitted some Mines triple flow cam baffles.
-
Decided to buy new brake, got some XYZ 355x32 6 pot front and 4 pot rear. It might be a bit of over kit considering the hatch original came out with 13" rims and now is going to have 14" discs. Have 12mm clearance between the spokes and the caliper and 6.5mm between the inner barrel and the caliper .
-
Stripped the covers and gave them a satin finish. Wasn't happy with the catch can/washer bottle, decided to make it a bit lower and raise the bottom to hide the washed pump and boost control valve.
-
Decided to make a trolley to hold the stud welder and a few hammers and dollies so they're at arms reach while I do the body work. Had to make one good ignition switch from 3. Rebuilt and painted the column. Ordered new door trims in SS style.
-
Made up a battery holder with isolator switch. This will hold a Full River HC44 battery.
-
Welded in some tabs to mount the panel that has the ECU, relays and fuses on it. Patched the fan duct hole.
-
Made a new console to join into the skyline console from some 1.6mm aluminium which will be cover with vinyl. Switch block made and mounted the ATTESA pro control and G sensor.
-
Decided to replace the entire bottom of the door. Folder up a new section and tacked in. Skin test fitted then welded in.
-
Time for an update. Wiper arms painted. Needed to replace the lower door skin. Remade the corner.
-
The R32 GTS-4 is a 6x1 diff flange. The complete rear subframe in the R32 GTS-4 is the same as a R32 GTR including the alloy hubs, the only difference is the VSD diff centre instead of LSD diff centre. The price they ask for the GTS-4 gears it would be cheaper to change to GTR 4.11 front and rear diffs.
-
Help with attesa electronics
turbo76lx replied to andres14oj's topic in Suspension, braking, tyres and drivetrain
Easier way is not to use the factory ATTESA system and use a Full Race stand alone system. https://www.full-race.com/store/nissan/r14-kit/ets-pro-center-diff-torque-split-controller-for-r32-r33-r34-skyline-gt-r-1/ Also have a look at their S14 kit for some ideas. https://www.full-race.com/store/nissan/r14-kit/r14-conversion-kit-skyline-gtr-rb26-awd-240sx-swap/ Here is a commodore that was modified to take the GTR running gear, you can see the front hubs use a custom coil over that bolts into the top of the hub. -
Started repairing the doors. Blasted the paint off the wiper motor, gave it a clean and repainted. Also stripped the paint off the wiper arms.
-
Made up a few low crown dollies and a slapping hammer/spoon to chase the highs and lows, also chasing the high and lows.
-
This link is a fix for photobucket at the moment to see the earlier photos. https://chrome.google.com/webstore/detail/photobucket-hotlink-fix/kegnjbncdcliihbemealioapbifiaedg?hl=en


