

turbo76lx
-
Posts
179 -
Joined
-
Last visited
-
Days Won
13 -
Feedback
100%
Content Type
Profiles
Forums
Events
Gallery
Media Demo
Store
Everything posted by turbo76lx
-
 The filter can only be cleaned when you split the casing.
 -
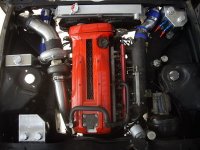
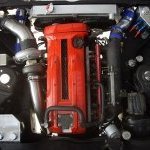
Got the wiring loom finished off, some of the sensors that the ECU will have is. 2x inlet air temp coolant temp engine oil temp gearbox temp transfer case temp 2x knock sensors MAP sensor fuel pressure oil pressure ATTESA oil pressure speedo sensor rear l/h and r/h wheel sensors Gave the transfer case a quick freshen up and changed the disc and clutch plates from 12/7 to 10/9, the spare one had water in it luckily I only needed 2 clutch plates out of it. Since I had a spare ATTESA cylinder I decided to drill and tap it to take a pressure sensor.
-
Sent you a PM
-
Good fun isn't it.
-
Pulled the motor and gearbox out today to finish the engine wiring harness.
-
Got most of the relays wired, now starting the engine bay wiring.
-
Still slowly working on the wiring, finding it hard to stay motivated.
-
Still slowly working on wiring in the ECU.
-
The cam bracket was machined out on a multicam cnc router then I machined the back out on a manual lathe.
-
Got most of the body harness wired now need to wire the engine bay. Also made up a cam sensor bracket.
-
Pick up a gearbox and clutch yesterday, a big thanks to Paul (Piggza) for meeting me in Goulburn.
-
Started wiring the body harness, had to sort through and cut up some spare wiring looms to make one good one up. Looking at buying the Link G4+ thunder ECU, seems to have everything I will need and more. http://www.linkecu.com/G4PlusThunder
-
Made up a bulkhead fitting for the attesa lines. Also stripped the R33 loom to reuse some of the wire. One day later.
-
Bit more done, started the brake lines and fuel lines. Got sick of using a cheap brake line flaring tool so lashed out and brought a sykes pickavant flaring tool but my super dodgy tube straightener make from roller door wheels still works ok.
-
Started filling all the 10mm hole that were drilled from when the dealer had it rust treated back when it was new. They weren't scared to drill random holes everywhere to spray the rust treatment in. It's nice when you find bog inside the car and a random hole. This quarter panel on the passengers side did have 16mm of bog in it so I guess they started levering the quarter out from the inside. Some of the other old repairs, looks like they cut patches out from inside the car to hammer the sill panel out.
-
I've already made the fuel tank, it's back on page 1, no need to pay anyone as i've made a fuel tank and fuel cells in my time.
-
Removed the back fuel tank mount that had been butchered for the old drop tank and filled the two back body plug holes. Maybe I should made 2.
-
Got the other side done.
-
Started filling in the gap from cutting the body to clear the tyres, because I've had to cut so high I had to weld the two inner panels together first. The fun of welding through tar, body deadener and paint. Little bit of rust in the lower 1/4 so easier to just cut the whole section out as this is covered by the flare. One side done.
-
Decided to try and for Currie Enterprises Johnny Joints to the front caster rods since the rubbers are flogged out. I think these will be ok considering they are used in the suspension of 3 ton rock crawlers and the engineer is happy with them because of the urethane bush. It's a pity it wasn't 0.4mm bigger in diameter then it could have been pressed in and not have to weld it. Tapped a new thread for the grease nipple through the castor rod and lined it up with the grease nipple hole in the johnny joint then welded it on both sides. Also dropped the motor, turbo and dump pipe back in to see if the brake line will clear and be far enough away from the exhaust.
-
Another little job done, remade the front brake hard lines from the brembos the the brake line mount.
-
Got the other side flares done and put it on the ground to see how it looks. This is with no springs sitting on the bump stops to check clearances. This is at standard ride height, will probably lower it about 20mm.
-
Started on the other side.
-
Started on the rear flare. Made some adaptors to mount he Recaros on the autotecnica seat rails.
-
Started extending one of the front flares, thought I would try the tape and bog trick. Cut the bottom off the flare and screwed both parts to the guard. Put masking tape across the two. Mixed up some bog and towelled over the tape and also cut some tig filler rod that I pushed into the bog to give it some extra support. After the bog was dry I remover the flare and fibreglassed the inside. Still needs a lot of work but should come up ok.

