


Sydneykid
-
Posts
12,004 -
Joined
-
Last visited
-
Days Won
1 -
Feedback
96.2%
Content Type
Profiles
Forums
Events
Gallery
Media Demo
Store
Everything posted by Sydneykid
-

Jaycar Boost and Fuel Control
Sydneykid replied to Sydneykid's topic in Four Door Family & Wagoneers
Light pre-igntion is a ting ting ting sound, heavy detonation is closer to knock knock knock. There are sound wave files floating around of cars pre-igniting, do a search and have a good listen. The standard ECU has temperature compensation, via the engine water temp and the AFM. A dyno is a pretty harsh environment, the engine is working at 180 kph but there is only the dyno fan pointed at the radiator, not a 180 kph gail blowing over the whole car. If you tune it for zero preignition on the dyno, then it shouldn't have any on the road. The standard ECU has knock detection and appropriate mapping on the rare occasions that it becomes an issue. cheers -
Confusing Dyno Result..r34 Gtt
Sydneykid replied to gts4-skyline's topic in Engines & Forced Induction
A quick tune with the SAFC will fix the R&R problem, shouldn't take more than 1/2 hour and cost less than $100. Since you have higher airflow you should have more power. You need to take a little more interest in what your tuner is doing, that way you can help him achieve a better result. Tuning with an AFM voltage bender, like an SAFC, has compromises. To lean out the A/F ratio (and get away from the R&R mapping) your tuner will reduce the AFM voltage seen by the ECU by using the SAFC. But (there is always a but) this also advances the igntiion timing, that is the compromise. So your tuner will have to balance out the leanness needed to get good A/F ratios and the preignition caused by the advanced igntiion timing. The SAFC is a piggy back, the standard ECU is still there. The Power FC ( FC = Full Computer) replaces the standard ECU, just unplug the standard ECU and plug in the PFC. Takes about 5 minutes, most of which is spent removing the trim that covers the ECU. The PFC comes with the basic mapping necessary to starrt the car and it to the dyno for a fine tune. You haven't a lot of mods, so the PFC will have no problems, just don't rev the beegeesus out it until you get it fine tuned. The Power FC (being a replacement ECU) doesn't have any compromises, for example your tuner can change the A?F ratios without afffecting the ignition timing. Hope that was of some more help cheers -
Sorry Chris, Jamex don't take credit cards. In order to get the Group Buy pricing I had to agree to their payment terms. Following are the prices for your requested kit; R32GTST 73175 Front Springs $144.00 70191 Rear Springs $144.00 Front Bilstein Shocks $561.00 Rear Bilstein Shocks $561.00 W0921 Bump Stop & Dust Cover $102.00 Zero Freight $- Sub Total $1,512.00 Less extra 5% $75.60 Total $1,436.40 PM me for further details Cheers
-
Hi guys, there are only 2 sets of R33GTR Bilsteins left. As soon as they are sold Jamex will be closing the Group Buy on the R33GTR kit. We have no word from Germany as to when they will be making the next production run of R33GTR Bilsteins. So if you are thinking about joining in, don't wait too long. Cheers
-
Advice On Track And Drift Set-up...
Sydneykid replied to J-Boy's topic in Suspension, braking, tyres and drivetrain
Whilst I agree with Roy on the suitablility of a standard Skyline to handle a track day pretty well, the proviso is that it is a well maintained standard Skyline. Plenty of the guys with track experience have already covered the maintenance items. Stuff like; 1. Change the fluid in the brakes, I see so many cars that have to stop early in the day because the fluid is old, has water comntamination and boils. 2. Check the pad depth, you will be stunned at how fast you can wear out a set of pads on the circuit. Again I see many cars limping home with pads down to the backing plates. 3. Radiator flush and refill with coolant, the number of boilers is amazing, especially now when it is getting on for the hot season. The circuit race seasons stops in November for a very good reason. 4. Tyre pressures, the old chestnut, I can always catch out half the field at a drive day with low tyre pressures. Check them. 5. Remove the junk, every road car accumulates stuff inside the cabin and in the boot. They make great missiles in a spin or under heavy braking. 6. Check the fuid levels, power steering, engine oil, gearbox oil, diff oil ......what you might get away with on the road will show up on the track very quickly and can spoil your day at the very least and cost you a bomb if the bad stuff happens. Remember to finish first, first you have to finish. Pitty some of the guys didn't apply that lesson yesterday. cheers -
Go the PFC first. cheers
-
Excelleant, good info, how old is " the older soundstreams"? Is my 6 year old one old or new? cheers: )
-
Confusing Dyno Result..r34 Gtt
Sydneykid replied to gts4-skyline's topic in Engines & Forced Induction
There is no such thing as "BOOST CUT", the standard ECU has Rich & Retard (R&R) mapping for excessive airflow as measured by the AFM. Boost is IRRELEVANT, I have seen heavy R&R mapping at 9 psi and the R34 generation of ECU (as used in R34GTT and Stagea) has very aggessive R&R strategy. You have removed some restrictions with the dump and exhaust upgrade. Removing restrictions means that the airflow is higher even at the same boost level. Always keep in mind that boost is simply a measure of the resistance to airflow, NOT a measure of the airflow itself. Moving onto your specific problem, actually I suspect that you have 2 problems. The first (the major one) is the additional airflow has moved the ECU deeper into R&R mapping, this means more correction is needed via the SAFC. Secondly, at 12 psi you may be getting to the limit of temperature control as the efficiency of the standard turbo drops off at airflow over 30 lbs of per minute. If you have decent intercooler and good ambient airflow this may not be a problem, but it will be close. The cost of retuning the SAFC should be around $100 as it will take less than 1 hour, most of which will be spent plugging the car into the Dynapack. Hope that was of some help cheers:) -
Front Upper Arms For Ecr33...
Sydneykid replied to J-Boy's topic in Suspension, braking, tyres and drivetrain
There are toe adjusters standard front and rear. cheers -
Advice On Track And Drift Set-up...
Sydneykid replied to J-Boy's topic in Suspension, braking, tyres and drivetrain
You shouldn't have too much roll at the Paperclip, what stabiliser bars settings are you using? Cheers -
R33 Coilovers Fit R32 ?
Sydneykid replied to GTR_83's topic in Suspension, braking, tyres and drivetrain
Front will fit, rear won't. Shocks are far too long, the R33 rear top mount is much higher in the chassis (right up under the rear parcel shelf) than the R32 rear top mount. cheers -
I know this is an exhaust thread, but ground clearance and ride height are important considerations when choosing an exhaust. So there is a mixture of exhaust and ride height dimensions that might come in handy following. Before we get into it I should mention that I have raised mine 8mm (using the next up circlip groove) since the pictures where taken. It now sits at 345 mm centre of wheel to guard at the rear (350 mm at the front) and at that height the STANDARD exhaust is exactly 100 mm from the ground. That's measured under the rear stabiliser bar same as Alex's. At that height it just clears the local speed bumps that I usually use to check clearances. Note that the front 350 mm and rear 345 mm gives a 10 mm rake (nose down) when measured at the sills. At 405/380 Alex's is sitting around 10 mm nose up, which is what mine was like when I got it. The 10 mm nose down makes a big difference to how it looks, much more agressive stance, so to speak. For the guys getting the Whiteline/Bilstein Group Buy kit that is 1 circlip groove up from standard, both front and rear. The standard exhaust is ~2.5" (62 mm) OD, so a 3.25" (83 mm OD) exhaust is going to be 20 m closer to the ground. Even a 3" (75mm) exhaust is going to be 13 mm lower. I can't raise the exhaust up any higher than standard because it will hit the stabiliser bar. So I might have to go up another 8 mm in the spring height to give similar ground clearance to what I have now. That will leave the front at 358 mm and rear at 353 mm (still with a 10 mm rake, nose down) which is 47/27 lower than where Alex's is at the moment. Cheers
-
Ah yes, but yours is just a lot more STOCK than the rest. cheers
-
Crd Dyno Tuning Of My R32 Gt-r.... My 0.02c!
Sydneykid replied to williamsf1's topic in New South Wales
So you are going to bring it back to Sydney for comparison on the same dyno's? cheers -
Let's get the mathematics and terminology sorted out first; 500 rwhp is 375 rkw (Dyno Dynamic roller dyno out put at the rear wheels) That's ~450 kw or ~600 bhp (at the engine) That's similar to WilliamsF1 so maybe a look at his engine mods and tuning thread would be a good place to start http://www.skylinesaustralia.com/forums/in...topic=87893&hl= cheers
-
Internal Gate Boost Control Problems
Sydneykid replied to SimonR32's topic in Engines & Forced Induction
Nope, your at looking at it as if the wastegate is either fully open or fully closed and this is not the case. Plus you are thinking of this as if it is the only test. It is one of a sequence of tests to eliminate the possibilities. There is no one test that will eliminate all of the posibilities, so I have to do them one by one in a logical sequence. If I wire the wastegate flap fully open and it still builds excessive boost, then I know it isn't the wastgate flap that is causing the boost to build. One item eliminated and I can start looking elsewhere. Plus the very process of wiring the wastegate flap open by itself will tell me if there is an obstruction to its full opening. Another item eliminated. If the boost builds with the flap fully open, then I drop the exhaust at the entry to the cat and see if that stops the boost build. If it does then I know the issue is cat back. If it doesn't, then I know it is between the engine and the cat. Another item eliminated. If I wire the wastegate fully open and it doesn't build boost, then I need to check that the wastegate actuator is actually capable of fully opening the wastegate. I do this by tightly tieing a cable tie onto the wastegate actuator shaft such that it is pushed along the shaft by the action of actuator body moving the shaft. I then go for a drive, build some boost and then check how far along the shaft the cable tie has moved. I compare that to the full movement of the wastegate flap to make sure the actuator has sufficient travel. If not, I then adjust the length of the shaft to achieve more flap opening. I have to be careful as lengthening the shaft also increases the preload on the wastegate actuator spring and thus increases the boost level at which the activator moves. I have carried out this elimination process on a number of Skylines, and I have ALWAYS found the problem. The most common of which is insufficient wastegate flap opening, either from obstruction or poor adjustment. Hope that clarifies cheers -
I have tried having 92 ron and 98 ron maps, both tuned on Shell fuels. What I found was around 5-7% lower fuel economy. I put most of that down to the engine loosing efficiency at retarded ignition timing, maybe a little to the more efficient burn of the 98 ron. And the balance was me trying to get the same performance out of the car ie; more heavier application of the throttle. After a month of driving around on 92 ron the fuel bill in $ terms was much the same. I would have improved that by driving for more fuel economy, but I could have done that with 98 ron just as successfully. cheers
-
Better not listen to those people again, and avoid those workshops because they are WRONG. I have seen 6 different models of Commander and I haven't found one that will work on any Power FC's other than the model/models it is listed for. ie; there is no universal one. For Nissans, there are 2 Commanders that seem to do most models. From memory the 415-X001 is by far the most common. And the 415-N001 is for use with the later models of Power FC's. Check out the application chart for your particular model. cheers
-
Hi guys, I will try and answer the questions, but before I do I should point out that you can swap most of your good bits onto/into an RB25DET and end up with a better result than building an RB23/RB24. And it will cost a damn site less as well. On to the questions; The standard RB20 bore is 78 mm, the most common RB23 (2,280 cc's) piston upgrade is 4AGZE which are 81 mm (from memory). This means you will need to relieve the combustion chambers radius at the bore by 1.5. Then taper it into the normal combustion chamber shape. Pretty simple really, any machine shop could do it. You will need to relieve the combustion chamber volume to achieve your target compression ratio. From memory about 3 cc (slightly more than a good polish) gives 8.8 to 1 for an RB23. The combustion chamber volumes will have to be equalised of course. Porting is pretty much essential if you want to use the higher rpm effectively without huge amounts of boost. There is a lot of work on both the inlet and exhaust ports needed. If you do a really good job, you should end up around 85% of what a standard RB25 cylinder head flows. Depending on the experience of the machinist and the workshop hourly rate you are looking at around $1K to do the above. There are larger valves available for RB20's , I have seen 2mm larger inlet valves and 1.5 mm larger exhaut valves. I have a recollection that they were for a VG30 or CA18 but they fit the RB20. Since VG30's are popular in the US there are quite a few valve, valve spring alteratives. A quick check of the sizes should confirm the suitability. From memory the VG30 valves where around $US20 each, so that's $640 for the set plus freight. RB26 cranks vary considerably in price, I have seen R32GTR cranks around $400, rods around $200. Up to double that for R33GTR cranks and rods. The best suggestion I can make is to shop around the For Sale forum and check out the historic prices. As for cams, 256 to 264's would be fine for using with the hydraulic followers (260 Poncams for example) . But to really use 272's or higher you would need to do a solid follower conversion. No, RB26 bits won't fit, well not without some serious engineering and machining. But CA18/VG30 may well fit, worth checking anyway. By the time you have the necessary RB23/RB24 parts purchased, get it all machined and assembled you are looking at a bit over $5K. Then you have to add the accessories, manifolds, turbos etc. Hope that was of some help cheers
-
Jaycar Boost and Fuel Control
Sydneykid replied to Sydneykid's topic in Four Door Family & Wagoneers
Suggestions to your questions follow; 1. There should be no difference, the engine should run exactly the same. I strongly suggest you check the input and output voltages across the whole range of AFM voltages 2. I use fine mode, I reckon course mod is only necessary for AFM and/or injector size changes 3. Our race team dyno guy uses his carefully calibrated ears, he can pick pre-ignition from the other side of the workshop. I use mechanics ears (microphone, amp and headphones). Most good workshops have them 4. Until the pre-ignition stops Hope that was of some help cheers -
Any 1 Involved In Motorsport, Track Etc?
Sydneykid replied to RU34ME's topic in Motorsport Discussion & Builds
Hi Ryan, trying desparately not to rain on your parade. Improved Production regs require an engine with same number of cylinders as the car came with standard and the engine must come from the same manufacturer. So the 6 cylinder RB in a 180SX (that came with a 4 cylinder) is a no go. Plus the body panels must be standard, except the front bumper and rear spoiler. So the S15 front is a no go as well. You could run it as a Sports Sedan, no problems with the engine swap and you might get away with the S15 front. But they are seriously fast, faster than a V8Supercar, so the competition is hot. I am not sure what to suggest to get you racing, other than change cars. Maybe try a few Spersprints first and see how you like the circuits. No problems with running in them, very few sports sedans, so not a lot of competion. And you can get mixed in with Skylines and others on the day for some fun. Join SAU and then look for invites to circuits that interest you. I am sure the guys will help uou out with a standard set of supersprint Sup Regs that you can study. Maybe pop out to an event before you run one to get a feel for what goes on and the types and speed of the cars. cheers -
No way I could fit a sub on the rear, I had 8 wheels and tyres in there last week and an RB25DET gearbox. That took up every square inch of space. The Soundstream amp is about 6 years old. It did good service for about 2 years and then sat unused for 3 years until the Stagea needed its services. I like the sound, not to harsh so it suites the MB Quartz very well. Is there some difference to the current Soundstream amps? cheers
-
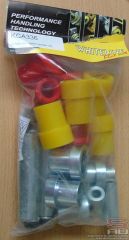
A couple of guys have asked me about the front camber kit KCA336, and its cost. As you can see it is a very complex kit with a lot of components; In the kit there are; 8 X polyurethane bushes 2 X steel offset drilled shafts 4 X aluminim collars 2 X high tensile bolts 4 X high tensile nuts 4 X centre drilled steel shafts 4 X high tensile spring washers 1 X set of instructions 1 X "Whiteline Test Pilot" sticker This enables you to adjust the camber at the outer upper control arm. It also replaces the rubber bushes (with polyurethane bushes) on the inner upper control arm. Both of these are high wear points on R32's, almost every R32 I see has worn upper control arm bushes. This is mostly due to their age, but Nissan obviously saw room for improvement in the design of the upper control arm. The R33 version of the front upper control arm spreads the load over a wider area in an attempt to reduce the wear on the bushes. So you do get a lot for your money and most R32's need it badly. cheers
-
From the album: Sydneykid's Gallery
