

GTRPSI
-
Posts
1,355 -
Joined
-
Last visited
-
Feedback
100%
Content Type
Profiles
Forums
Events
Gallery
Media Demo
Store
Everything posted by GTRPSI
-
Its the pressure senders that tend to be unreliable.
-
Pull the plugs and start cranking.
-
How far down your system that you plumb back your screamer will effect the sound level. The closer you plumb back to the rear of the system, the louder it should get as your bypassing the exhaust systems mufflers.
-
Gutting removes the internal honeycomb which is a restriction. Gutting is highly illegal, if you get slapped with a EPA test you will need to get a stock cat to pass the test and stay out of trouble. For weld in cats they cut the old cat out, keep the flanges, and weld the flanges onto the new cat.
-
Just a wild guess but either your cooling system was still under pressure when you undid the bolts and coolant seeped into the cylinders or just a case of no pressure but the bolts were undo while you worked on it a fluid got in because you did not drain the cooling system. Did you drain your cooling system before starting work? If you didnt, then thats your answer, if you did and fluid got in then you have a problem.
-

Rb20Det Won't Start After Cam Install!
GTRPSI replied to Prem72's topic in Engines & Forced Induction
You didnt disturb your injector wiring when removing the covers to put the cams? Check for spark, put a screw driver against a injector while someone cranks it and put your ear against the screw driver to listen if they are ticking and operating (like a stethoscope) -
The GTR pressure senders are known to play up, mine showed no pressure, put another in and its all good.
-
Weld in quality High Flow cats with metal substrates (so they dont burn out) are around the $170 mark on ebay. http://cgi.ebay.com.au/Universal-Catalytic-HIGH-FLOW-200-CPSI-converters-/130485317656?pt=AU_Car_Parts_Accessories&hash=item1e6187f018 If you want to save your dosh, gut the stock one. It sort of looks like its stock, take it off and check if its 3" and not smaller and bolted to your 3" system.
-
Garage Clean Up R32 Gtr Parts For Sale Melb
GTRPSI replied to jonmowa's topic in For Sale (Private Car Parts and Accessories)
n1 style side spouts painted in gun metal(they jsut overlay the stock gtr side skirt )$200 SOLD to me, pm me with a time and address, will pickup and pay as soon as i hear from you. -
For what model are the rotors and what brand /compound of pads and for what calipers? RDA Part numbers would be better so i can ID them.
-
Bump for the day.
-
Looking for a working R32 GTR digital clock and also a power steering pump with the hose to the reservoir. Not in a rush, just wanting to sort out a non working clock and small oil leak. PM me.
-
Gtr Left Over Parts, Shed Clean Out Sa
GTRPSI replied to PbP-031's topic in For Sale (Private Car Parts and Accessories)
Which version of HKS boost controller with scramble button is it? -
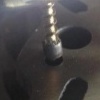
Hi, could i have the numbers stamped of each the camshafts to identify the specs and any other tale tell signs. I cannot find Tomie 264 10.25 cam references. Maybe something else, another brand, Tomie different specs, Kelro cam......
-
Leave your coil covers off and run the engine at night in the dark. Enjoy the electrical storm. Id be testing plugs regapped to 0.8mm first though, before you put the coil covers on have a look for sparks arcing around the coil packs. I also run a smear of dielectric grease on the ends of my coil packs to help stop spark loss on both my GTR and XR6.
-
Quick Question For Mechanically Minded Ppl
GTRPSI replied to GTRAAH's topic in Engines & Forced Induction
+1 for fitting a rev limiter, engines are not cheap. -
Im running one of these with no noticeable driving difference between a decat pipe and the cat fitted. http://cgi.ebay.com.au/Ultra-High-Flow-Rac...=item19bcb98d81
-
Nissan Gtr High Idle And Throttle Body Fix
GTRPSI replied to GTRPSI's topic in Tutorials / DIY / FAQ
Just an update, our GTR still idles at 950rpm solid since this mod, the silicon is holding well in the throttle bodies and doing its job. Lots of adjustment left still in the AAC valve, i could drop the idle down as far as id like to if needed. -
Those plates look so sweet on the GTR.
-
My unit with the control knobs is on the right, a plug to a really long cable (more than 2.5m) then another plug that connects to a black box. Near this black box are 2 different plugs that do not look related to the gforce sensor and also a bullet type connector. (on the left) Its the fact that the wire is so damn long that makes me wonder if it goes straight into the g force meter. Where is the factory torque split controller for attesa? If its under the rear parcel shelf, things may start making sense as to why the cables are so long. If not, it must plug into the g force meter but the plugs look a little diffrent to me....i could be wrong though. Edit just rechecked my plugs on the unit, the large one is 9 pin (3X3 pins) and the smaller one is a straight 3 pins in line so im going to guess going by the picture posted that it does not plug into the g force sensors.
-
I just got my hands on a HKS etc unit (electronic torque controller) and its without any connection or instruction manual. Does anyone here know how they are connected/wired up? Its got the adjustable control box that goes on the dash next to the gauges, a really long cable and another box with plugs that i assume (guessing) sits under the rear parcel shelf due to its length. Any tips would be appreciated.
-
Oil Control In Rb's For Circuit Drag Or Drift
GTRPSI replied to Sydneykid's topic in Engines & Forced Induction
Wow, a Sunday arvo reading till page 24. LOL I have a different attitude to the problem at hand. We know the crankcase is pressurized due to blowby. This pressure runs up the block, through the oil drain backs to the place of least pressure, the breather hoses. While this air goes up, the oil is trying to go down....common sense. Take a garden hose, put some oil in it and blow through the other end. Larger, smoother (take note of m speeds large rear machined drains) helps the oil run back. Its an old school hot rod trick to open all oil drain backs, but 2 schools of thought how to go about it. 1/ make them larger and mirror finish smooth to let the oil run down faster, or 2/ open them up and paint them with the idea of a rough finish helps the oil pickup heat off the head and block on the way down. The argument with 2 is paint flaking off. The adding of a drain to the rear of the head gives another escape for blowby under pressure and oil under conditions of even pressure between the sump and cam covers. The more venting (opening all drainbacks and adding more) means less airflow though each drain individually going from top to bottom giving the oil more of a chance to run back down. Ideally there should have been a big 5 inch drain to reduce blowby air flow speed up the engine and give the oil a path of little resistance. Yes restricters help reduce the amount of oil you need to get back down again, a must with high/long periods of RPM. Just my thoughts... -
Nissan GTR throttle body and high idle fix. The Nissan Skyline GTR is known to sometimes have a high idle appear especially on vehicles being boosted for extra power. In extreme cases a misfire may also develop off boost in my case up to 3500rpm which would then disappear once boost was hit, all the way to the red line. The problem is often the standard factory paper gaskets getting brittle and combining this with high boost pressure, the brittle gasket will crack leading to air leak at the join, resulting in a high idle. A temporary fix is to adjust the idle screw till you run out of adjustment. To do this, disconnect the plug going into the idle speed control motor to eliminate the ECU's ability to control the idle and start the engine. Next to the idle control motor is a screw that can be turned to adjust the amount of air entering the engine. Turn off the engine and reconnect the plug back in so the ECU has control. If the engine speed has gone back up again after starting, take off the passenger side kick panel to expose the ECU. On the side of it is a variable pot that is a fine tune of the RPM, do not turn it too far to avoid damage to the pot. If that failed to bring the idle down enough, chances are good that one of your hoses is cracked and leaking or your throttle body gaskets are gone. After removing the throttle bodies and the intake manifold that holds them under it on the head, take a look at the gaskets. This is what your looking for. Cracked gaskets. Dirty looking sections where air was getting in. Discoloration on the aluminum surfaces where there was no or poor gasket contact. After cleaning all the old gasket off there are a number of ways to get a new seal. 1/ Replace them with new paper gaskets. Great if your not running high boost, coat the paper with a good sealer like Hylomar to help with the seal. 2/ Steel replacement gaskets such as those made by companies like Tomei. The problem here is that being steel, they will not blow however the seal is not the best and may still leak slightly. 3/ The racers trick. A nice thin even coating of "blue" silastic. While the throttle bodies are off you may want to clean them. If you look inside where the throttle butterflies are you may see a black coating inside the throttle bore. DO NOT clean this off, its a black silicon coating used to help seal the butterflies, use a carby cleaner spray and blow it clean with compressed air. Sometimes you may look and find its too late, where the previous owner or mechanic did not know better and cleaned the seal all off. If you didn't find a leaking gasket but all the black sealant removed off the throttle body, chances are that the leak caused by the sealant missing is the reason for the high idle. This is an example of no sealant in the throttle bore, actually you can see some black marks of where it use to be. Most people at this point give up and buy new ones from Nissan for over $1200 or try their luck sourcing second hand ones that have not been damaged by cleaning. What i did was a reset all the throttle stops to keep the butterflies as closed as possible, but not so far closed as the butterfly would bind in the bore. To do this undo the throttle stop adjustment on each throttle plate and let the butterfly close till it binds in the bore. Then turn the adjustment screw in till it contacts the lever for the butterfly. Now give it 1/3 of a turn in and check to see that the butterfly can open and close without binding closed in the bore. Should one or more throttles bind, redo them all to 1/2 a turn in and test again. The stop adjustment screw. Now to reseal or reapply the black factory coating that seals the butterflies. Take note of the direction the butterfly open, on one side from the top, and the opposite side from the bottom. You want to apply a thin coating of blue silastic to the opposite side of the throttle bore that the butterfly turns to. One side The other side Once the silicon has hardened to a slightly rigid consistency (1/2 hour), operate the butterfly to break the seal, otherwise the butterfly will get stuck in the bore. Do this a number of times to make sure things don't get stuck. After the silicon has hardened, hold the butterfly up to a light and look for leaks, if any are found add a little more to this area. When finished rub off any excess off the butterflies so any sealant only remains on the throttle bore. There you just saved over $1200. Now just reassemble and readjust your idle as explained at the beginning of this write up, there should be heaps of adjustment now.
-
Hypergear Turbochargers, Turbo Hiflow And Rebuild Service.
GTRPSI replied to hypergear's topic in For Sale (Business Traders)
Might pop in to speak with you about rebuilding one of my HKS 2540 turbos soon. I didnt know you rebuilt turbos there, Diago from AMR next door to you has been servicing my company Camry for years and will be doing a RWC on my GTR next month (hopefully), might pop in then for a chat. AMR is highly recommended by me for anyone that needs work done honestly at a reasonable price. -
R32 Gtr, R33 Gtst, R34 Gtr Parts
GTRPSI replied to bnr324's topic in For Sale (Private Car Parts and Accessories)
Tried calling at 11.30....the numbers disconnected.
