Jump to content
SAU Community

Recommended Posts

$$$$$$$$$$$$$$$$$$$$$$$$$PRICE DROP$$$$$$$$$$$$$$$$$$$$$$$$$$$$$$$$$$$$$$

Dropped to only $16k!!!!!!!!!!!!!!!!!!!!!!!

Good Day Peoples

Unfortunately it's already time to part with the onevia.

It has been the most fun and the most scary car i've had but it's a bit too much for a daily driver.

I'm looking to get an aristo. I'd love to keep this bad boy as well but i owe too much money as it is.

I purchased this car about 4 months ago and have only had it on the road for the last month and a bit. i purchased of a guy in south australia for 14k who had brought it in as a personal import from japan. After i took delivery, i then had to spend almost 6 grand to get it engineered and ready for rego. It was built in japan as a very competitive drift car and it definately is. there is so much work on this car, it makes it so easy to drift. i have taken it to winton once and for my first time on the track, i really impressed myself on how easy it was to do in this car.

So if anyone has a modified aristo the want to swap, let me know.

enough about my life story. more about the car.

Some of the things about the car i am unsure of as i have only had the car a few months.

Car: 1989 Nissan Silvia Sunroof Model- Converted in japan to Onevia

Engineered in Victoria as a 2 seater.

Engine: Original: CA18DE - Converted in japan to Red top SR20DET

Head has been ported and polished

Unknown internal work - It's quicker than any other SR i've been in, so i figure it has work done.

Disco potato GT28RS, done only 1200ks - Have receipt

A/M Aftermarket manifold.

Greddy front mount inercooler

Grex Oil cooler and filter relocation kit with braided lines

Oil catch can

Hks Air filter

Brand new Hi flow metal cat

Larger twin core radiator

GTR fuel pump

Engine dampener (brand new not fitted)

Transmission: Manual

Heavy duty button clutch - Unsure on what type

Viscous LSD

redline oil

Exterior:

Body is Very Straight, could do with a new front bar as it has been repaired previously.

Paint is top secret gold from window sill down and black with blue fleck on the roof.

Boot lock shaved

badges shaved

Antenna relocated to in engine bay

guards flared in japan

FRP wide guards

FRP vented bonnet

Possibly a Vertex kit..... (Thanks)

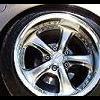
Blitz 17x9" front rims (80% tyres)

Work VS-KF 17x9.5" rear rims (80% tyres)

Ganador CF electric mirrors

Plastic garnish on rear lights painted

LED front indicators

Metal guard under engine

Interior:

Sound deadening stripped and interior painted gold

All interior (boot and back seat excluded) is now installed again. Door trims are functional but look very average

Nardi steering wheel

Razo Carbon Gearknob

Drift handbrake button

4 point Nismo Harness

Electronic Climate control

4 x DEFI gauges with controller (Oil Pressure, Oil/Water temp, Boost)

Nismo 260km Speedo

Greddy Profec S Dual stage electric boost controller. (purchased 1 month ago)

Gizzmo Dual Stage Shift Light (purchased same time as boost controller)

Suspension:

Adj front castor arms

Adj rear camber arms (brand new not fitted)

Office Kei coilovers with front camber tops

Front and rear strut braces

Upgraded diff & steering bushes

5 Stud Conversion

Brand new rear discs and almost new s15 front discs.

I have a garage full of spares that can be included for extra. they will be advertised as well. But car buyer will get a better deal.

Some of these include:

SR20DET motor minus head. Good for spares or bottom end rebuild - includes alternator, manifold, water pump and all head components

FRP custom bolt in sunroof panel. Reduce weight by 13kg

Coil packs

Engine belts

Everything needed to reinstall aircon

Stock gearknob/steering wheel/handbrake

4 x Good condition S15 rims with new tyres

4 Advan Tree Spoke rims with tyres (no tread)

3-4 sets of 17in drift tyres

1-2 sets of 16in drift tyres

Set of 4 x S15 injectors flow tested with new o rings

Greddy turbo timer

Low km's road legal suspension

The back seat and seat belts and baby bolts

Z32 AFM

If i asked what i've paid for this, i'd would be about 20-21k. I know i wont get that.

So NEW Asking price of only $16,000 ono. Make me an offer.

If you want to give lo ball offers, i can remove enough parts to equal your offer. if your serious and want a heavy duty piece of machinery. Not on the net a lot so Please SMS or call me on 0405 674 827

Nick

(I only have pictures the previous owner took at the moment, will put more up when i wash the car.)

Link to comment
https://www.sau.com.au/forums/topic/144084-for-sale-already/
Share on other sites

Hey Nick it's Greg off ns.com (hotesx).

this car is the dogs bollocks people, so similar to mine, and would make for a good car to do club events in next year, cheap maintenance compared with a gtr/gtst and still heaps of fun, the rwd line up for club sprints next year has never looked so good so someone buy it and enter the sau championship next year.

gluck with the sale.

Greg.

  • 2 weeks later...
  • 2 weeks later...

Create an account or sign in to comment

You need to be a member in order to leave a comment

Create an account

Sign up for a new account in our community. It's easy!

Register a new account

Sign in

Already have an account? Sign in here.

Sign In Now


  • Similar Content

  • Latest Posts

    • Did this end up working? Did you take some pictures?
    • And finally, the front lower mount. It was doubly weird. Firstly, the lower mount is held in with a bracket that has 3 bolts (it also acts as the steering lock stop), and then a nut on the shock lower mount itself. So, remove the 3x 14mm head bolts , then the 17mm nut that holds the shock in. From there, you can't actually remove the shock from the lower mount bolt (took me a while to work that out....) Sadly I don't have a pic of the other side, but the swaybar mounts to the same bolt that holds the shock in. You need to push that swaybar mount/bolt back so the shock can be pulled out past the lower control arm.  In this pic you can see the bolt partly pushed back, but it had to go further than that to release the shock. Once the shock is out, putting the new one in is "reverse of disassembly". Put the top of the shock through at least one hole and put a nut on loosely to hold it in place. Put the lower end in place and push the swaybar mount / shock bolt back in place, then loosely attach the other 2 top nuts. Bolt the bracket back in place with the 14mm head bolts and finally put the nut onto the lower bolt. Done....you have new suspension on your v37!
    • And now to the front.  No pics of the 3 nuts holding the front struts on, they are easy to spot. Undo 2 and leave the closest one on loosely. Underneath we have to deal with the wiring again, but this time its worse because the plug is behind the guard liner. You'll have to decide how much of the guard liner to remove, I undid the lower liner's top, inside and lower clips, but didn't pull it full off the guard. Same issue undoing the plug as at the rear, you need to firmly push the release clip from below while equally firmly gripping the plug body and pulling it out of  the socket. I used my fancy electrical disconnect pliers to get in there There is also one clip for the wiring, unlike at the rear I could not get behind it so just had to lever it up and out.....not in great condition to re-use in future.
    • Onto the rear lower shock mount. It's worth starting with a decent degrease to remove 10+ years of road grime, and perhaps also spray a penetrating oil on the shock lower nut. Don't forget to include the shock wiring and plug in the clean.... Deal with the wiring first; you need to release 2 clips where the wiring goes into the bracket (use long nose pliers behind the bracket to compress the clip so you can reuse it), and the rubber mount slides out, then release the plug.  I found it very hard to unplug, from underneath you can compress the tab with a screwdriver or similar, and gently but firmly pull the plug out of the socket (regular pliers may help but don't put too much pressure on the plastic. The lower mount is straightforward, 17mm nut and you can pull the shock out. As I wasn't putting a standard shock back in, I gave the car side wiring socket a generous gob of dialectric grease to keep crap out in the future. Putting the new shock in is straightforward, feed it into at least 1 of the bolt holes at the top and reach around to put a nut on it to hold it up. Then put on the other 2 top nuts loosely and put the shock onto the lower mounting bolt (you may need to lift the hub a little if the new shock is shorter). Tighten the lower nut and 3 upper nuts and you are done. In my case the BC Racing shocks came assembled for the fronts, but the rears needed to re-use the factory strut tops. For that you need spring compressors to take the pressure off the top nut (they are compressed enough when the spring can move between the top and bottom spring seats. Then a 17mm ring spanner to undo the nut while using an 8mm open spanner to stop the shaft turning (or, if you are really lucky you might get it off with a rattle gun).
    • You will now be able to lift the parcel shelf trim enough to get to the shock cover bolts; if you need to full remove the parcel shelf trim for some reason you also remove the escutcheons around the rear seat release and you will have to unplug the high stop light wiring from the boot. Next up is removal of the bracket; 6 nuts and a bolt Good news, you've finally got to the strut top! Remove the dust cover and the 3 shock mount nuts (perhaps leave 1 on lightly for now....) Same on the other side, but easier now you've done it all before
×
×
  • Create New...