

Announcements
-
Similar Content
-
-
Latest Posts
-

By joshuaho96 · Posted
Isn't there a PAR engineering gearset that has closer to stock ratios? And they claim they'll do whatever ratios you want. -
 And this is the the thing with a high powered, AWD, heavy car. The engine is easy, the driveline costs just as much as the engine. 🤷♂️ Welcome to GTRland. Whatever you think your budget is, double it. Whatever you think your timeline is, triple it.
 -
 I thought I'd heard rumor of someone that was developing a 6 speed kit to convert the 5 speed box. But maybe I was thinking of the PPG 6 speed sequential? That's about half the price of a car...
 -
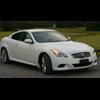
 I've searched fairly extensively among Japanese websites but found nothing really like those skirts in your photo. The closest I got was Origin Labo side skirts however they look more 'complete' in that they have a finishing piece or tab at the rear of the skirt so it blends into the bodywork, unlike the one in your pic. For that reason I'd say the skirts in your pic could be adapted from another car and they didn't include that tab piece, or those skirts aren't copied from an existing skirt but an original design. Sorry I can't help out in regard to ID'ing/sourcing them
 -

By Dose Pipe Sutututu · Posted
Wonder if JB Weld sponsored the event lol
-


Recommended Posts
Create an account or sign in to comment
You need to be a member in order to leave a comment
Create an account
Sign up for a new account in our community. It's easy!
Register a new accountSign in
Already have an account? Sign in here.
Sign In Now