Brycey Posted April 30, 2008 Author Share Posted April 30, 2008 bbuummpppppppppppppppp Link to comment https://www.sau.com.au/forums/topic/212690-fs-1999-s2-stagea-rs-four-dayz/page/2/#findComment-3833365 Share on other sites More sharing options...
Brycey Posted May 4, 2008 Author Share Posted May 4, 2008 bumpo Link to comment https://www.sau.com.au/forums/topic/212690-fs-1999-s2-stagea-rs-four-dayz/page/2/#findComment-3841276 Share on other sites More sharing options...
Brycey Posted May 9, 2008 Author Share Posted May 9, 2008 bump Link to comment https://www.sau.com.au/forums/topic/212690-fs-1999-s2-stagea-rs-four-dayz/page/2/#findComment-3854787 Share on other sites More sharing options...
iadore4door34s Posted May 10, 2008 Share Posted May 10, 2008 No offence to stagea owners, but i hate them... THIS ONE IS AWESOME THOUGH... seriously bro, if i had more than $15 G's i would buy it, but i dont, so i wont disrespect the car by offering it... I cant believe it hasnt sold yet... BEST STAGEA EVER Link to comment https://www.sau.com.au/forums/topic/212690-fs-1999-s2-stagea-rs-four-dayz/page/2/#findComment-3856478 Share on other sites More sharing options...
Brycey Posted May 10, 2008 Author Share Posted May 10, 2008 haha cheers man it means alot Link to comment https://www.sau.com.au/forums/topic/212690-fs-1999-s2-stagea-rs-four-dayz/page/2/#findComment-3856635 Share on other sites More sharing options...
Brycey Posted May 11, 2008 Author Share Posted May 11, 2008 price drop!! $21,900! Link to comment https://www.sau.com.au/forums/topic/212690-fs-1999-s2-stagea-rs-four-dayz/page/2/#findComment-3857530 Share on other sites More sharing options...
BKC34 Posted May 11, 2008 Share Posted May 11, 2008 hrmm very very nice stag man, if it was silver and manual it would be absolutely perfect, how ever i wouldnt mind a tiptronic and you've got the dual sun rooves which is awesome 2 questions tho, whats the stereo like? (music is my life and i like a good stereo, the stag will be carrying my guitar amps and guitars) and 2nd question does it have cruise control by any chance? either way very nice car and i am very interested, and for your info i should be gettin and approved load within 6 weeks..... Peace, Bradd Link to comment https://www.sau.com.au/forums/topic/212690-fs-1999-s2-stagea-rs-four-dayz/page/2/#findComment-3858432 Share on other sites More sharing options...
D3RV Posted May 11, 2008 Share Posted May 11, 2008 21,900! If I had the money I would buy a 2nd Stagea... Just to let you know guys, it costs atleast 7500 to get the parts from japan to do this conversion let alone the labour and paint. Plus the quality of the mods, and how much of a sweetheart Bryce is, this car is an absolutely steal. I paid 23k, late 2006 for my 00' S2, (don't regret it one bit). Just letting you guys know how much of a steal this car is. And how Carazy (ooh car pun) Brycey is for selling this thing. Link to comment https://www.sau.com.au/forums/topic/212690-fs-1999-s2-stagea-rs-four-dayz/page/2/#findComment-3858679 Share on other sites More sharing options...
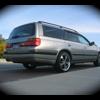
Brycey Posted May 11, 2008 Author Share Posted May 11, 2008 (edited) hrmm very very nice stag man, if it was silver and manual it would be absolutely perfect, how ever i wouldnt mind a tiptronic and you've got the dual sun rooves which is awesome 2 questions tho, whats the stereo like? (music is my life and i like a good stereo, the stag will be carrying my guitar amps and guitars) and 2nd question does it have cruise control by any chance? either way very nice car and i am very interested, and for your info i should be gettin and approved load within 6 weeks..... Peace, Bradd g'day mate, yeah the tiptronic works surprisingly well, i have never been one for automatic cars ( i converted my last car to manual because i just got fed up) but i haven't felt the need or want to convert this car, the box always seems to find the right gear for the right speed, when in tiptronic it reacts especially well and its just all round suited for the car.and plus, D for cruising tiptronic for fun the sterio isnt too bad, pretty tricked up how you can play, pause skip etc etc on the touch screen, then it has the 6 stacker in the back which you;ll load up and not touch for months, but i have recently attached my iriver mp3 player to the head unit (it comes with aux jacks from the factory) and that has been working perfect . the down side is that the factory speakers arnt too great on heavy/really loud music, so if i was going to keep the car that would be one of the things i would be changing - but in saying that, for normal/semi loud music they work perfectly, great quality etc, its just when you turn it up to 11 it gets crackely. but once again i havnt felt the need to change this because its not a huge deal, still goes up pretty loud but yeah. PLENTY of room for anything you want to put in the back. unfortunately no cruise control the brackets are there but the modual isnt. the guys in the stagea section were talking about this not long ago and after market units fit up pretty nicely, but yeah mate, no cruise control cheers bradd 21,900! If I had the money I would buy a 2nd Stagea... Just to let you know guys, it costs atleast 7500 to get the parts from japan to do this conversion let alone the labour and paint. Plus the quality of the mods, and how much of a sweetheart Bryce is, this car is an absolutely steal. I paid 23k, late 2006 for my 00' S2, (don't regret it one bit). Just letting you guys know how much of a steal this car is. And how Carazy (ooh car pun) Brycey is for selling this thing. haha thanks mate yeah im losing a fair bit of money.. but i dont modify cars to make money! its all for the pleasure and the passion the MASA R34 front end kit from japan would have been a cheaper road to go down looking back, but i think i would have got a second grade result. all parts on my front end are either factory R34 GTR parts or australian made fibreglass, nothing but the best quality! this car is priced extremely reasonably - if i dont say so myself hahaha, but i know whoever buys it will love it to bits! oh and its regular service was done this weekend (oil, filter, gearbox oil, transfer case oil) Edited May 11, 2008 by Brycey Link to comment https://www.sau.com.au/forums/topic/212690-fs-1999-s2-stagea-rs-four-dayz/page/2/#findComment-3858959 Share on other sites More sharing options...
BKC34 Posted May 12, 2008 Share Posted May 12, 2008 thats awesome brycey! 1 more question of thought of today at work however, is.... does the tiptronic have a 5 speed box or is it just the 4 speed? and about the stereo thats all good, i may end up keeping my r31 anyways and cannibilising it which would mean having my big fully hektic stereo system.....or at the least i would grab the focal speakers out of it they're awesome Peace Bradd Link to comment https://www.sau.com.au/forums/topic/212690-fs-1999-s2-stagea-rs-four-dayz/page/2/#findComment-3860473 Share on other sites More sharing options...
Brycey Posted May 12, 2008 Author Share Posted May 12, 2008 its a 4 speed box mate (and when in D it has overdrive) love the R31's Link to comment https://www.sau.com.au/forums/topic/212690-fs-1999-s2-stagea-rs-four-dayz/page/2/#findComment-3861009 Share on other sites More sharing options...
BKC34 Posted May 12, 2008 Share Posted May 12, 2008 hrmm its really startin to grow on me, yellow's not my colour but damn thats a sexy yellow! plus its the neo engine which is great.......... would only really need to lower it a tad and i think it would be my perfect car............ hi - ho hi - ho its off to the bank we go!!!!!!!!!!!!!!! how much did u say again 18 500?????? Link to comment https://www.sau.com.au/forums/topic/212690-fs-1999-s2-stagea-rs-four-dayz/page/2/#findComment-3861531 Share on other sites More sharing options...
typevu Posted May 12, 2008 Share Posted May 12, 2008 that.... is.... HOT! R34 GTR wheels would look sooooooo sweet on that Link to comment https://www.sau.com.au/forums/topic/212690-fs-1999-s2-stagea-rs-four-dayz/page/2/#findComment-3861606 Share on other sites More sharing options...
Brycey Posted May 12, 2008 Author Share Posted May 12, 2008 (edited) hrmm its really startin to grow on me, yellow's not my colour but damn thats a sexy yellow! plus its the neo engine which is great.......... would only really need to lower it a tad and i think it would be my perfect car............ hi - ho hi - ho its off to the bank we go!!!!!!!!!!!!!!! how much did u say again 18 500?????? i was the same mate, before i bought it i didnt think yellow was for me but it really suits the car ever since owning it i absolutely love it! and yes the neo and neo box is a big bonus yeah all she really needs is lowering, even just some new springs would do the trick hahah keep dreaming about that price mate :P that.... is.... HOT! R34 GTR wheels would look sooooooo sweet on that cheers man, yeah R34 GTR wheels would really set it off but i love the modena's very very quality wheel Edited May 12, 2008 by Brycey Link to comment https://www.sau.com.au/forums/topic/212690-fs-1999-s2-stagea-rs-four-dayz/page/2/#findComment-3861700 Share on other sites More sharing options...
EvoMitchy Posted May 13, 2008 Share Posted May 13, 2008 pending mechanical health check this car is sold!! sorry mexicans, this car is going north to the Gold Coast! hehe Link to comment https://www.sau.com.au/forums/topic/212690-fs-1999-s2-stagea-rs-four-dayz/page/2/#findComment-3864214 Share on other sites More sharing options...
Brycey Posted May 19, 2008 Author Share Posted May 19, 2008 looks like it is heading to qld! sold to evomitchy Link to comment https://www.sau.com.au/forums/topic/212690-fs-1999-s2-stagea-rs-four-dayz/page/2/#findComment-3876770 Share on other sites More sharing options...
darrinspencer Posted May 19, 2008 Share Posted May 19, 2008 Good work, I will have to get mine up for sale soon. One less r34 fronted stagea to compete with Bring one the 260rs! Link to comment https://www.sau.com.au/forums/topic/212690-fs-1999-s2-stagea-rs-four-dayz/page/2/#findComment-3876777 Share on other sites More sharing options...
Brycey Posted May 19, 2008 Author Share Posted May 19, 2008 hahaha, not that there is many r34 fronted stags to compete with in the first place! cant wait to see yours painted up and finished hopefully you and mitch live near eachother - the 2 stags would make a good photoshoot! Link to comment https://www.sau.com.au/forums/topic/212690-fs-1999-s2-stagea-rs-four-dayz/page/2/#findComment-3876795 Share on other sites More sharing options...
BOZ22N Posted May 19, 2008 Share Posted May 19, 2008 so what ya getting now Bryce? a black one? hahaha Link to comment https://www.sau.com.au/forums/topic/212690-fs-1999-s2-stagea-rs-four-dayz/page/2/#findComment-3876810 Share on other sites More sharing options...
Brycey Posted May 20, 2008 Author Share Posted May 20, 2008 black would be nice but im thinking silver maybe.. we'll have to see Mitch just took ownership of the car, i already miss it enormously hope you love it as much as i do mate! Link to comment https://www.sau.com.au/forums/topic/212690-fs-1999-s2-stagea-rs-four-dayz/page/2/#findComment-3881760 Share on other sites More sharing options...


Recommended Posts
Create an account or sign in to comment
You need to be a member in order to leave a comment
Create an account
Sign up for a new account in our community. It's easy!
Register a new accountSign in
Already have an account? Sign in here.
Sign In Now