Jump to content
SAU Community

Recommended Posts

Will only seperate parts once engine is sold!

RB25/30 Long motor rebuilt november 2011,

Reco head with welded vtc and waterjacket, RB20 inlet cam, 25 exhaust cam, metal head gasket.

Linished std crank, crank collar, N1 oil pump, New acl bearings and moly rings on std RB30E pistons & rods.

1.2mm restrictors, block drilled, lightly honed. New Exedy HHHD clutch, timing belt, idlers and waterpump.

Can see running and fitted to vehicle.

$1650

Kando T67-25G with Tial MVR 44mm wastegate mounted off exhaust housing.

Includes modified stainless top mount manifold, dump and screamer/flanges/flex.

Turbo 4months old & still under warranty.

Fitted to vehicle and only for sale once engine sold!

$1250

Freddy RB25 inlet manifold & 80mm throttle body, modified to clear R32/S13 master cylinder.

Chrome outer and machined face, Tps & 3' intake pipe/hoses included

Fitted to vehicle and only for sale once engine sold!

$450

Apexi powerFC suit rb25

Includes hand controller, Z32 afm & k/n pod filter.

Tuned by Pits - Rb25 with Z32 afm with 80mm throttle,750cc & Gt3037s with .63.

Fitted to vehicle and only for sale once engine sold!

$1000

Nismo 750cc injectors in modified fuel rail with twin feeds.

Fitted to vehicle and only for sale once engine sold!

$600

Splitfire coilpacks suit series1 R33 Rb25.

Fitted to vehicle and only for sale once engine sold!

$350

Greddy GREX oil cooler kit

big cooler, thermostat and filter relocator, New Russell braided hose

Fitted to vehicle and only for sale once engine sold!

$550

R32 40mm Alloy Radiator & 16' electric fan

Fitted to vehicle and only for sale once engine sold!

$220

Complete 3.0 litre setup ready for your transmission in a silvia, skyline or whatever????

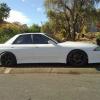
All parts are currently fitted to my R32 GTST and I drive it everyday to work.

No dyno sheets, No tyre kickers & No bullshit!

Very aggresive and No knock even on 14psi

Heaps of quality R32 parts available!

Will only seperate parts once engine is sold!

Will sell all $5500 ono and include spare RB25 long motor!

Gold coast

Sam 0423 648 114

Edited by 32TAXI

This is a bargain... Makes me depressed thinking I how much I have spent putting together a similar setup (without a 3L). Am I reading right that you are including 2 running engines in the $5500 package?

Yeap, All the shit plus 2x engines - 1x rb25/30 complete running, 1xrb25 spare long motor

My plans were to bolt 25 back in and go further with 30!

Basic bolt up to your gearbox in either R32 or R33 and GO!

post-58828-0-39228000-1343038569_thumb.jpg

p.s. Turbo in picture not included in sale

Story of the 25/30!

The old rb25 had leaky valve stem seals and smoked on hard decel, but still had even comp on all.

So weighted it up to rebuilt a 25 or 30 but scored a 30 Short block, collar, cometic head gasket, new waterpump and 2x 1.2mm restrictors cheap off SAU so it started.

.

Bought a spare 25 head, welded water passage and vct then got full reco and 2x valves by Gilberts.

Got a New genuine N1 oil pump and Nissan gasket set, Acl bearings and Moly rings from states at the right time.

Crank was sent to Probuilt, Grubscrews and collar fitted, checked and linished.

Gave the block a good clean, drilled, restricted and a light hone(slight top ring wear) Standard bores, deck and crank, new dayco belt and hi/lo tensioners, RB20DET inlet cam/sprocket as always wanted GTR covers!

I'm a Mechanic of 15 years at Nissan, In the trade as they say and was built cheap so sell cheap.

RB25/30 was built in november 2011, No forgies, No rods, supported well, never spun over 7k or 14 psi.

Just a tough street engine that pulls hard, very aggresive and runs great.

Needs a good balancer as never got around to it & VCT can be fitted via external line or internal mod if needed.

$1650

Parting out my modified R32 4 door sedan once engine sold

eg. 327AXI rego, 5 months rego, mod plated, no defect, rolling shell $3500, Safety21 4door 4seat 6point rollcage $1200, GTR front bar $500, GTR Bonnet $250, R33 5 speed g/box $1200, nismo 2way lsd $650, Tein HE driftmaster coilovers $900, cusco rear arms $250, RG tension arms $150, Adjust front upper $220, 28mm rear swaybar $ 250, Sabelt GT1 seats $650, Greddy profec b spec 2, greddy timer, pivot shiftlight, Nardi wheel + + + +

Edited by 32TAXI

Keen on the inlet mani and oil cooler, let me know wen ur ready to sell.

Motor and inlet sold

Oil cooler available $550

Turbo, power fc, injectors, splitfires and alloy radiator also available

Create an account or sign in to comment

You need to be a member in order to leave a comment

Create an account

Sign up for a new account in our community. It's easy!

Register a new account

Sign in

Already have an account? Sign in here.

Sign In Now


  • Latest Posts

    • From there, it is really just test and assemble. Plug the adapter cables from the unit into the back of the screen, then the other side to the car harness. Don't forget all the other plugs too! Run the cables behind the unit and screw it back into place (4 screws) and you should now have 3 cables to run from the top screen to the android unit. I ran them along the DS of the other AV units in the gap between their backets and the console, and used some corrugated tubing on the sharp edges of the bracket so the wires were safe. Plug the centre console and lower screen in temporarily and turn the car to ACC, the AV should fire up as normal. Hold the back button for 3 sec and Android should appear on the top screen. You need to set the input to Aux for audio (more on that later). I put the unit under the AC duct in the centre console, with the wifi antenna on top of the AC duct near the shifter, the bluetooth antenna on the AC duct under the centre console The GPS unit on top of the DS to AC duct; they all seem to work OK there are are out of the way. Neat cable routing is a pain. For the drive recorder I mounted it near the rear view mirror and run the cable in the headlining, across the a pillar and then down the inside of the a pillar seal to the DS lower dash. From there it goes across and to one USB input for the unit. The second USB input is attached to the ECUtec OBD dongle and the 3rd goes to the USB bulkhead connected I added in the centre console. This is how the centre console looks "tidied" up Note I didn't install the provided speaker, didn't use the 2.5mm IPod in line or the piggyback loom for the Ipod or change any DIP switches; they seem to only be required if you need to use the Ipod input rather than the AUX input. That's it, install done, I'll follow up with a separate post on how the unit works, but in summary it retains all factory functions and inputs (so I still use my phone to the car for calls), reverse still works like factory etc.
    • Place the new daughterboard in the case and mount it using the 3 small black rivets provided, and reconnect the 3 factory ribbon cables to the new board Then, use the 3 piggyback cables from the daughterboard into the factory board on top (there are stand offs in the case to keep them apart. and remember to reconnect the antenna and rear cover fan wires. 1 screw to hold the motherboard in place. Before closing the case, make a hole in the sticker covering a hole in the case and run the cable for the android unit into the plug there. The video forgot this step, so did I, so will you probably. Then redo the 4 screws on back, 2 each top and bottom, 3 each side and put the 2 brackets back on.....all ready to go and not that tricky really.      
    • Onto the android unit. You need to remove the top screen because there is a daughterboard to put inside the case. Each side vent pops out from clips; start at the bottom and carefully remove upwards (use a trim remover tool to avoid breaking anything). Then the lower screen and controls come out, 4 screws, a couple of clips (including 3 flimsy ones at the top) and 3 plugs on the rear. Then the upper screen, 4 screws and a bunch of plugs and she is out. From there, remove the mounting brackets (2 screws each), 4 screws on the rear, 2 screws top and bottom and 3 screws holding in the small plates on each side. When you remove the back cover (tight fit), watch out for the power cable for the fan, I removed it so I could put the back aside. The mainboard is held in by 1 screw in the middle, 1 aerial at the top and 3 ribbon cables. If you've ever done any laptop stuff the ribbon cables are OK to work with, just pop up the retainer and they slide out. If you are not familiar just grab a 12 year old from an iphone factory, they will know how it works The case should now look like this:
    • Switching the console was tricky. First there were 6 screws to remove, and also the little adapter loom and its screws had to come out. Also don't forget to remove the 2 screws holding the central locking receiver. Then there are 4 clips on either side....these were very tight in this case and needed careful persuading with a long flat screw driver....some force required but not enough to break them...this was probably the fiddliest part of the whole job. In my case I needed both the wiring loom and the central locking receiver module to swap across to the new one. That was it for the console, so "assembly is the reverse of disassembly"
    • But first....while I was there, I also swapped across the centre console box for the other style where the AV inputs don't intrude into the (very limited !) space.  Part# was 96926-4GA0A, 284H3-4GA0B, 284H3-4GA0A. (I've already swapped the top 12v socket for a USB bulkhead in this pic, it fit the hole without modification:) Comparison of the 2: Basically to do the console you need to remove the DS and PS side console trim (they slide up and back, held in by clips only) Then remove the back half of the console top trim with the cupholders, pops up, all clips again but be careful at the front as it is pretty flimsy. Then slide the shifter boot down, remove the spring clip, loose it forever somewhere in the car the pull the shift knob off. Remove the tiny plastic piece on DS near "P" and use something thin and long (most screwdrivers won't fit) to push down the interlock and put the shifter down in D for space. There is one screw at the front, then the shifter surround and ashtray lift up. There are 3 or 4 plugs underneath and it is off. Next is the rear cover of the centre console; you need to open the console lid, pop off the trim covering the lid hinge and undo the 2rd screw from the driver's side (the rest all need to come out later so you can do them all now and remove the lid) Then the rear cover unclips (6 clips), start at the top with a trim tool pulling backwards. Once it is off there are 2 screws facing rearwards to remove (need a short phillips for these) and you are done with the rear of the console. There are 4 plugs at the A/V box to unclip Then there are 2 screws at the front of the console, and 2 clips (pull up and back) and the console will come out.
×
×
  • Create New...