Jump to content
SAU Community

Recommended Posts

Bottom end assembly.

The bottom end of this engine went together virtually the same as any normal RB26 block. The only real was that the oil squirters had to be grub screwed and blocked off, as the 90mm stroke 12 counterweight crank could not be modified to clear squirters. Basically the hardness of the Nitto crank proved to be too hard to reliably machine/modify, also due to the nature of an intermittent cut while modifying a crankshaft.

post-26553-0-30387000-1383721196_thumb.jpg

post-26553-0-74743700-1383721228_thumb.jpg

post-26553-0-96359700-1383721247_thumb.jpg

At the start of this V3 project, I contacted Nitto and asked them about making a custom crankshaft for me. As it turns out I was very fortunate that they had already made a custom one-of crankshaft that was going to suit my purposes perfectly.

The crank is a Nitto 90mm RB26 stroke crankshaft. Rod journal sizes are Rb26/SR20, so it was exactly what I needed.

I was initially going to go with Nitto I-Beam rods as well, but ran into issues with the 19mm wide bearing on the crankshaft. In short, the radius's off the journals was too large to allow the bearings to run properly. So I switched back to conventional Rb26 17mm wide bearings and H-Beams. Nitto's SR20 rods are apparently good for 700+ hp in an SR20, so they will meet my goals no problems.Rod bolts are ARP2000's.

As the block had the oil squirters removed, I have had some jets milled into the rods to squirt oil from the rod journal to the bottom of the piston. This will aid oil flow to the rod journal a little, and also help with piston cooling. This is a very simple approach that was pioneered in the Porsche 917's, and proved to work well in their 1000hp engines.

The pistons are a custom order from Nitto/JE. 89mm bore with a 4cc dome, and a 28mm compression height. To achieve this pin height it was necessary for JE to run the oil ring over the gudgeon pins. There is a steel support ring under the lower oil ring making the ring assembly possible. The pistons are also notched for high level valve lift.

post-26553-0-27567500-1383721417_thumb.jpg

post-26553-0-21648500-1383721582_thumb.jpg

post-26553-0-98434900-1383721640_thumb.jpg

post-26553-0-32886100-1383722159_thumb.jpg

post-26553-0-99646500-1383722249_thumb.jpg

post-26553-0-79768000-1383722303_thumb.jpg

The two oil supply galleries that would supply oil to the head had been drilled out and threaded to receive a grub screw prior to the cleaning process. These plugs were installed now as the oil supply to the head comes from the spacer plate.

Next, the spacer plate comes into play again. An oil gallery is drilled through the top of the plate, to 10mm deep, and then a 1/6th BSPT thread was tapped into the side of the plate to allow a -4AN fitting to be installed.

The plate also has some custom 35mm long 15mm dowels installed here as well.

post-26553-0-99077400-1383722710_thumb.jpg

Before installing the plate, a Tomei pump was installed along with the cam timing gear. The mail oil gallery was also grub-screwed to seal up the oil supply lines to the main and rod bearings.

Then the spacer plate fitment was re-checked with the dowels installed.

(Truthfully, I trial assembled the engine 5 times... But I had to show off just how good this all looks!)

post-26553-0-60227000-1383723150_thumb.jpg

post-26553-0-93272100-1383723325_thumb.jpg

post-26553-0-61958300-1383723367_thumb.jpg

Edited by GTRNUR

Now you can't see it in the picture above, but under the spacer plate there is a custom made gasket. This gasket seals the coolant and oil returns to the spacer plate.

On top of the spacer plate I use a second gasket, which is designed to seal against a copper head gasket. The two fibrous gaskets function to seal the spacer plate perfectly, and also to take up the thermal expansion variations of the plate. So the plate is essentially floating between two compressible gaskets.

In order to achieve the correct compression with these gaskets, the spacer plate was installed in a jig and surface ground to a specific thickness.

The gasket shown on top of the plate here has been lightly sprayed with a little hylomar, my favourite gasket sealing product.

post-26553-0-57720800-1383734310_thumb.jpg

post-26553-0-99158600-1383734450_thumb.jpg

post-26553-0-97539400-1383734733_thumb.jpg

post-26553-0-96917400-1383734807_thumb.jpg

Moving on... The cylinder head.

For this engine I have used a Tomei Complete head. It is essentially a new factory head fitted with the tomei catalogue. Oversize valves with thin stems, Tomei guides, and moderate porting around the valve seats and exhaust ports. It also has Tomei's buckets, titanium retainers and springs. The cams are step 2 procams, 272 x 10.25mm.

I honestly wanted more of a drag ported head for this engine with 260 x 10mm+ cams, but this was a good compromise. For the money there is a lot of good parts in the package, and to liven it up more it only needs a little more porting work. The quality of the assembly is extremely nice too, as you will agree from the photo's of the combustion chambers.

The addition of the wire O-rings is the only modification I have had done. These O-rings match the receivers in the tops of the sleeves.

The last picture shows the copper gasket deformation that occurs when the head is torqued. As you can see, everything is perfectly centred.

post-26553-0-21417600-1383737748_thumb.jpg

post-26553-0-43238800-1383737850_thumb.jpg

post-26553-0-36396600-1383737914_thumb.jpg

post-26553-0-85772100-1383738032_thumb.jpg

Edited by GTRNUR

Finally the cylinder head is installed.

The top side of the copper head gasket is installed with a smear of 3bond high viscosity sealant, to ensure the top of the gasket is chemically sealed to the head. The bottom side of the copper gasket is sealing against the top plate gasket, and the tops of the cylinder sleeves (and the o-ring area).

This engine uses ARP2000 head studs, torqued to 125ft-lb. If the block were fitted with 12x1.75mm inserts, an off the shelf option exists to use ARP CA625 studs which torque to 160ft-lb. For the sake of this build that would be overkill.

That's all for tonight.

post-26553-0-30922400-1383738489_thumb.jpg

post-26553-0-14088200-1383738544_thumb.jpg

post-26553-0-01054100-1383738614_thumb.jpg

post-26553-0-37796200-1383738667_thumb.jpg

Ahhh wow!

Do the fibrous gaskets below and above the spacer plate have any sort of fatigue life due to the expansion taking place, or are they good for the life of the head gasket?

Finally the cylinder head is installed.

The top side of the copper head gasket is installed with a smear of 3bond high viscosity sealant, to ensure the top of the gasket is chemically sealed to the head. The bottom side of the copper gasket is sealing against the top plate gasket, and the tops of the cylinder sleeves (and the o-ring area).

This engine uses ARP2000 head studs, torqued to 125ft-lb. If the block were fitted with 12x1.75mm inserts, an off the shelf option exists to use ARP CA625 studs which torque to 160ft-lb. For the sake of this build that would be overkill.

That's all for tonight.

i think I've just jizzed in my pants

Always find this stuff really interesting.

And a kudos to Ian for providing such detail on this system, the thought that's gone into it, etc. I'm no engineer but always good to learn how things work :)

Ahhh wow!

Do the fibrous gaskets below and above the spacer plate have any sort of fatigue life due to the expansion taking place, or are they good for the life of the head gasket?

The gasket material has been carefully chosen to be able to seal under a very wide range of operating temperatures. The compressability and recovery combined with the operating temperature capability of the of the material can easily absorb 1.2 thou of variation(the allow plate growth). According to the data sheet, pressure tests performed with nitrogen gas survived pressures of over 80 bar over 250 degrees of operating temperature. It will definitely out live the life of the engine.

I didn't mention it above, but before assembly the alloy spacer plate is surface ground back to a specific thickness. Such that the total thickness of the plate and plate gaskets when installed will seal, and achieve the same height as the top of the sleeves (extended deck).

  • Like 1

Moving on again...

Intake side, cam covers, gears, timing belt, and the ATI balancer all installed.

I went with a Greddy intake on this engine. Not the wisest decision I ever made, as the added size of it meant there was contact with the clutch master cylinder when the engine was installed later. I resolved this issue by lowering the K-frame a little, using an alternate model GTR clutch master cylinder (that had a smaller OD around the piston), and shaving some material off the master cylinder to clearance it. The combination of all three gave me about 9-10mm clearance. I still retain the clutch booster.

post-26553-0-10618700-1383824677_thumb.jpg

post-26553-0-98281000-1383824706_thumb.jpg

post-26553-0-76778800-1383824781_thumb.jpg

What an awesome build. Good to see someone trying something different. Will be a nice torquey engine.

How would the open deck design work on a RB30 with a 3.2 or 3.4 crank..? RB40..?

What an awesome build. Good to see someone trying something different. Will be a nice torquey engine.

How would the open deck design work on a RB30 with a 3.2 or 3.4 crank..? RB40..?

It would need at least a 10mm spacer plate, as the machining for the larger sleeves/cylinders alters the way the stresses from torqueing the head are applied to the block. If you could get it in a car, I believe you could use a 90x94mm setup. (3589.45cc), so another 240cc on this engine.

Its not something I'll be trying anytime soon though. The whole point of the open deck RB26 though is to allow for easier fitment without having to use adapter plates or chisel away your bonnet framework. If I had used a stock plenum and twin turbo setup, the engine can still pass for stock.

Edited by GTRNUR

And the hot side.

Ceramic coated Full-Race twin scroll manifold, twin Tial gates, and a Precision 6466 with a 1.00 housing.

This has the engine pretty much completed and ready to swap into the car.

post-26553-0-25235500-1383828466_thumb.jpg

post-26553-0-87206200-1383828513_thumb.jpg

post-26553-0-59672100-1383828571_thumb.jpg

post-26553-0-77376000-1383828617_thumb.jpg

post-26553-0-36750500-1383828672_thumb.jpg

  • Like 1

I know I may be getting in a bit early, but do you have any expectations for figures? Obviously the area under the curve is what's going to interest most, but considering the rod ratio, what are you planning on revving it to? Not that you'll have to, to get the most from this setup.

My guess is the whole point will be that it doesn't have to rev or work that hard to make very solid torque and power figures.

I think he said earlier the Nitto SR20 rods were good for 700hp, in an SR, so I'd be thinking expect a bit more on that quite easily.

I love the idea of an engine package that's capable of big power but running it at 70-80% of its capability and still having more than enough on tap without stressing anything.

The valve train is good for 9k. The piston size, rod and stroke combination is the same as the SR23 stroker kits, and they rev those to 10k.

Realistically it shouldn't need to go past 8k, and this cam setup should make peak torque around 6500. The rod bolts are the limitation for revs, not the rod ratio (piston acceleration etc).

Dan is totally getting the idea. Its seems that many people tune RB26's to within an inch of destruction when going after big power. My thoughts are why not have a setup that can produce a good strong result a whole lot easier. Make the power goal you want and do it easily and with a soft tune.

Based on calculations this setup should make over 500kw atw at about 25lb boost.

  • Like 2

Create an account or sign in to comment

You need to be a member in order to leave a comment

Create an account

Sign up for a new account in our community. It's easy!

Register a new account

Sign in

Already have an account? Sign in here.

Sign In Now


  • Latest Posts

    • I know why it happened and I’m embarrassed to say but I was testing the polarity of one of the led bulb to see which side was positive with a 12v battery and that’s when it decided to fry hoping I didn’t damage anything else
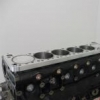
    • I came here to note that is a zener diode too base on the info there. Based on that, I'd also be suspicious that replacing it, and it's likely to do the same. A lot of use cases will see it used as either voltage protection, or to create a cheap but relatively stable fixed voltage supply. That would mean it has seen more voltage than it should, and has gone into voltage melt down. If there is something else in the circuit dumping out higher than it should voltages, that needs to be found too. It's quite likely they're trying to use the Zener to limit the voltage that is hitting through to the transistor beside it, so what ever goes to the zener is likely a signal, and they're using the transistor in that circuit to amplify it. Especially as it seems they've also got a capacitor across the zener. Looks like there is meant to be something "noisy" to that zener, and what ever it was, had a melt down. Looking at that picture, it also looks like there's some solder joints that really need redoing, and it might be worth having the whole board properly inspected.  Unfortunately, without being able to stick a multimeter on it, and start tracing it all out, I'm pretty much at a loss now to help. I don't even believe I have a climate control board from an R33 around here to pull apart and see if any of the circuit appears similar to give some ideas.
    • Nah - but you won't find anything on dismantling the seats in any such thing anyway.
    • Could be. Could also be that they sit around broken more. To be fair, you almost never see one driving around. I see more R chassis GTRs than the Renault ones.
    • Yeah. Nah. This is why I said My bold for my double emphasis. We're not talking about cars tuned to the edge of det here. We're talking about normal cars. Flame propagation speed and the amount of energy required to ignite the fuel are not significant factors when running at 1500-4000 rpm, and medium to light loads, like nearly every car on the road (except twin cab utes which are driven at 6k and 100% load all the time). There is no shortage of ignition energy available in any petrol engine. If there was, we'd all be in deep shit. The calorific value, on a volume basis, is significantly different, between 98 and 91, and that turns up immediately in consumption numbers. You can see the signal easily if you control for the other variables well enough, and/or collect enough stats. As to not seeing any benefit - we had a couple of EF and EL Falcons in the company fleet back in the late 90s and early 2000s. The EEC IV ECU in those things was particularly good at adding in timing as soon as knock headroom improved, which typically came from putting in some 95 or 98. The responsiveness and power improved noticeably, and the fuel consumption dropped considerably, just from going to 95. Less delta from there to 98 - almost not noticeable, compared to the big differences seen between 91 and 95. Way back in the day, when supermarkets first started selling fuel from their own stations, I did thousands of km in FNQ in a small Toyota. I can't remember if it was a Starlet or an early Yaris. Anyway - the supermarket servos were bringing in cheap fuel from Indonesia, and the other servos were still using locally refined gear. The fuel consumption was typically at least 5%, often as much as 8% worse on the Indo shit, presumably because they had a lot more oxygenated component in the brew, and were probably barely meeting the octane spec. Around the same time or maybe a bit later (like 25 years ago), I could tell the difference between Shell 98 and BP 98, and typically preferred to only use Shell then because the Skyline ran so much better on it. Years later I found the realtionship between them had swapped, as a consequence of yet more refinery closures. So I've only used BP 98 since. Although, I must say that I could not fault the odd tank of United 98 that I've run. It's probably the same stuff. It is also very important to remember that these findings are often dependent on region. With most of the refineries in Oz now dead, there's less variability in local stuff, and he majority of our fuels are not even refined here any more anyway. It probably depends more on which SE Asian refinery is currently cheapest to operate.
×
×
  • Create New...