


Neostead2000
-
Posts
80 -
Joined
-
Last visited
-
Days Won
2 -
Feedback
0%
Content Type
Profiles
Forums
Events
Gallery
Media Demo
Store
Everything posted by Neostead2000
-
R33 GTST front subframe differences?
Neostead2000 replied to Neostead2000's topic in R Series (R30, R31, R32, R33, R34)
So just a little update for anyone wondering, this has been 100% confirmed S15 SR20 front subframe. The entire rest ofthe front suspension is bolt on, control arms, R33 steering rack, hubs. While I'm still looking for a GTST subframe I decided to make my own adapter brackets for the engine mounts, similar to the kit ISR sells but just the two mounts. I got the angles and distances right (the bolt hole centers on the adapter brackets need to sit 125mm FORWARD of the S15 mounting holes!) and the driver side bracket needs to be angled slightly more than the other. However even with these, I cannot mount the custom turbo oil return line I have made for the HX35. The tube bends too far out and clashes with the S15 stock mount point. For this to work, a significant portion of that point will need to be cut out just so the pipe can go through it. Definitely not something I want to do. -
Issues running with my rb20DEneo
Neostead2000 replied to Kaleb's topic in R Series (R30, R31, R32, R33, R34)
Wish I could help with advice but I haven't yet assembled my 20Neo. One thing I've read on the forums here especially about the Neos is a bad ground on the coolant temp sensor. During cold startup the ECU always runs in open loop until a set of parameters have been met and usually ignores the CTS. After awhile it switches to closed loop and starts following your CTS reading. However, if the ground is bad, it will be sending funky signals (if at all) and thus cause the motor to run poorly. -
R33 GTST front subframe differences?
Neostead2000 replied to Neostead2000's topic in R Series (R30, R31, R32, R33, R34)
If I was to find a proper 33 gtst subframe would my RB20 be able to sit on it with these brackets? -
R33 GTST front subframe differences?
Neostead2000 replied to Neostead2000's topic in R Series (R30, R31, R32, R33, R34)
Gosh darn it, it's already been hell finding the missing parts for this car, now a subframe?! Will have to modify the mounts or the subframe then but I've got no idea how I would get the motor to sit like OEM. What a mess. 😢 -
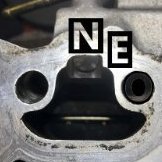
As I went to paint my engine bay I had to remove the entire subframe and after looking at it for a little bit I then started to compare with pictures from others and their R33s, and mine looks different to theirs! What I mean is, the two faces where the engine mounts bolt up are completely in-line with the entire frame, whereas all other R33 GTST pics I've seen have the locations sticking further outward (towards the front) and are in-line with the forward-most bolt. I am attaching a picture of my subframe (LEFT) and a random R33 GTST subframe (RIGHT). My chassis is an ECR33 factory spec 2 GTS-T RWD. Is this some sort of oddball that left the factory or has the previous owner done a subframe swap? If so, I cannot imagine how an RB20/25 would fit inside the bay with the mounts situated close to 10 centimeters back towards the bulkhead. Interestingly there is not a single thread or video talking about such differences so I am coming here for your advice.
-
Thanks, I have not looked into that but I'll keep it in mind. Oddly, these bearings were listed in every website as proper fit for the RB20 Neo but apparently that was majorly wrong and neither seller has fixed that yet. Another chap from NZ found this out and had to re-order OEM (NDC) bearings.
-
Up for sale is a brand new ACL conrod bearing kit for an RB20DET motor, 45mm big end diameter. I had ordered these for my 20DE Neo but turned out the Neo uses a smaller crank journal for the rods (42mm) as opposed to the regular RB20. I paid $80 USD for these but I am open to offers as I need these gone. Will ship internationally, located in Bulgaria, EU. I accept Paypal, Revolut or Bank Transfers.
-
O-ring or gasket for Oil Strainer?
Neostead2000 replied to Neostead2000's topic in R Series (R30, R31, R32, R33, R34)
The block side is completely flat with no grooves. I do not know if the R32 blocks have the same groove cut out or if it's just machined onto the strainer flange. I agree though, if I was to fill the groove it may be a much better idea to use metal epoxy essentially "welding" it flush inside the groove. -
O-ring or gasket for Oil Strainer?
Neostead2000 posted a topic in R Series (R30, R31, R32, R33, R34)
Long story short my '99 RB20Neo came without an oil pickup tube (oil strainer) and i had to source one. The one they sent me has a groove which in my opinion should work with an O-ring only. However, when I was ordering the gasket for it via correct part number (150531E400), the gasket is a thin metal piece with a very slight protrusion which is meant to crush between two flat surfaces. So now I'm wondering should I just go to the hardware store and find a suitable O-ring and run that only, or try using the gasket only? This is the gasket that came: And this is how my oil strainer looks like, with a big groove for an o-ring: From what I gather, this strainer is from an early RB from an R32 which under the parts diagrams only appears to use an O-ring? What if I filled the groove fully with RTV silicone and then added the OEM gasket on top? I reckon that should still produce a good seal for the vacuum of the oil being sucked up. -
Weird sound from exhaust(RB20DE NEO)
Neostead2000 replied to Kapr's topic in R Series (R30, R31, R32, R33, R34)
It looks like those are very common problems on these NEOs. My water pipe sleeve was also moderately corroded but I can still keep using it. You can just pull it out and have a standard sleeve with a lip machined, or just look for any pipe you have laying around that would be a snug fit, but certainly would need to have a lip at the end so the hose can seal well. Also when i took apart my RB20 Neo I also noticed ALL of the exhaust valves and their seats were very pitted, whereas the intake valves looked spotless. This is a very low mileage motor, mind you (I am guessing less than 60k km). I ended up lapping all the valves and polishing the chambers to give it more flow since I will be turbocharging. Also, can you link exactly which JP parts store website you are referencing? I want to avoid Amayama also as I just saw they have 60-90 day delivery times which is insane. I am almost ready to assemble my engine, I will be updating my build journal with it so keep an eye out if you want to see more about the 20 Neo -
To give them the benefit of the doubt, Skylines are absolutely popping off right now so if I was working for a car export company one of the logical things to do is driving around neighborhoods and asking people if they'd sell their car. You'd be surprised how many people would accept a good offer right then and there. When I took my car (1997 Eagle Talon TSI AWD) to Belgium and to the UK, on 3 separate occasions I had similar "We buy sports cars" leaflets left on my windshield, almost right after I parked up. Those people are going 'round and round looking for interesting cars worth a dollar or two. That said, yeah these guys could be up to no good but... Just tell them next time your oil pump is shattered.
-
Weird sound from exhaust(RB20DE NEO)
Neostead2000 replied to Kapr's topic in R Series (R30, R31, R32, R33, R34)
NOOOOOOOOOOO oh my god cancel your order on that Subaru gasket!!! Did you compare the images before you ordered? The Subaru gasket simply happens to have the same part number as the Nissan but IT IS NOT the same. This is the subaru gasket: And this is how our one with the same part number looks like: It is missing from the 25 kit because the 25 does not use the swirl valve mechanism. Only the 20DE Neo has it so it requires an additional custom gasket. Also the last gasket that lays between the head and intake, there are two different part numbers between 20 and 25 however on a Russian parts store it says 140355L300 works for both 20 and 25 NEO : Link So you may get lucky with that whole kit for the 25 but you still need the other one, or just reuse your old one if it's not too bad. Or like GTSBoy said, make it out of paper but it's very complicated in shape. Hope this helps! P.S Use something like this website and input your actual VIN so you get 100% accurate part numbers for your specific car. And always compare and look at the diagrams + web images to make 100% sure what part you are buying! https://nissan.epc-data.com/skyline/hr34/3948-rb20de/ -
Weird sound from exhaust(RB20DE NEO)
Neostead2000 replied to Kapr's topic in R Series (R30, R31, R32, R33, R34)
161755L700 - 1 140335L300 - 2 140325L300 - 3 14038AA000 - 4 14035AA000 - 5 Refer to the diagram below, I have marked in read each corresponding number of gasket. There are a total of 5 intake gaskets on our 20 Neos. I have looked all throughout the EU across websites and stores, however since there wasn't an official RB20DE Neo equipped car marketed in the EU, nobody has these in stock. So your only option would be to source from Amayama. Should be able to find all those from the same warehouse in Japan or UAE. I thought about ordering them but the price outweighs the benefits, so I will be coating my old gaskets with copper spray and thoroughly boost leak testing. Worst case, there are two gasket makers in my home town which could replicate these gaskets, or I could just have them laser cut from 0.1mm sheets. Just some options worth considering. -
You're correct. Actually I didn't know this info was explained in the manual, but I opened it up and those pages do talk about it a little bit. Basically the spring inside the actuator is always pushing the valves open, but if the engine is running (running always under vacuum), it should be pulling the diaphragm against the spring, essentially closing the valve assembly across all 6 runners. I took a closer look at the diagrams, it doesn't seem to be a clear ON/OFF scenario, but rather the ECU determines when and how much to open the valves by selling the solenoid to let air past it and start "pulling" on the diaphragm. It's a bit convoluted but after a few minutes of study, it appears clear. I believe that with a decent aftermarket ECU, the SCV (Swirl Control Valve) and it's solenoid can be configured to remain CLOSED up to the pre-spool RPM range of the selected turbocharger, then slightly open just as it starts spooling in conjuction with advanced timing and leaner AFRs. Then as full boost is attained, the valves should go 100% open (boost hitting the diaphragm) and richening the mixtures and dialing back the timing. In theory, and based on my own experience of ECM tuning, this should work nicely and offer a good economy "round town" operation whilst picking up on boost once power is demanded. I attached a video I took just to show physically how the arm moves and valves open for anyone curious. video-1645126038.mp4
-
Been reminiscing with some classics such as Apollo 440, Stanton Warriors, Crystal Method, as well as some modern stuff like KOHH (Japanese rapper) and MySchool (Russian rapper that mostly sings about cars, JDM stuff etc.). Nice soundtracks when working on these cars.
-
Correct, the swirl valves are normally open when the actuator is at rest. As I pull the shaft towards the actuator, it moves the valves closed. So that would imply under vacuum they will be fully closed and 100% of the airflow will be redirected through the two little Mickey Mouse ports. However, this is an N/A engine, so *naturally* it is always under vacuum. That's why there is a separate controller under the manifold that looks like a big vacuum pump of sorts, with three vacuum lines. I didn't spend too much time tracing the vacuums before I disassembled it, but I suspect at least one vacuum line goes directly from manifold to the pump, then the other two lines go to the actuator and a solenoid perhaps. As far as I know the swirl effect was designed to be operation under low-RPM operation, but I have not found a specific value. I would guess anywhere from 0-3000 RPM. The swirl effect helps air-fuel atomization while entering the combustion chambers as well as providing a leaner burn at those conditions (Which is why this engine in the factory manual is referred to as "L/B" - Lean Burn). My worry is, since this engine will be seeing boost, it is going to slam shut both valve mechanisms and severely restrict airflow to the head. I HIGHLY doubt Nissan designed the solenoid and vacuum pump to operate with boost in mind, as that system is not present on the turbo NEOs. So this will be an interesting task to tackle. BMW use the same exact system on their N57 turbodiesel engine, so there must be a way to configure it for proper turbo operation also.
-
Hopefully I can shed some more light into this. I was sent an RB20DE Neo by mistake (instead of a 25) so now I am stuck with it, trying to build it up for +T and also learning all the specifics about this "little" engine. I made some pics when I tore it down, hopefully this will help people. Note that I took a video of the swirl valve actuator and then took a picture from it to upload here. The manifold is technically a five piece design: 1. Throttle Body ---> 2. Y-shaped divider ---> 3. Top part of manifold including the big central torque valve ---> 4. Lower part of manifold ---> 5. Flange with swirl valves on one common shaft in each runner that mates up to the head. I am still uncertain whether I should keep the swirl valves and torque valve when turbocharging or if I should somehow remove them or hack them to stick open permanently. So far the crankshaft looks to be identical to a standard RB20 however it has the SHORT snout, but matched to an N1 oil pump (took it apart to confirm). The water pump is the smaller impeller one. Solid lifters, no front head drain/breather, coil on plug setup. I just test fitted the stock 25 turbo manifold and it bolts on perfectly.
-
Holset Hx35w Installation In Standard Low Mount Position
Neostead2000 replied to CEF11E's topic in Engines & Forced Induction
Perfect response! This is exactly what I was looking for; actual real world experience and data. I'm going to be keeping the Torque valve as well as swirl valves on my DE Neo as well as variable intake, so that would no doubt help with spool up immensely. I am already set on the HX twin scroll series turbo, but if I can get my hands on both a 30 and 35 to make a hybrid like you did, I might do that. Power is not really my goal as much as just making this 20 feel on par if not slightly peppier than a stock 25DET. I looked at that gated spacer and honestly I've never seen one like that but it looks genius. However I'm worried about potential boost creep? Those ports are not only small but they exit at 90 degrees to the exhaust flow, which is usually not optimal. Also what about the little slot in the stock manifold opening at the divider? Did you weld that up then grind flush or did you leave it be? I'm unsure why Nissan left it slotted like that but I would imagine it's to account for thermal expansion and to help with channeling the gasses downwards? -
Holset Hx35w Installation In Standard Low Mount Position
Neostead2000 replied to CEF11E's topic in Engines & Forced Induction
Curious as to whether Cef's car is still alive and running this setup? Anyone else bolted an HX35 on an RB20 with similar results? I always thought the factory manifold is a twin scroll by design so pairing it with a twin scroll turbo is a no-brainer. -
im 15 getting an r34 and need help please, am i getting scammed?
Neostead2000 replied to SK9R's topic in Introduce yourself
I don't think you are getting scammed in terms of the price; the Japs have picked up on the huge demand of these cars so they are punping up the prices ever before they leave Japan. It says you're from Massachusetts, USA? Are you aware of the 25 year rule for imports? This car is 2000 so it would technically be legal to import in 2025 at the earliest, keep that in mind. Also it has the RB20DE Neo naturally aspirated engine, the one I got by mistake and currently working on. It does not have oil jets from the block gallery, it has a single compression ring on the piston (9.5:1 CR), it has no provisions for oil/water feeds/returns for a turbo, so you would need to tap/drill and fab up from scratch. The head has solid lifters which is great, the crankshaft has the same main journal diameter as RB25s however the conrod journals are smaller at 45mm. It has a swirl valve mechanism across all intake ports which is a cool little system however a big problem it seems with these is that the sensors responsible for telling when the ECU to open these valves go bad over time so you get almost no power/acceleration from 5000 RPM and up. The intake ports DO NOT match with any other RB20/25 intake manifold and neither do the gaskets. I have yet to test fit a stock turbo manifold on this head but that one I'm 99% sure it will fit. I am still learning as I go and have lots of pictures already. Good luck! -
Thanks. I completely disassembled the pump today and did all the measurements as per the service manual. She is well within the tighter-end of spec, very little scarring or pitting. Also I measured the snout engagement (40.7mm) versus the drive gear engagement (40.65mm) so that gives me 0.025mm of tolerance on each side. It feels fairly tight when pressed against the snout and coupled with the actual centering ring rotating snugly inside the oil pump inlow, I don't think this pump is going anywhere.... famous last words? 😅 Also, I did a light port/smoothing on the pump inlet and outlet as to ease the oil flow, however I will not be shimming the relief valve at this point.
-
Hey, and sorry for this generic question, but as usual, I'm your average "just got into the RB/Skyline scene" guy trying to make sense of it all. In the process of tearing down this 20, I saw it had an N1 oil pump and it has the extra 8th screw in the backing plate. The crank unfortunately is the short snout version and at first glance, the drive gear engagement flat spot looks ever so slightly marked but no noticeable deformation, likewise on the crank's snout. I have yet to pull the pump apart (will do that tomorrow since I got an impact screwdriver today). I believe I have the right tolerance specs from the manual so I will be using feeler gauges on the pump teeth. Additionally, I noticed all rods aside from #3 had the stamps on the end caps facing one way, but only #3 rod's stamping faced the other. In other words, #3 conrod has the nissan logo facing down, while all other 5 rods have the nissan logo facing up. Yet, on one end of the rods there is a "0-0" marking and they all follow it. On the opposite end, each # rod is marked 1-1, 2-2, 3-3 and so on, and they all were aligned with no mismatch. Am I just paranoid and nitpicking, or is the casting random? Also, here are some more pictures I took of the conrod/piston assembly with a ruler for rough scale. Could anyone confirm if these would be the same as regular 20DET rods? 2cm thick and 1.2cm wide give or take. P.S It appears to be a low mileage motor off an R34 coupe however the #3 conrod bearing has weird delamination yet the crank journal is spotless. I am anxious to see what condition the pump internals are in.
-
I am using an epoxy-based primer from Novol. The specific one is Novol "Spectral 395" white. It is a light-coat non-sandable primer, so what I do is I prep the surface with 240 grit sandpaper then apply two-three coats of this primer with 10 minutes in between. For the underspray I use another product by Novol called "Gravit 600 Antigravel" coating, sprayed at 4 bar from a cheap spray gun, two thick coats. Also I use a variant of Wax/Grease remover called "Silicone remover" by OFO. Professional painters told me it's a good product to use when you need to wipe down bare metal or painted surfaces inbetween coats etc. Lastly, I was recommended to apply seam sealer OVER at least one coat of epoxy primer, but never over bare metal. The epoxy is what gives the bare metal protection against moisture and oxidation, and the seam sealer is what repels water from inter-panel space.
-
First foray into the Skyline world, R33 GTST restoration
Neostead2000 replied to Neostead2000's topic in Introduce yourself
We're situated about 40 degrees North of the equatorial belt which actually produces a very balanced climate. However, I happen to live on the coast so I have it even better. Summers start around May around 20C and peaks at 35-36C mid July/September. This year we had 20C up to New Years Eve! I was down working on the Skyline in the shed while everyone was busy eating and celebrating; couldn't let the good weather get away hah! However, normally our winters get anywhere from 0C to -15C and a good amount of snow. My AWD Mitsubishi lets me traverse the city and countryside even before the snowploughs go through! All that said, I'd give up this place for Australia any day! But that's a whole 'nother story. -
First foray into the Skyline world, R33 GTST restoration
Neostead2000 replied to Neostead2000's topic in Introduce yourself
Thanks. I've got a garage actually (pictured in front of the car), however it is small by Aus/US standards and you can't even swing the door wide open. I just put up a build thread where you can see some progress. Honestly I'm not too fussed about the whole thing now since this is NOT going to be my only 33. I will most probably end up selling it once I do as much as I can to it, then I'll look for another 33 with an actual 25 in it. That one will be the one I end up keeping. Prices are going through the feckin roof I tell you!


