

mosquitocoils
-
Posts
1,695 -
Joined
-
Last visited
-
Days Won
5 -
Feedback
100%
Content Type
Profiles
Forums
Events
Gallery
Media Demo
Store
Everything posted by mosquitocoils
-
I'm baaack: C34 Stagea
mosquitocoils replied to mosquitocoils's topic in Members Cars, Project Overhauls & Restorations
FINALLY installed a full-size battery into the engine bay. With the freddy intake this is kinda tricky so I took inspiration from the RB26 and punched a hole in the side of the battery tray to route the cold side piping through. I know I could have done a boot relocation (and even went as far as checking and measuring the sidewall area of the rear hatch) but this was cheaper and overall easier in my opinion, plus leaves me more options for rear cargo space (if I didn't put it in the sidewall it would be against the rear seat etc). I cut the hole, sealed the edges then covered in rubber edging (which I might redo with thicker edging down the track) and redid the hard pipes and silicone joiners to suit. Only needed to buy one new silicone joiner to make it all work. Very happy with the final product - It probably seems dumb but this is a big moment for this car, as this was one of the biggest issues when I bought it. It wouldn't start consistently and would always need jump starts etc. I've taken the Stagea out several times since putting this new battery in and I'm so much more confident with leaving home in it now. It cranks so much quicker and fires right up and it idles perfectly as soon as its started (whereas before the revs would drop and the car would almost die over and over for the first minute or two). -
I'm baaack: C34 Stagea
mosquitocoils replied to mosquitocoils's topic in Members Cars, Project Overhauls & Restorations
Been a while since the last update but I've been slowly getting stuff together and little bits done. Firstly I picked up some eyelids from a guy on Instagram. Mine arrived, but my mates never showed up and the seller stopped responding... thanks to paypal he got his money back but still a weird situation. Happy mine came! I don't have any great photos of them on but the one below shows them just sitting in place, not stuck down yet. Makes a big difference. Oh yeah and the new place makes it so much easier to work on this car! SO much space for storage and working. -
I'm baaack: C34 Stagea
mosquitocoils replied to mosquitocoils's topic in Members Cars, Project Overhauls & Restorations
Here's some photos from a recent night out. I'm loving the overall look and stance now. -
Dose/Stutu/Flutter
mosquitocoils replied to MindlessR33's topic in R Series (R30, R31, R32, R33, R34)
Oh man that's quite ironic, I actually swapped my straight piped de-restricted Kawasaki ER6N for my Stagea... My ears definitely thanked me for that trade!! -
Dose/Stutu/Flutter
mosquitocoils replied to MindlessR33's topic in R Series (R30, R31, R32, R33, R34)
I've never known nor do I claim to know. However I am building my Stagea specifically so it can dose and be as loud and obnoxious as possible... ??? -
I'm baaack: C34 Stagea
mosquitocoils replied to mosquitocoils's topic in Members Cars, Project Overhauls & Restorations
Ok cool! Here's the clip for Another Autumn... it's embedded from their Instagram so hopefully it works/stays up. -
I'm baaack: C34 Stagea
mosquitocoils replied to mosquitocoils's topic in Members Cars, Project Overhauls & Restorations
Now for the big reason for the rush... My Stagea, along with a couple of other cars from our club, were used for a photo/film shoot for a clothing label. Here are some pics I took myself, and I can't wait to see the much better photos still to come from the shoot. I'm not sure if branding/advertising/promo videos are allowed here but the final video turned out really cool! if anyone wants to see I can put up a link. -
I'm baaack: C34 Stagea
mosquitocoils replied to mosquitocoils's topic in Members Cars, Project Overhauls & Restorations
The last thing I needed to get done in a hurry was wheels. The car had 17 inch rota grid lookalikes when I bought it, they did the job but weren't exactly inspiring. A mate had these 18 inch RJR (Bob Jane specials) wheels on his S1 Stagea which is off the road for a full rebuild which will take him 6 months, so we decided I could borrow them/maybe buy them if I liked them. The reason they caught my eye is that they remind me of one of the OEM Stagea wheels... maybe Autech? I'm not exactly sure which ones but these do seem very fitting, especially on my silver Stagea. I'll be a lot happier once I have some more garage space in the new place for sure So at this point the car is running, driving and looks pretty badass compared to when I bought it! Once I have my new garage sorted out I'll be swapping the new turbo setup in and continue working on the ECU wiring so I can finally start tuning. Still need a wastegate and wideband soooo we'll see how long this all takes in reality haha -
I'm baaack: C34 Stagea
mosquitocoils replied to mosquitocoils's topic in Members Cars, Project Overhauls & Restorations
I've had these parts sitting here for a couple of months and finally had a reason to put them all on at the same time... New (painted) headlights and a new OEM front bar with a YUUUUGE cutout to show off that intercooler! Ignore the mess, starting to pack the garage up to move house. First things first... off with the old: Then on with the new headlights, this was just plug and play and once the front bar is off there's only about 5-6 bolts holding the headlight housing in. These have been taken apart and the housings have been painted black, while the outer ring of each light has been painted red. I wasn't originally a huge fan of the red but as you'll see in later pics I think it works well. The new front bar is the same as my previous one (just a stock OEM bar) but the previous owner cut the middle section out to show off the intercooler which I personally think looks sweet. It was only $50 and in overall better paint condition so why not. It wasn't a perfect fit though as that bottom lip needed the back trimmed A LOT to fit with my intercooler. This was the same when I first bought the car - the front bar had no lip because the previous owner didn't want to hack it up to fit, but supplied it to me upon sale to do what I wanted with it. I'm pretty handy with a dremel and made it all fit, so this was the same process again. This time though, the bolts which hold the lip on were all intact (previous owner already cut them all off the original bar) which means the lip will sit properly and higher than the one I've been driving around with! Nothing too difficult, just a trial and error process until it fits on the car with my intercooler/piping. The (kind of) finished product: -
I'm baaack: C34 Stagea
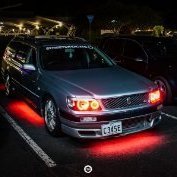
mosquitocoils replied to mosquitocoils's topic in Members Cars, Project Overhauls & Restorations
Keeping in line with purely aesthetic mods... LIGHTS! ALL OF THE LIGHTS!! I will explain the reason for these in a future post... Interior lights - a kit of 6 LED tubes which was pretty straightforward, wired up to switched 12v behind the stereo. Exterior lights - a $30 ebay kit of 4x RGB LED strips with remote control. I have the same kit in my daily Forester and it does it well! These were stuck one with double sided tape and the cables were routed up through the various holes in the floor (boot under the spare wheel, and there's also two holes under the rear seat, one on each side, with a grommet you can pop out). The front one goes around the engine bay and through the firewall near the brake booster and needed an extra 2m of 4-core wire to extend so it could reach the control box (good thing I have an awesome wire stripper!)... Then the lines all connect in the centre console. Sorry for potato quality pic (more coming soon) - And finally front demonic grill! This is just 2x red LED strips connected straight to the battery when I want them on. I leave it unplugged permanently and just connect them for photos. All up this stuff was super easy and I spent maybe $40 so not a huge deal and is visually super effective in person! -
Project 'Wheezy' Coupe
mosquitocoils replied to Wheezy's topic in Members Cars, Project Overhauls & Restorations
Looking damn good -
Damn this is a cool idea, welcome!
-
I'm baaack: C34 Stagea
mosquitocoils replied to mosquitocoils's topic in Members Cars, Project Overhauls & Restorations
In preparation for moving house (it's currently running, I don't want to jeopardise that right now!) I've switched my attention to some interior work and it's actually pretty therapeutic and calming haha. I finally have a working AC control unit! I still don't have AC as the condenser was removed from the engine bay and the lines cut at the firewall before I took possession but I'm not fussed, just having a blowing fan is a HUUUGE improvement on warm days. The next thing I picked up free from a mate - a Joying android 10" tablet head unit. Everything works but the touchscreen itself doesn't respond. I took the whole thing apart and I could buy a generic replacement digitiser off ebay for ~$50ish but I'm not committed to the idea just yet. For now I'm using a mouse plugged in via USB. I haven't actually driven the car yet so I'm not sure how annoying it will be, but it's not a daily so not fussed. Then while I had the centre console out to replace the stereo and install the AC unit I stickerbombed all the parts I could (audible groan...). Yeah yeah, it's ricey... ah well... I wanted this to be removable down the track if I didn't like it so spraying clear coat was out of the question. I used a combination of glue dots and super glue (only to stick to other stickers which were already stuck onto the trim parts, not to the trim itself) and it seems to be holding well for the timebeing. Looking pretty good - The final result with everything in place and buttoned up - I get that it's a bit ricey and dumb but it actually looks way better in person than I was expecting it to, especially contrasted against the new-ish black leather interior. Plus that 90s japanese "fast and furious" vibe (stickers, neons, big subs etc) is kind of a guilty pleasure of mine and seems fitting with the stagea hahaha. -
I'm baaack: C34 Stagea
mosquitocoils replied to mosquitocoils's topic in Members Cars, Project Overhauls & Restorations
I have been slowly making progress with wiring my Haltech to the stock ECU and while this picture may not seem like much, I'm stoked that I finally have an RPM signal along with correctly functioning home and trigger (I think...!). It turns out I'm just an idiot when it comes to reading ECU pinout diagrams ??? So as of now I'm up to here: - Reading RPM as well as engine position - Reading manifold pressure from internal MAP sensor - Reading throttle position - Reading coolant temp - Intake air temp sensor installed in cold side piping, need to run a wire from there into the cabin From here the plan is: - Cut injector wires and run directly from the Haltech - Cut ignition wires and run directly from the Haltech Once up and running under its own force then I'll add the fun things like boost controller, wideband and flex fuel sensor, all of which should mostly be simple plug and play. In related news I also saw this week that the latest Haltech updates now include auto transmission control! I will be watching this and trying to figure things out in the near future. At the moment the RB transmission isn't listed as one of the "supported" transmissions but there is an option to use a "generic transmission" and program everything in manually although I'm not comfortable with that at the moment. At this point it's likely only a matter of time until the RB auto is officially supported so I can probably wait a bit longer. This would mean I just get the Haltech patch cable and run full standalone which would be awesome! -
I'm baaack: C34 Stagea
mosquitocoils replied to mosquitocoils's topic in Members Cars, Project Overhauls & Restorations
I came across a really good deal on a different turbo setup and jumped on it. This is proper gear to replace the ebay GT35 turbo, manifold and gate on there at the moment. The more time I spend working on this car the more I realise I want to do things right and use proper parts so I don't have that lingering question about reliability in the back of my mind. Because I'm taking my time getting the Haltech wired in (parent life, other priorities etc) I'm not running any kind of tune yet so it makes sense to get this side of things sorted out now before going too much further with the ECU + tune. What's coming: - Hypergear ATR43 (G3 SAT) ceramic ball bearing with .63 rear - Havoc Fabrication externally gated + mildly ported factory manifold - Heatshield to suit I always wanted a Hypergear due to the reputation on this site even 10 years ago when I was researching upgrades for my R33. From what I can work out this turbo is pretty similar to a GTX3076 based on size and bearing material and should spool up nice and quick while still having good top end power. With all the other mods taken care of, this is an 11 second-capable turbo. I won't be able to fit it for at least a month due to moving house soon but I will be making it a priority as soon as I can! -
That's amazing and thank you for coming back and posting the end result!
-
What Have You Done To Your Stagea Lately?
mosquitocoils replied to Hanso's topic in Four Door Family & Wagoneers
I'm still working on wiring my Haltech in. Making some progress but now the thing won't start so (on the stock ECU) I can't test my latest connections! I did however just purchase a hypergear ATR43 ball bearing turbo... should be here next week ? -
You can go either way, depending on what your goal is. Basic mods like a free flowing exhaust will sound good, maybe offer a small improvement in power, but overall if you want to take advantage of the power increase you will need fuel/timing management of course. You will be 'safe' to drive around with an aftermarket exhaust and probably intake as that's what maybe 75% of young guys do here in Aus with no tune. Do some of them run into trouble and cause damage? Yeah. Can it be blamed entirely on lack of engine management? I would argue probably not. A lot of those same people also thrash their cars, probably lack maintenance etc. The smart ones realise that if they want to push their cars they should be using management of some kind. In my mind, for an RB the same line has always been exhaust and intake/pod filter/s. Add a boost controller to sit at 12/14 psi or so (maybe different for the RB26 stock twins, I'm not personally sure) but in that low-ish range and you shouldn't have many problems. I had this setup on my old R33 about 9-10 years ago and had that for about 2 years with no issues at all, but I used my car mainly for a fun daily and some spirited cruising on the streets. No track work, no limiter bashing or drifting etc. Having said all that, while the Power FC is older tech, it is still fine in cars of that era and as you said costs a fair bit less, and I would guess there are still a good quantity of tuners in Japan who tune them? That's the other point you need to consider.
-
First Time Skyline Owner in Virginia USA
mosquitocoils replied to LiteraCola's topic in Introduce yourself
Haha! Those japanese stereos are good for a laugh... we had a mate with a V35 skyline that came with the full japanese stereo and he purposely left it in there because it would audibly remind him when he was getting low on fuel. He couldn't understand what she was saying, just got to learn what that phrase meant hahaha. What stereo is in yours? Can you change the language you think? Also I'm with you about your daughter. My 2 year old son believes my Stagea is 'his car' and can do the BOV/flutter sound pretty good now as a result! He's grown so attached to it that my partner keeps telling me "you know you'll have to actually let him drive it one day" ? -
First Time Skyline Owner in Virginia USA
mosquitocoils replied to LiteraCola's topic in Introduce yourself
Hell yeah... I completely agree! My partner recently bought a Mazda CX5 with relatively low km on it and while it's fantastic to take on our longer trips on the highway, going to see family, the beach etc, it doesn't really strike me with any sense of "fun". It's super comfy and roomy but it almost drives itself. Anyway I love that you have your little slice of JDM history over there now. Enjoy all the looks you get! -
Thanks Kiwi. I was so sure that the 2x CAS 120 wires I needed had to be green as per the excel doc floating around, that once I saw them I decided they were it. Circled in pic attached. I see now that I was a whole block away from where I should be looking... and the fact they weren't next to each other, but on top of each other was making me think my wiring was all messed up... the black/red wires next to each other (44/45) and the and peachy wire (46) do look correct now. I'll splice into them when I get a chance and report back. Thanks! I'm still unsure how to test continuity though (just for future things like this) and I'm gonna keep trying to verify as I feel it's a pretty handy skill to add to the list! Ya live, ya learn ?
-
Also I identified a gnd and a 5v pin at the CAS plug. The other two pins weren't giving my any voltage drop to ground.
-
Thanks mate. Interesting that you said it needs sensor ground to crank. That would probably indicate that the ECU harness would need to be plugged into the ECU for my testing as the sensor grounds all come together there don't they? Might have to get some better probes that can better pierce wire insulation. I have the metal Mitsubishi CAS... and I've looked at that diagram A LOT over the past few days but it doesn't help me identify the specific place on the ECU the wires come out. That's why I'm trying to check continuity of wires between CAS plug and ECU to figure out which one is which manually. I was hoping there was an easier way but it doesn't look like it.
-
Bit of a strange one here but I am trying to identify which are the correct CAS wires at my ECU. (My S1 Stagea has the 0v300 ECU for which a pinout is basically non-existent. Some wires match with the R34 GT-T ECU but some do not, most importantly the CAS wiring for Home and Trigger. I'm trying to wire in a Haltech Elite 2000 and I'm stuck on these ones.) I'm a bit of a noobie when it comes to ECU wiring I will admit, but I have a lot of history with general car electrics. I thought this would be a simple case of unplugging the CAS plug, sticking a wire into it, running the other end of that wire into the cabin and checking for continuity between that and any/all of the ECU plug pins. When I did this I couldn't get any continuity readings from any of the 4 CAS pins across every ECU pin. I'm thinking I might have over-simplified the process and hoping someone here could help confirm a couple of things: - Where do the wires from the CAS actually go before going to the ECU? From the overall R33/R34 wiring diagrams it looks like it should be a straight connection. between I notice one of the colour of wires at the CAS plug do not show up at the ECU at all (peach) and the 2x thick green wires which are meant to be the CAS Home signal at the ECU are not present at the CAS plug itself either - Does the ECU have to be plugged in to get a continuity signal? I.E. me unplugging the harness could have interrupted the signal? Do I just pierce the back of each wire with my multimeter probe? - Same question for the CAS itself - does it need to be plugged in? Thanks
-
Plazmaman RB25DET Full Billet Intake Manifold
mosquitocoils replied to Riiim6's topic in R Series (R30, R31, R32, R33, R34)
Wow that's a decent dip in torque. At the moment I have a freddy manifold so even going back to stock long runners under the plazma top half would surely give me more torque than I have currently...

