Jump to content
SAU Community

Recommended Posts

3.jpg

PictureCeffy1.jpg

rims.jpg

2005_0104Image0011.jpg

Driveline:

RB20DET

RB25DET gearbox

OS Twin plate & light weight flywheel

2-Way LSD

HKS T04e

HKS cast manifold

HKS 38mm external gate with screamer

Wolf 3D v4 ECU

Blitz stainless air filter

Custom stainless crossover & turbo outlet pipes

Loud in tank pump

GTR injectors

GTR intercooler

Trust Type R BOV

RSR* exhaust

Splitfire coil packs

Modified rad support housing triple core TR's radiator

Twin thermo's (tempreture controlled via ecu)

ARC oil cooler + Grex filter relocation

Sard header tank

Cusco oil breather

Suspension/Handling:

Seam welded

GET coilovers with camber tops

Tein castor rods

Cusco rear upper arms

Cusco rear swaybar

Rear traction rods

Welded rear strut brace

Non HICAS cradle

Alloy cradle bushes

Alloy steering spacer

5 stud conversion

Interior:

Thrash style fixed back seat

Rare Abarth leather wheel

Omori Oil pressure, Omori water temp, Greddy oil temp, Blitz boost gauges in custom dash panel

Profec-A EBC

Exterior:

Pearl blue paint

Missile front bar (missing lip)

Insurance DIANA skirts and rear bar

Yanack bonnet vent

Bolt-on flares smoothed over

Late model front/rear lights and grill

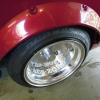
Stich Evolution 18x10 +18 front, 18x11 -1 rear

Falken Azenis ST115 tyres with good tread

Other stuff:

Factory sunroof

Fully rebuilt tailshaft

Jap workshop & club stickers

Bad bits:

Uncomplied, 15 yr import approval will be supplied.

Guards could do with attention.

Clutch isn't disengaging fully. This started happening straight after new engine was installed. Suspect snapped release pivot which is a cheap replacement.

Only on basic tune atm. 220 rwhp on 9 psi. No where near turbo's efficiency.

$10500 FIRM. Very unique vehicle. As far as I know the only Cefiro in Aus with Insurance skirts and/or rear bar. In saying that don't expect show quality body and paint, it's a pig.

[email protected]

0415291321

Edited by D-limo
Link to comment
https://www.sau.com.au/forums/topic/189641-fs-jap-spec-cefiro/
Share on other sites

  • Replies 56
  • Created
  • Last Reply

Top Posters In This Topic

Top Posters In This Topic

Posted Images

All work done in Japan. Tokage can get them not sure if they are the same size might be a bit smaller. Or Yahoo auctions. It's a mission though if you still want the rear doors to open like mine. Your guards are pumped and hot already aren't they?... Just find some good offsets and it will be sex.

  • 2 weeks later...
  • 2 weeks later...
  • 4 weeks later...
  • 4 weeks later...
i cannot beleive nobody's bought this??

it's so cheap it'd make a WICKED race car...

I think the non compliance issue is scaring people away.. $800 and a bit of effort and you have an off tap street car.

At this price it doesn't worry me too much if it doesn't sell. I just wish if it does, it be sooner rather than later :blush:

so cheap and so tempting...

you know u wanna!, you miss the ceffy chassis?

this is one cefiro that could pull off uras aero.

10k is a bargin...i dont have 10k :D

+1 :banana::D

I think the non compliance issue is scaring people away.. $800 and a bit of effort and you have an off tap street car.

At this price it doesn't worry me too much if it doesn't sell. I just wish if it does, it be sooner rather than later :D

just the wrong time of year to sell i think mate, nice car though, id own it if i had the $$ . also i think t04z and rb20 scare people off too tbh, is it laggy?

my mates got a T04Z on his RB20 with tomei cams and makes fullboost around 5k, but man does it hit hard, sounds nuts too. just rb25 the farker, use the same turbo, wack some uras aero on it, smash it on the ground, then drift the shite out of it. done and DONE.

sooo...whos got 10k to lend? :thumbsup:

It's a T04E from ye old school.. Starts spooling just before 4k. Screamer sounds fantastic at low boost...From what I've gathered turbo is rated at about 500-520hp.

Sorry but Diana owns Uras :thumbsup: In person the lines just look sex. She's JDM low already too :P

The only other Cefiro in the country with similar guards is the purple one running the RB26 that appeared in HPI.. That car got wrecked when they fitted Uras IMO

Edited by D-limo

Create an account or sign in to comment

You need to be a member in order to leave a comment

Create an account

Sign up for a new account in our community. It's easy!

Register a new account

Sign in

Already have an account? Sign in here.

Sign In Now


  • Similar Content

  • Latest Posts

    • From there, it is really just test and assemble. Plug the adapter cables from the unit into the back of the screen, then the other side to the car harness. Don't forget all the other plugs too! Run the cables behind the unit and screw it back into place (4 screws) and you should now have 3 cables to run from the top screen to the android unit. I ran them along the DS of the other AV units in the gap between their backets and the console, and used some corrugated tubing on the sharp edges of the bracket so the wires were safe. Plug the centre console and lower screen in temporarily and turn the car to ACC, the AV should fire up as normal. Hold the back button for 3 sec and Android should appear on the top screen. You need to set the input to Aux for audio (more on that later). I put the unit under the AC duct in the centre console, with the wifi antenna on top of the AC duct near the shifter, the bluetooth antenna on the AC duct under the centre console The GPS unit on top of the DS to AC duct; they all seem to work OK there are are out of the way. Neat cable routing is a pain. For the drive recorder I mounted it near the rear view mirror and run the cable in the headlining, across the a pillar and then down the inside of the a pillar seal to the DS lower dash. From there it goes across and to one USB input for the unit. The second USB input is attached to the ECUtec OBD dongle and the 3rd goes to the USB bulkhead connected I added in the centre console. This is how the centre console looks "tidied" up Note I didn't install the provided speaker, didn't use the 2.5mm IPod in line or the piggyback loom for the Ipod or change any DIP switches; they seem to only be required if you need to use the Ipod input rather than the AUX input. That's it, install done, I'll follow up with a separate post on how the unit works, but in summary it retains all factory functions and inputs (so I still use my phone to the car for calls), reverse still works like factory etc.
    • Place the new daughterboard in the case and mount it using the 3 small black rivets provided, and reconnect the 3 factory ribbon cables to the new board Then, use the 3 piggyback cables from the daughterboard into the factory board on top (there are stand offs in the case to keep them apart. and remember to reconnect the antenna and rear cover fan wires. 1 screw to hold the motherboard in place. Before closing the case, make a hole in the sticker covering a hole in the case and run the cable for the android unit into the plug there. The video forgot this step, so did I, so will you probably. Then redo the 4 screws on back, 2 each top and bottom, 3 each side and put the 2 brackets back on.....all ready to go and not that tricky really.      
    • Onto the android unit. You need to remove the top screen because there is a daughterboard to put inside the case. Each side vent pops out from clips; start at the bottom and carefully remove upwards (use a trim remover tool to avoid breaking anything). Then the lower screen and controls come out, 4 screws, a couple of clips (including 3 flimsy ones at the top) and 3 plugs on the rear. Then the upper screen, 4 screws and a bunch of plugs and she is out. From there, remove the mounting brackets (2 screws each), 4 screws on the rear, 2 screws top and bottom and 3 screws holding in the small plates on each side. When you remove the back cover (tight fit), watch out for the power cable for the fan, I removed it so I could put the back aside. The mainboard is held in by 1 screw in the middle, 1 aerial at the top and 3 ribbon cables. If you've ever done any laptop stuff the ribbon cables are OK to work with, just pop up the retainer and they slide out. If you are not familiar just grab a 12 year old from an iphone factory, they will know how it works The case should now look like this:
    • Switching the console was tricky. First there were 6 screws to remove, and also the little adapter loom and its screws had to come out. Also don't forget to remove the 2 screws holding the central locking receiver. Then there are 4 clips on either side....these were very tight in this case and needed careful persuading with a long flat screw driver....some force required but not enough to break them...this was probably the fiddliest part of the whole job. In my case I needed both the wiring loom and the central locking receiver module to swap across to the new one. That was it for the console, so "assembly is the reverse of disassembly"
    • But first....while I was there, I also swapped across the centre console box for the other style where the AV inputs don't intrude into the (very limited !) space.  Part# was 96926-4GA0A, 284H3-4GA0B, 284H3-4GA0A. (I've already swapped the top 12v socket for a USB bulkhead in this pic, it fit the hole without modification:) Comparison of the 2: Basically to do the console you need to remove the DS and PS side console trim (they slide up and back, held in by clips only) Then remove the back half of the console top trim with the cupholders, pops up, all clips again but be careful at the front as it is pretty flimsy. Then slide the shifter boot down, remove the spring clip, loose it forever somewhere in the car the pull the shift knob off. Remove the tiny plastic piece on DS near "P" and use something thin and long (most screwdrivers won't fit) to push down the interlock and put the shifter down in D for space. There is one screw at the front, then the shifter surround and ashtray lift up. There are 3 or 4 plugs underneath and it is off. Next is the rear cover of the centre console; you need to open the console lid, pop off the trim covering the lid hinge and undo the 2rd screw from the driver's side (the rest all need to come out later so you can do them all now and remove the lid) Then the rear cover unclips (6 clips), start at the top with a trim tool pulling backwards. Once it is off there are 2 screws facing rearwards to remove (need a short phillips for these) and you are done with the rear of the console. There are 4 plugs at the A/V box to unclip Then there are 2 screws at the front of the console, and 2 clips (pull up and back) and the console will come out.
×
×
  • Create New...