Jump to content
SAU Community

Recommended Posts

his is different. unless carwings has bee cracked that one will be a no go.

Hi Chis

I have been advised that this system may be a possibility. I understand that the system has been coverted on the V35 up to 11/2005.

We are looking at a July / August time line for the conversion. I will keep you posted on the progress.

Cheers

Andy

  • Replies 63
  • Created
  • Last Reply

Top Posters In This Topic

Top Posters In This Topic

Posted Images

  • 1 month later...

Say hi to V-SPOT for me will ya :D For those of you who frequent G35driver you will know where I got this from...

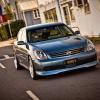
Lowered 1" all round with a set of 350z struts and springs

Before:

IMG_2847.jpg

After fitting Z suspension:

IMG_3958.jpg

IMG_3961.jpg

IMG_3960.jpg

IMG_3959.jpg

The Z suspension has made for a slightly firmer ride while maintaining comfort...body roll has been greatly diminished...feels great! Cheapest suspension mod I've done by far on any of my cars..Now does anyone know how to remove that damn piece of black plastic bumper protector just below the front bar? Its scraping everytime I roll out of my driveway.

Wheels next...watch this space :ermm:

Pretty sure chrome exterior comes standard.

Nice ride NISMO, so clean and sleek. Thinking of putting that zymol stuff on my car. Also thinking of the permagard ($$$$) so I don't ever have to do it again!

Where did you get the Z suspension from? I'm looking for lowered suspension that doesn't sacrifice ride comfort too much and from what you described, its the most ideal one.

Just noticed those weather shields on your windows. Take them off!!!!!

I took them off and it made my car look way better. Less old man/woman ish.

I'm a smoker and i know how convenient they are in the rain, but damn... they look so bad!

Took my stupid spoiler off too, left 5 holes on the boot. Got some rubber plugs in them but i think it still looks better.

Just my opinion though. :P

i am thinking of getting a v35 sedan too. Nice clean car.

where did you get the chrome trims around the door handle and window from?

any bodykit in future?

Pretty sure the chrome trim is factory standard.

As for bodykit...the only thing I am looking at adding is the OEM front lip and also possibly an M3 lip spoiler on the bootlid.

Just noticed those weather shields on your windows. Take them off!!!!!

I way ahead of you ;) Took my drivers side one off yesterday and spent about 2 hrs trying to get all the residue off! Another 3 more to do..I also took the chrome side door protectors off over the weekend...that also took me quite a while to get the sticky stuff off :P

Where did you get the Z suspension from? I'm looking for lowered suspension that doesn't sacrifice ride comfort too much and from what you described, its the most ideal one.

I got it from a workshop who recently fitted a set of coilovers to a 350z. Try looking in the 350z-tech forums under aussie classifieds. The wreckers may be a good place to search as well. If you can get a full set of suspension in good condition is definately a worthwhile suspension mod...

i heard a 350z tein s tech spring can be used for lowering. is this true? was it a better option to change over to a stock z's suspension? sorry, i am really keen of getting a sedan myself and is presently trying to pick things up before getting one.

There's not really a hard and fast rule on which combo is better. Yes the Tein S Techs are a common upgrade for the V35. I chose the Z suspension because it was available then and there, cheaper and also it was a matching shock and spring combo.

Read here for the different spring rates of various springs available:

http://g35driver.com/forums/showthread.php?t=65190

I way ahead of you :) Took my drivers side one off yesterday and spent about 2 hrs trying to get all the residue off! Another 3 more to do..I also took the chrome side door protectors off over the weekend...that also took me quite a while to get the sticky stuff off :(

It took me about 3 hours to take all 4 off. With the residue and other sticky stuff like glue from stickers, I use nail polish remover to get it off. Borrow some off your mum/girlfriend/sister and give it a try. Its also good for taking dry chewing gum off your jeans! :P

Where did you get the Z suspension from? I'm looking for lowered suspension that doesn't sacrifice ride comfort too much and from what you described, its the most ideal one.

The NISMO S-TUNE SUSPENSION KIT as fitted to 6 Speed PV35's can be sourced from Japan Parts it is available for CPV35's and a complete NISMO suspension kit with sway bars is another option, Nissan sell a BILSTEIN SPORTS SUSPENSION KIT which is listed individually for the 3 engine sizes in the sedan, info on Spring Rates and height it drops the car is listed.

post-5805-1210767480_thumb.jpg

Edited by Guest
  • 3 months later...

Just an update.. :)

Got my Z-tube today

OEM front lip has arrived from Japan waiting delivery

Clear Indicators and HKS Sport Muffler arriving this weekend from the US (Thx Mark!)

Thts it for now...just in time for my bday! :rofl:

IMG_4871.jpg

hey mate who to contact about clear indicators as i want a set!

Few places you can look:

www.everythingg35.com

www.riversideinfiniti.com

www.ebay.com (US site)

I got someone to purchase it for me from everythingg35.com and bring it back.

  • 4 weeks later...

Nice! Really like the clear indicators make the car look even better than before (almost impossible) Not sure when i'm going back to the states but will keep updated, might be able to organise a group buy while i'm there, which should make a difference on our dollar being so low.

Glad your happy about your purchase, apologise again for the delay for when I got back.

Can you please supply the Part number and what year model it fitted?

I just received my Nissan Genuine Clears. Hoping to fit tomorrow night.

Part B61F0 - AM900. That is for my 2003 CPV35

I got mine of a dude in the States via Ebay $55 delivered and got here in 10 days (customs must have been slow).Don't buy the cheapies!

Edited by Data Queue

hey guys im thinking of getting another set of clears in

as nice as the flat ones are, i saw an '06 model the other day which had like a protruded bulge on its clear corners

anyone have the jdm part number for the '06 model clear corner lights?

Create an account or sign in to comment

You need to be a member in order to leave a comment

Create an account

Sign up for a new account in our community. It's easy!

Register a new account

Sign in

Already have an account? Sign in here.

Sign In Now


  • Latest Posts

    • So stock ECU does not like anything above 10 psi?  That Nistune one is just for "try" if it will be any different, I know it need to be tune for that. I know but YOU may know about these problem but i/we dont. They few little Skylines here let alone people who know anything about tham so that is why iam asking here  
    • So now we have a radiator with no attachments whatsoever. It lifts up with a particularly tight spot between the drivers side air box mount and the lower radiator outlet, but if you've got this far you will sort that too. This is the lower mounts with the rad out so you can see where the rubber bushes go, it is a straight shot upwards Done! Assembly is the reverse of disassembly, with blood less likely to be shed.
    • Right, onto the second last trick. The Air Con condenser is mounted to the front of the radiator and stays in the car when the radiator is removed. There are 2x 10mm headed self tappers holding the top of the condenser to the radiator, remove those The bottom of the condenser is attached to the radiator with clips. You need to lift the condenser out of those clips and clear (up, then forward). f**ked if  could work out how to do that last bit with the front bumper on. I hope you can, and you share the trick.  Bumper removal probably deserves its own thread one day once I've recovered the will to live, but basically you need to remove the wheels, front inner guard liners (clips and 10mm headed bolts), the self tapper between the guard and the bumper at the rearmost point of the bumper (same as an R32 that bit), any remaining clips at the top/front of the grill, an absolute bastard design with a plate that holds the top of the bumper above the headlight each side (only 1 bolt which is tricky to get to, but the plate catches 2 places on the bumper and must be removed....carefully!) and push clips between the bumper and guard under the headlight. If you've done all that you will be faced with wiring for the fog lights on both sides and in ADM Q50 RS at least, 4 nasty tight plugs on the driver's side for the ADAS stuff. So, the clips at the bottom look like this on drivers side (looking from the front) And on the passenger side (also from the front), you can see this one is already out Clearance on both of these are super tight; the condenser needs to move up but the upper rad support mount prevents that, and the radiator can't move down far because it is (rubber) mounted. Once you achieve the impossible and drop the condenser off those mounts so it does not stop the rad moving, you are good to go
    • OK, next the shroud needs to come off and there are a couple of tricks. Firstly, there is a loom from near the passenger side headlight to the fans, coolant temp sensor etc and there is no plug to undo.  In my case I was OK to leave the shroud on top of the engine so I just undid the passenger side fan plug and about 10 of the clips which gave enough free wire to put it aside. The fan plugs were super tight, the trick I used was a small falt screwdriver to push down on the release tab, then a larger flat screwdriver to lever the plug out of the fan unit....be careful with how much force you apply! If you need to remove the shroud altogether for some reason you will have to deal with all the plugs (tight) and clips (brittle)....good luck. I removed all of the clips and replaced them with cable ties that I will just cut next time. Also, in the Red Sport / 400R at least, the intake heat exchanger reservoir hose is bolted to the shroud in 2 places with 10mm headed bolts; so remove them (the hose stays in the car; no need to undo it at the t fittings down at the radiator lower mount. Once you've dealt with the HX hose and the wiring loom, there are 3x 10mm headed self tappers holding the top of the shroud to the radiator; remove those.   The shroud then lifts out of the bottom mounts where it sits on the radiator, up and onto the engine out of the way. Simples
    • Ok, disregard my “rate them” comment, sorry for my unrealistic input
×
×
  • Create New...