Jump to content
SAU Community

Recommended Posts

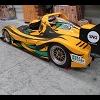
Hey guys, came across this car on the net, and thought you may be interested in having a look.

The full build up is here: http://www.rogerclarkmotorsport.com/gobstopper.asp?id=0

It's an awesome car, currently does all sorts of motorsport in the UK, inlcuding their Time Attack series.

Gobstopper Specs:

Power = 850 bhp

Weight = 1120 kgs

Intended use: street/track/hill climbs/drag strip/time attack

Body

WRC steel arches WRC front and rear bumpers

WRC carbon rear spoiler

FIA T45 multi point welded in roll cage

STi alloy bonnet with RCMS heat extraction vents and gas struts

Heated front screen

WRC non heated lightweight rear screen

Engine

2.0Litre closed deck subaru block

RCMS extreme arrow rods

RCMS 75mm steel crankshaft

RCMS omega flat top pistons (coated) compression ratio 9.5:1

V4 STi cylinder heads with WRC/RCMS O-ring head gaskets and gas rings

One piece Nimonic exhaust valves

One piece stainless inlet valves

RCMS uprated valve springs

Plasma nitrided titanium spring caps

WRC main and big end bearings

WRC R-Profile high wrap cam belt system

RCMS modified oil pump to suit R-Profile belt

WRC S10 inlet manifold

RCMS eight injector kit

RCMS 72mm throttle body

RCMS 5.5 litre alloy sump

WRC short runner exhaust manifold

Garret GT 35-40 turbo with speed sensor

K&N air filter with RCMS 100mm inlet trumpet

RCMS high flow intercooler with twin tube core

70mm stainless steel intercooler pipe work

Electronics

M800 Motec ECU with traction control,nitrous control,anti-lag

paddle shift control,and full engine management control and data login

Motec dash with data login

Defi gauges for turbo,oil,fuel pressure

Interior

FIA carbon kevlar Recaro seats

FIA Sabelt 6-point harness

Transmission

R180 STi rear axle 3.9:1 cwp and plated Modena LSD differential

GKN rally drive shafts front and rear

Torque line carbon fibre propshaft

Six speed subaru gearbox casing modified for sequential housing

Six speed Modena gear kit

Subaru 3.9:1 front cwp

RCMS sequential system

RCMS paddle shift system

Plated centre diff with 1:1 uprated output Modena gears

Plated front Modena differential

Fuel System

FIA spec 26 litre rubber/kevlar bag tank in aluminium cover

Twin Bosch fuel pumps (200 litre per pump)

-8 Goodrich fuel feed pipe

-6 Goodrich fuel return pipe

-6 fuel cooler with cooling fan on return

RCMS 8 injector distribution block

2x SX fuel regulators running at 4 bar static pressure

Suspension

WRC spec EXE-TC fully adjustable dampers

High and low speed bump + rebound adjustment

STi Rose jointed rear lateral links

STi Rose jointed rear trailing links

EXE-TC bottom rose jointed upright bushes

STi alloy front arms (polished)

STi quick-steer steering rack

Other

WRC roller bearing single piece steering column

Momo suede steering wheel

Nitrous

NX full wet system

121bs carbon bottle with heater jacket

High flow shark nozzle

Motec auto control or driver manual system

Adjustable from +35bhp to +400bhp

Clutch

RCMS spec triple plate alloy cover OS Giken clutch and flywheel

RCMS hydraulic light pressure system

Quick release dry brake fluid connection

Brakes

AP 355mm six pot front (track and road use)

AP 304mm four pot front (drag strip use)

AP 290mm four pot rear with floating discs

RCMS hydraulic carbon handbrake

-3 stainless steel goodrich pipe work and fittings

Wheels

Road/Track use 19x8 forged alloy 1 piece rims

Drag strip use 15x8 spun alloy 3 piece rims

Videos:

http://www.rogerclarkmotorsport.com/gobsto...highqality.mpeg

http://www.rogerclarkmotorsport.com/gobsto...g%20Course.mpeg

post-8405-1212016969_thumb.jpg

post-8405-1212016982_thumb.jpg

post-8405-1212016999_thumb.jpg

post-8405-1212017015_thumb.jpg

post-8405-1212017040_thumb.png

post-8405-1212017053_thumb.jpg

post-8405-1212017208_thumb.jpg

Link to comment
https://www.sau.com.au/forums/topic/221396-roger-clark-sti-gobstopper/
Share on other sites

I'm in love with this car, the quality of the parts, and the workmanship is amazing. Paddle shift!

I was going to say the same thing.

The level or finish and presentation is first class. This is is how all race cars should look.

The suede on the dash is awesome...the whole car is but the interior is pretty spesh.

beautiful car and it would be awesome fun to blast around in such a well sorted piece. good to see some nice aussie gear in there. aussie gear set, aussie diffs, aussie ecu. go ostraya!

thats a Super Rexy!

it might the first wrx that has a chance of keeping up with a GTR! :thumbsup:

As far as I know this car is comparable (if not faster than) to the Zen Performance WRX also from the UK that went to Japan to compete in Revspeeds super battle at Tsukuba that ran >1second faster than the "all conquering" Hioctane racing R32 GTR :(

Wheels

Road/Track use 19x8 forged alloy 1 piece rims

Drag strip use 15x8 spun alloy 3 piece rims

the first photo on the website and the last picture in original post the car has the full carbon fibre wheels on it, and the last picture in post 1

can't remember the company over in the UK that produces them off the top of my head

Edited by Whiplash

Create an account or sign in to comment

You need to be a member in order to leave a comment

Create an account

Sign up for a new account in our community. It's easy!

Register a new account

Sign in

Already have an account? Sign in here.

Sign In Now


  • Latest Posts

    • Did this end up working? Did you take some pictures?
    • And finally, the front lower mount. It was doubly weird. Firstly, the lower mount is held in with a bracket that has 3 bolts (it also acts as the steering lock stop), and then a nut on the shock lower mount itself. So, remove the 3x 14mm head bolts , then the 17mm nut that holds the shock in. From there, you can't actually remove the shock from the lower mount bolt (took me a while to work that out....) Sadly I don't have a pic of the other side, but the swaybar mounts to the same bolt that holds the shock in. You need to push that swaybar mount/bolt back so the shock can be pulled out past the lower control arm.  In this pic you can see the bolt partly pushed back, but it had to go further than that to release the shock. Once the shock is out, putting the new one in is "reverse of disassembly". Put the top of the shock through at least one hole and put a nut on loosely to hold it in place. Put the lower end in place and push the swaybar mount / shock bolt back in place, then loosely attach the other 2 top nuts. Bolt the bracket back in place with the 14mm head bolts and finally put the nut onto the lower bolt. Done....you have new suspension on your v37!
    • And now to the front.  No pics of the 3 nuts holding the front struts on, they are easy to spot. Undo 2 and leave the closest one on loosely. Underneath we have to deal with the wiring again, but this time its worse because the plug is behind the guard liner. You'll have to decide how much of the guard liner to remove, I undid the lower liner's top, inside and lower clips, but didn't pull it full off the guard. Same issue undoing the plug as at the rear, you need to firmly push the release clip from below while equally firmly gripping the plug body and pulling it out of  the socket. I used my fancy electrical disconnect pliers to get in there There is also one clip for the wiring, unlike at the rear I could not get behind it so just had to lever it up and out.....not in great condition to re-use in future.
    • Onto the rear lower shock mount. It's worth starting with a decent degrease to remove 10+ years of road grime, and perhaps also spray a penetrating oil on the shock lower nut. Don't forget to include the shock wiring and plug in the clean.... Deal with the wiring first; you need to release 2 clips where the wiring goes into the bracket (use long nose pliers behind the bracket to compress the clip so you can reuse it), and the rubber mount slides out, then release the plug.  I found it very hard to unplug, from underneath you can compress the tab with a screwdriver or similar, and gently but firmly pull the plug out of the socket (regular pliers may help but don't put too much pressure on the plastic. The lower mount is straightforward, 17mm nut and you can pull the shock out. As I wasn't putting a standard shock back in, I gave the car side wiring socket a generous gob of dialectric grease to keep crap out in the future. Putting the new shock in is straightforward, feed it into at least 1 of the bolt holes at the top and reach around to put a nut on it to hold it up. Then put on the other 2 top nuts loosely and put the shock onto the lower mounting bolt (you may need to lift the hub a little if the new shock is shorter). Tighten the lower nut and 3 upper nuts and you are done. In my case the BC Racing shocks came assembled for the fronts, but the rears needed to re-use the factory strut tops. For that you need spring compressors to take the pressure off the top nut (they are compressed enough when the spring can move between the top and bottom spring seats. Then a 17mm ring spanner to undo the nut while using an 8mm open spanner to stop the shaft turning (or, if you are really lucky you might get it off with a rattle gun).
    • You will now be able to lift the parcel shelf trim enough to get to the shock cover bolts; if you need to full remove the parcel shelf trim for some reason you also remove the escutcheons around the rear seat release and you will have to unplug the high stop light wiring from the boot. Next up is removal of the bracket; 6 nuts and a bolt Good news, you've finally got to the strut top! Remove the dust cover and the 3 shock mount nuts (perhaps leave 1 on lightly for now....) Same on the other side, but easier now you've done it all before
×
×
  • Create New...