

Announcements
-
Similar Content
-
-
Latest Posts
-

By joshuaho96 · Posted
From the factory on RB26s there's a fitting on the intake manifold collector/"plenum" that provides pre-throttle boost signal. That's how they did it back in the day, I figure it's fine to replicate it. -
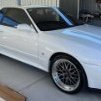
 I would be surprised if that wasn't the issue. It's probably telling you, that even if you remove the plastic liner, you may have some other clearance issues that may occur too in some scenarios. IE, tyre to guard. It looks like someone has already rolled the lip, but you may still have issues in the future IE, turning and hitting a bump etc. The fact it changes how bad it makes the noise when you are going backward vs forward is highly indicative that it's the tyre rubbing. They do make a terrible sound, even if you're only pushing a project car that has a liner hanging down on a tyre! Has the car been lowered? If it has been, what is the measurement from the centre of the wheel hub to the lip of the guard straight up?
 -

-
-
-


Recommended Posts
Create an account or sign in to comment
You need to be a member in order to leave a comment
Create an account
Sign up for a new account in our community. It's easy!
Register a new accountSign in
Already have an account? Sign in here.
Sign In Now