Jump to content
SAU Community

Recommended Posts

Hey guys

Finally picked up the front lip I want (Yes, same as yours Charles) - Car mate has them for 280+shipping so called around. Got one from DMD which fit (Well pre-fitted) really well for $150 brand new.

Primed it yesterday. Sanded it really early this morning. Sprayed my colour coats on about 30 minutes later then sprayed the clear coat on about 5 hours after that - Just finished up and put it in the kitchen under the fan to hopefully speed things up. It's pretty shinny at the moment as the last coat is only about 1 hour old.

post-50568-0-96895700-1309507463_thumb.jpg

post-50568-0-59432900-1309507468_thumb.jpg

post-50568-0-75586100-1309507471_thumb.jpg

Looks like the camera picked up a few specks of dust which I can't actually see with plain sight :| but at least you get the idea...

autobarn did the paint up pretty well. They recommended I use a can rather than my air gun so I did and I am glad I listened to their advice.

Got away with only 400ml of paint (5 good coats). When I did my bumper on my 33 with the airgun, I ripped through quite a bit of paint and quickly.

Link to comment
https://www.sau.com.au/forums/topic/369639-r34-diy-front-lip-spray-done/
Share on other sites

Haha, sorry! Have you got one Clint?

I've been looking around for a couple of weeks now it took me a while to get my hands on it.

It's an aftermarket fiberglass model - It's quite light and flexible. Really happy with it - It's much better quality and better fitting than my old aftermarket trial front for my R33 which was from a random seller.

Will recommend DMD (Slacks Creek - 2 turns from Moss Street). Looks fairly good and didn't need much sanding done at all. I would of spent probably no more than an hour priming + sanding.

Okay, I couldn't help myself. Everytime I walked into the kitchen I saw the lip sitting there... whispering in my ear to be installed and wow'd apon - So I listened and installed :D

Pretty happy with a can job - And pretty damn happy with DMDs product.

Took a couple of photos of it. The colours are really weird, for example the white 'glow' under the car is really just a shadow... and the car doesn't look as clean as it really is :(

post-50568-0-14463600-1309524177_thumb.jpg

post-50568-0-93498100-1309524181_thumb.jpg

post-50568-0-33693200-1309524185_thumb.jpg

post-50568-0-30329600-1309524189_thumb.jpg

Oh wow... Nice work... It looks like it fitted WAY better than my fibreglass one :O

Might consider getting one from them lol.

Can you please take some pics of joints? Wanna see how light it hugs the bar :P

@sonnyQ - That lip is originally a factory option lip :)

Just about to head out to my brothers birthday breakky... will try and take some photos while its in the sun.

After that photo I walked past with a small bottle of paint and bloody dropped a bit on the lip right in the middle >< I wiped it off and it looked clean but it was pretty dark... can't believe it (*#$ ANGRY. Hope it really is clean now I'll get to see it in the sun soon.

Anyways, hopefully get some close up pics of the joints in a few hours.

Haha its def worth it... In total I reckon I would of spent about 2 hours doing it (Not including the waiting around time)... Def worth the saving of $300+

We stopped by my mums house today on the way to see Transformers 3 (Friggen awesome) and on the way out, my misses was at the door already so I thought I'd quickly take a snap shot on my phone before letting her in :D

This is the first good photo I've been able to take since putting the front lip on.

post-50568-0-36664100-1309598703_thumb.jpg

that looks great man :)

my skylines the same colour as yours and I was wondering how this front lip would turn out!

I was planning to do it but my whole bumper is sagging pretty nasty .. took it to a panelbeaters who said the only way to fix it was to replace the whole bumper. might try to find something to match the impul sides/rear :)

I think the front lip will actually match the flow of your skirts :P

Because at the front of the lip (front of your car), it's higher than the rear of the lip (wheel guards), which is the lowest point of the lip, which I think will match your skirts :)

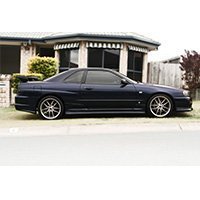
Here's a pic of it side on. I've actually got some genuine Nismo sideskirts at home that I'm gonna put on :D I think the front lip will match the height of the skirts, then my rear DIY pods will match the skirts xD

img0426xv.jpg

EDIT:

I just went outside to test fit my Nismo skirts and it seems to line up pretty well with my lip and pods :D

img1243sm.jpg

img1246lw.jpg

img1247z.jpg

that looks great man :)

my skylines the same colour as yours and I was wondering how this front lip would turn out!

I was planning to do it but my whole bumper is sagging pretty nasty .. took it to a panelbeaters who said the only way to fix it was to replace the whole bumper. might try to find something to match the impul sides/rear :)

I love this colour - I was specifically looking for this colour when purchasing the car

My old 33 had sagging front bumper but I fixed it up myself in about an hour. Took off the whole front bar and bent all the places the screws hold onto back up. I then chucked about $5 worth of fiberglass under the steel frame to give it a bit of support, drilled the holes again and put it back on - looked like brand new. Didn't take more than an hour - I almost busted my blinked though when I forgot to remove one of them...

This was a TRIAL front spoiler but I cut the bottom of it off because it was about 5cm off the ground lol.

post-50568-0-37957600-1309663277_thumb.jpg

Charles - That looks awesome. Will look really good when painted yellow. I'm also looking at getting the Aero skirts to match the front.... I would love some pods for my rear bumper but $300 bucks for a set? Seems a tad excessive in price for what you get. What are these DIY rear pods you are talking about?

Well the rear pods are garage door seals :P Here's the thread to it :)http://www.skylinesaustralia.com/forums/topic/367338-diy-universal-lip/

It cost me $25 for a roll, and since I only used 1/3 of the roll, the rear pods cost me less than $10 haha ;)

Also, I have a pair of Nissan Aero sideskirts for sale, very good condition :P Let me know if you are interested :)

Hey Charles,

A bit off topic here, but I was wondering if you had your wind deflectors sprayed or are they after market?

I was planning on pulling them off cause the color has gone off, but didn't want to risk breaking them, so I was going to mask the car off and get some black vinyl dye and dye them black.

Create an account or sign in to comment

You need to be a member in order to leave a comment

Create an account

Sign up for a new account in our community. It's easy!

Register a new account

Sign in

Already have an account? Sign in here.

Sign In Now


  • Similar Content

  • Latest Posts

    • Yeah well per the video it took 15s for the stock unit to start up....even if I give it a few seconds discount for starting that is at least 12 sec before you get a reverse camera if you are trying to leave a park.  The android unit is way faster, but 2016 for the stock unit is a long time ago in consumer electronics
    • Yea that’s why I said ima test them with multimeter and see the reads.
    • Only at idle. Isn’t a problem when rev it seems.
    • @Haggerty This seems silly to ask, but are you confident in your ability to tune the Haltech?  
    • Next on the to-do list was an oil and filter change. Nothing exciting to add here except the oil filter is in a really stupid place (facing the engine mount/subframe/steering rack). GReddy do a relocation kit which puts it towards the gearbox, I would have preferred towards the front but there's obviously a lot more stuff there. Something I'll have to look at for the next service perhaps. First time using Valvoline oil, although I can't see it being any different to most other brands Nice... The oil filter location... At least the subframe wont rust any time soon I picked up a genuine fuel filter, this is part of the fuel pump assembly inside the fuel tank. Access can be found underneath the rear seat, you'll see this triangular cover Remove the 3x plastic 10mm nuts and lift the cover up, pushing the rubber grommet through The yellow fuel line clips push out in opposite directions, remove these completely. The two moulded fuel lines can now pull upwards to disconnect, along with the wire electrical plug. There's 8x 8mm bolts that secure the black retaining ring. The fuel pump assembly is now ready to lift out. Be mindful of the fuel hose on the side, the hose clamp on mine was catching the hose preventing it from lifting up The fuel pump/filter has an upper and lower section held on by 4 pressure clips. These did take a little bit of force, it sounded like the plastic tabs were going to break but they didn't (don't worry!) The lower section helps mount the fuel pump, there's a circular rubber gasket/grommet/seal thing on the bottom where the sock is. Undo the hose clip on the short fuel hose on the side to disconnect it from the 3 way distribution pipe to be able to lift the upper half away. Don't forget to unplug the fuel pump too! There's a few rubber O rings that will need transferring to the new filter housing, I show these in the video at the bottom of this write up. Reassembly is the reverse Here's a photo of the new filter installed, you'll be able to see where the tabs are more clearing against the yellow OEM plastic Once the assembly is re-installed, I turned the engine over a few times to help build up fuel pressure. I did panic when the car stopped turning over but I could hear the fuel pump making a noise. It eventually started and has been fine since. Found my 'lucky' coin underneath the rear seat too The Youtube video can be seen here: https://www.youtube.com/watch?v=uLJ65pmQt44&t=6s
×
×
  • Create New...