Jump to content
SAU Community

Recommended Posts

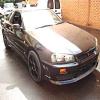
Just finished making and doing this to my GTT. Very time consuming process but well worth the hard work and end results. I've made molds off a GTR, so can make more peices if anyone wants/interested in them. (I am in NZ though) Can make the gtr front, sideskirts, rear bumper, nismo skirts/caps, wide rear arches (not identical to gtr slightly wider). I used genuine front gaurds, and sourced bonnet and spoiler. As i say alott of work but the end result has been worth it, very happy. Couple pics for those interested.

post-52658-0-11127200-1321649418_thumb.jpg

post-52658-0-76684500-1321649545_thumb.jpg

post-52658-0-02403200-1321649587_thumb.jpg

Edited by mawzy
  • Like 1

that looks really well done.... let me guess your a panel beater or spray painter??? its just a guess..

No I'm a builder by trade, skylines just my hobbie/interest. Had 32, and 33, always done as much work etc myself, otherwise wouldn't be able to afford. But was lucky enough to get access to a spray booth for the paint. Everything else has been done in my garage

Stupid fake GTRs

Stupid arrogant GTR owner.

  • Like 1

http://www.rhdjapan....B25DET&x=20&y=8

You can obtain most of the costs from this web page.

I favour the East Bear Masterpiece Collection kit. It's what's on my car.

Budget:

Purchase: $4000

Transport: $1800

Fitting & painting: $300

A much cheaper fibreglass kit, can be had from here, with the wide body option:

http://www.ebay.com.au/itm/Nissan-Skyline-R34-GTT-2Door-GTT-GTR-style-wide-bodykit-/260821721289

This is not the VSpec II Nur look alike though. The masterpiece collect is, and also is FRP or CF.

Edited by TR33GT-001

http://www.rhdjapan....B25DET&x=20&y=8

You can obtain most of the costs from this web page.

I favour the East Bear Masterpiece Collection kit. It's what's on my car.

http://www.skylinesa...06062011346jpg/

A cheaper fibreglass wide body conversion, can be had here:

http://www.ebay.com.au/itm/Nissan-Skyline-R34-GTT-2Door-GTT-GTR-style-wide-bodykit-/260821721289

However, this kit is not FRP, nor is it the VSpec II Nur look alike.

Edited by TR33GT-001
  • 2 years later...

For all the parts i make, can do at $1800NZ plus shipping (unknown) You would need to source bonnet and front fenders. If you aren't fitting and painting yourself, I would allow more than $300,

any chance your still making these parts?

  • 3 weeks later...

R34GTT to R34GTR. Not being an arrogant GTR owner - I just don't understand

(I have a 34GTT also)

Seems an expensive way to go.... If your that keen on the looks I suppose I can understand a little

but please NEVER put a GTR badge on anything other than a GTR

32 GTS-t's look a lot nicer with the GTR fronts on but IMHO not the 34GTT's

The black 34 above looks really well kept too

Edit: For the dollars mentioned above I'd upgrade to a 3076 with an .82 rear housing some ID injectors etc....

Edited by Sinista32

i think we can all agree that the GTR kit looks way better then any GT/T kit

i only did it because i did some front end damage and needed a new front bar and fenders and a bonnet was only a little more so i thought why not.

heres a before and after pic

OneYear_zps9545f80f.jpg

and how it sits now (obviously will never put any GTR badges on it)

IMG_3232_zpsbae5407e.jpg

IMG_3234_zps700a49d8.jpg

thats only the front end though, im going to get the skirt add ons and rear pods as well as pump my rear guards to fit bigger rims.

*sorry for the bad quality pics but i only have an iphone for a camera

Edited by IMPORTS ONLY

Okay persuaded - definitely a lot better

rims alone make/brake a 34's looks as well

also keep it clean of stickers

with the rear wing gone maybe think about removing the rear wiper and putting in a delete plug

yup definitely agree on the rims, dont know what i was doing with the stickers haha 34's look way better clean

and yup ive thought about getting rid of the rear wiper as a delete plug is only $50 but then the rear wiper jet is still there and that would look odd?

i think we can all agree that the GTR kit looks way better then any GT/T kit

Sorry, I disagree lol.

Here's my proof, car using stock front bar with oem lip, nismo skirts and stock rear bar.

1781188_10152596897129409_1215710287_o.j

1973609_10152596897204409_1615966804_o.j

Edited by Charles89

Sorry, I disagree lol.

Here's my proof, car using stock front bar with oem lip, nismo skirts and stock rear bar.

Hey Charles, is that a GTR front diffuser?

Does that just bolt right on to the oem lip, or did it need a bit of modification?

I have the same front as yours, but that lip sets it off

Create an account or sign in to comment

You need to be a member in order to leave a comment

Create an account

Sign up for a new account in our community. It's easy!

Register a new account

Sign in

Already have an account? Sign in here.

Sign In Now


  • Similar Content

  • Latest Posts

    • @Murray_Calavera  If I were an expert I wouldn't be in here looking for assistance.  I am extremely computer literate, have above average understanding on how things should be working and how they should tie together.  If I need to go to a professional tuner so be it, but I'd much rather learn and do things myself even if it means looking for some guidance along the way and blowing up a few engines. @GTSBoy  I was hoping it would be as simple as a large vacuum leak somewhere but I'm unable to find anything, all lines seem to be well capped or going where they need to be, and when removed there is vacuum felt on the tube.  It would be odd for the Haltech built in MAP to be faulty, the GTT tune I imported had it enabled from the start, I incorrectly assumed it was reading a signal from the stock MAP, but that doesn't exist.  After running a vacuum hose to the ECU the signal doesn't change more than 0.2 in either direction.   I'll probably upload a video of my settings tomorrow, as it stands I'm able to daily drive, but getting stuttering when giving it gas from idle, so pulling away from lights is a slow process of revving it up and feathering the clutch until its moving, then it will accelerate fine.  It sounds like I need to get to the bottom of the manifold pressure issue, but the ignition timing section is most intimidating to me and will probably let a pro do that part.  Tomorrow I'll try a different vacuum line to T off of, with any luck I selected one that was already bypassed during the DBW swap. @feartherb26  I do have +T in the works but wanted to wait until Spring to start with that swap since this is my good winter AWD vehicle.  When removing the butterfly, did it leave a bunch of holes in the manifold that you needed to plug?  I thought about removing it but assumed it would be a mess.   I notice no difference when capping the vacuum line to it or letting it do its thing.  This whole thing has convinced me to just get a forward facing manifold when the time comes though.
    • Update: tested my spark plugs that are supposed to be 5ohms with a 10% deviation and one gave me a 0 ohms reading and the rest were 3.9ohm<, so one bad and the others on their way out.
    • 9" wheels are a little too wide for a RWD 32. They can fit. People have put R33 GTR wheels on 32s for years and years. But they are a very tight squeeze. This has been known for about 30 years. As I said - there is no difference between a 17 and an 18 in terms of what will fit. The rolling diameter needs to stay about the same as stock - not very much larger. If you increase that, you will start to have problems. If you increae rolling diamater at the same time as yo increase width, you will have problems earlier. as 9" wheels are pushing the boundaries already, you would need to be careful with tyre choice. I would put 8.5s on the front of mine, but would expect problems with 9s.
    • post up screen shots of your injector tables
    • Diagnostic flow for a code 21 says check signal at the ECU pins, on a voltmeter of some kind it should read 0.1V at idle, 0.12V cranking, 0.15-0.25V at 2000 rpm. Check each coil such that +1, -3 is infinite or very high resistance, -3, +2 should do the same. (-1, +3), (+3, -2), (+1, -2), and (-1, +2) should all be somewhere between 0 ohms and high resistance. If you trace the path from the coil pin all the way back to the ECU in the diagram the resistance you measure at the coil vs connected to the harness should be pretty much the same. 
×
×
  • Create New...