Jump to content
SAU Community

Recommended Posts

Hi all,


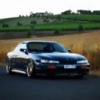
I have made the decision to sell the S14. Dont know why considering all the cash i have recently thrown into it, but just feels like its the right time.

I have had this car for 5 years and i am the second owner. It has been a weekend car for the last 2 years.

Has 180K on the clock and runs like a dream.

Car is serviced very regulalry with only quality Penrite Sin oils and genuine Nissan filters etc.


I am a mature owner (34) and drive this car with care.

I really cant believe i am selling this but the time has come.


DSC_6563-1.jpg


It was recently tuned by Trent at Status after the below list of mods were done and it made a very healthy and safe 265rwkw and 460mn on 18psi.

Car is currently tuned on E85

CEFABEF5-885B-45B5-A0EB-F277B3777403-199


See below for list of mods:

Current list of mods are:


Vertex side skirts

Factory front bar with HiSpec lip

Genuine Nismo rear bar (rare as i have never seen another S14 with one of these, which i love)

Blitz front mount cooler and piping

3" turbo back exhaust with Magnaflow mid muffler and Magnaflow rear twin tip muffler, (car will be sold with std cat)

Apexi Avcr ebc

Tomei Poncams and BC springs and retainers. - (1000kms old)

Kando TD06 20g 8cm turbo - (1000kms old)

Walbro E85 416lph pump - (1000kms old)

Deautschworks 1000cc injectors - (1000kms old)

Z32 afm - (1000kms old)

Forced Motorworks custom intake pipe - (1000kms old)

All above work done by Donny at Forced Motorworx

Jap spec Exedy stage 2 cushion button clutch - (1000kms old)

CLutch installed by Neil at Primal Garage

New VCT gear

Nistune ecu

BC Br coil overs

Adj camber and toe arms

Adj whiteline sway bars

AME/Enkei Circlar Spec R rims

18x9.5 +15 front

18x10 +15 rear

Full hi spec leather interior

Bride Low Max recliner (Car will come with factory leather front drivers seat)

2up carbon roof spoiler

Origin carbon boot lid spoiler

R33 diff with 4.11 ratio


All mods and tuning done by reputable workshops.

Donny at Forced and Neil at Primal can vouch for this car.


Has a full stereo system:

Alpine Head unit with full Ipod connectivity etc.

Focal front speakers and splits and Focal rear 6" speakers.

Soundstream amps and Sub.


Intereor is immaculate. No scrathes, tears or bubbles in the dash. New Genuine Nissan mats.

Tinted Windows.

Aero mirrors.


Thoose people who know me and the car know that it is very very clean and very well looked after.

Over the last 2 years it has been polished and cleaned more than it has been driven....and that is not an exageration.

No more work needs to be done to this car.


874af7dd-5c06-4580-b141-fcbb3264f0e3_zps

aafae385-3f4b-46af-8120-7e3451d9b5f9_zps

DSC_8007.jpg

DSC_5930.jpg

I am not in any real rush to sell it so low ballers dont bother.


I am asking for $12K which i think is very very reasonable considering i have pretty much spent $5K on it in the alst 6 months.


I have probably forgotten heaps of stuff so please feel free to ask any questions.


I live in Eastern Subs Melbourne.

Car will not be sold with a RWC and may be sold with full 12 months rego if the right buyer comes along.


I wont sell this car to anyone as i would hate to see it go to the wrong person.


If it doesnt sell on the forums (JDMST, MelbS15, SAU, NS.com) it will go on car sales.

I will try and take some pics of the interior tonight.

I can provide more pics etc.


PM me or call whatever

0425814813

Edited by greensa14

Yea the turbo is low mounted with factory manifold for the stealths!!

It makes full boost (18psi) by 3800.

I think i have a graph of the boost curve somewhere.

I will post up some interior pics in a minute.

Few more pics.

As mentioned the engine bay is very factory looking. Still running airbox, all pollution gear, factory BOV (modded to take the extra boost), charcoal cannister everything. I have had the police look over the bay and they couldnt pick anything.

Interior is schmick. Dash is spotless, steering wheel etc have no signs of wear.

Carpet is sweet and seats are also sweet. (Leather is easy to keep clean)

5532ab43-82ee-4ee4-85a9-efb20df7f24d_zps

22340f01-aa9a-45a6-ab68-d76bef16b60b_zps+

null_zps397efdc7.jpg

null_zps03eb482d.jpg

null_zpsafe255bf.jpg

null_zpsb1009613.jpg

null_zps7f3a7038.jpg

7b10994f-ce1c-4a6c-adb5-6db28d7252d5_zps

16fe6018-1463-45dd-afe8-f14b19a63fbe_zps

Edited by greensa14

Car comes with Factory leather seat as well, and also the std cat. The std mirrors also come with the sale, and factory suspension arms if wanted.

I will even throw in the factory diff.

Create an account or sign in to comment

You need to be a member in order to leave a comment

Create an account

Sign up for a new account in our community. It's easy!

Register a new account

Sign in

Already have an account? Sign in here.

Sign In Now


  • Similar Content

  • Latest Posts

    • So stock ECU does not like anything above 10 psi?  That Nistune one is just for "try" if it will be any different, I know it need to be tune for that. I know but YOU may know about these problem but i/we dont. They few little Skylines here let alone people who know anything about tham so that is why iam asking here  
    • So now we have a radiator with no attachments whatsoever. It lifts up with a particularly tight spot between the drivers side air box mount and the lower radiator outlet, but if you've got this far you will sort that too. This is the lower mounts with the rad out so you can see where the rubber bushes go, it is a straight shot upwards Done! Assembly is the reverse of disassembly, with blood less likely to be shed.
    • Right, onto the second last trick. The Air Con condenser is mounted to the front of the radiator and stays in the car when the radiator is removed. There are 2x 10mm headed self tappers holding the top of the condenser to the radiator, remove those The bottom of the condenser is attached to the radiator with clips. You need to lift the condenser out of those clips and clear (up, then forward). f**ked if  could work out how to do that last bit with the front bumper on. I hope you can, and you share the trick.  Bumper removal probably deserves its own thread one day once I've recovered the will to live, but basically you need to remove the wheels, front inner guard liners (clips and 10mm headed bolts), the self tapper between the guard and the bumper at the rearmost point of the bumper (same as an R32 that bit), any remaining clips at the top/front of the grill, an absolute bastard design with a plate that holds the top of the bumper above the headlight each side (only 1 bolt which is tricky to get to, but the plate catches 2 places on the bumper and must be removed....carefully!) and push clips between the bumper and guard under the headlight. If you've done all that you will be faced with wiring for the fog lights on both sides and in ADM Q50 RS at least, 4 nasty tight plugs on the driver's side for the ADAS stuff. So, the clips at the bottom look like this on drivers side (looking from the front) And on the passenger side (also from the front), you can see this one is already out Clearance on both of these are super tight; the condenser needs to move up but the upper rad support mount prevents that, and the radiator can't move down far because it is (rubber) mounted. Once you achieve the impossible and drop the condenser off those mounts so it does not stop the rad moving, you are good to go
    • OK, next the shroud needs to come off and there are a couple of tricks. Firstly, there is a loom from near the passenger side headlight to the fans, coolant temp sensor etc and there is no plug to undo.  In my case I was OK to leave the shroud on top of the engine so I just undid the passenger side fan plug and about 10 of the clips which gave enough free wire to put it aside. The fan plugs were super tight, the trick I used was a small falt screwdriver to push down on the release tab, then a larger flat screwdriver to lever the plug out of the fan unit....be careful with how much force you apply! If you need to remove the shroud altogether for some reason you will have to deal with all the plugs (tight) and clips (brittle)....good luck. I removed all of the clips and replaced them with cable ties that I will just cut next time. Also, in the Red Sport / 400R at least, the intake heat exchanger reservoir hose is bolted to the shroud in 2 places with 10mm headed bolts; so remove them (the hose stays in the car; no need to undo it at the t fittings down at the radiator lower mount. Once you've dealt with the HX hose and the wiring loom, there are 3x 10mm headed self tappers holding the top of the shroud to the radiator; remove those.   The shroud then lifts out of the bottom mounts where it sits on the radiator, up and onto the engine out of the way. Simples
    • Ok, disregard my “rate them” comment, sorry for my unrealistic input
×
×
  • Create New...