scottman Posted May 26, 2005 Share Posted May 26, 2005 i am shocked i wake up to scott come here scott my mum Yelling at me its like 11 she was outside with a white Gts-t Skyline r33 outside i am like wtf is going on I go out she shows me the car and says she found it at a dealer down the road i am Shocked for a Dealer in my shit town to have a import next i look at the price on the window thinking it will be heaps $16999 i am shocked Look over the car looks clean nice white body kit mags's 17's 120000ks inside is a little worn hand brake and gear boot it was imported in 2002 i get him to pop the hood I find a Big pod Brand name front month intercooler Turbosmart Bov look at the exhaust and under the car has 3" turbo back exhaust that isn't too loud which is just what i wanted i see aftermarket Shocks and springs Look at it i think its a M spec with bigger front brakes and LSD due to the wing caust its a 1994 with a big wing anyway bak to my story i go inside and mum goes back to the dealer i thing about it and go y not have a go i ring her tell him i will give him $15000 i wanting for a nah thats not right off him he takes my offer of 15k and tells me it is off the market till i pay up gave me a week I get 3 months warranty i went to the bank later that day and i am buying it he has taken it off the lot i am still shocked what r ya thoughts did i get a deal or what Link to comment https://www.sau.com.au/forums/topic/74938-getting-my-new-r33-soon-15000-from-dealer-what-a-deal/ Share on other sites More sharing options...
siksII Posted May 26, 2005 Share Posted May 26, 2005 from a dealer yes that is cheap, althouugh you are mistaken about a few things, all 33 gtsts have the same brakes and LSD not just mspec. just make sure its in good nick body and mechanically get a compression test done get someone that knows skylines to check it out it might be a rough car and u might not see it unless u know what to look for. Link to comment https://www.sau.com.au/forums/topic/74938-getting-my-new-r33-soon-15000-from-dealer-what-a-deal/#findComment-1375327 Share on other sites More sharing options...
scottman Posted May 26, 2005 Author Share Posted May 26, 2005 i know a bit about skyline and it looks fine to me yes the day i get it i am taking to my Import mod shop that only works on Imports and they will check it over Body is pretty good only thing is the seals on the windows and shit r going but my silvia was the same What what All r33 have LSD do they i thought it was only M specs Link to comment https://www.sau.com.au/forums/topic/74938-getting-my-new-r33-soon-15000-from-dealer-what-a-deal/#findComment-1375339 Share on other sites More sharing options...
siksII Posted May 26, 2005 Share Posted May 26, 2005 yeah windscreen and rear window seals are often shit probably best to take it to your import shop for inspection before u buy it rather than finding out any bad news (if there is any) after u get it. all r33 gtsts have LSDs and the same brakes for sure, i have inspected about a million of them for friends buying and have had 2 myself Link to comment https://www.sau.com.au/forums/topic/74938-getting-my-new-r33-soon-15000-from-dealer-what-a-deal/#findComment-1375348 Share on other sites More sharing options...
n15m0 Posted May 26, 2005 Share Posted May 26, 2005 your mom rocks! but i'd get the car checked out b4 handing over the cash. Looks can be deceiving. Having 120,000ks and also mods does make it a little suspect. but if its all good then well done! Link to comment https://www.sau.com.au/forums/topic/74938-getting-my-new-r33-soon-15000-from-dealer-what-a-deal/#findComment-1375353 Share on other sites More sharing options...
r34_skyline Posted May 26, 2005 Share Posted May 26, 2005 if only i had a mother like yours, lol. Link to comment https://www.sau.com.au/forums/topic/74938-getting-my-new-r33-soon-15000-from-dealer-what-a-deal/#findComment-1375400 Share on other sites More sharing options...
hippy Posted May 26, 2005 Share Posted May 26, 2005 120000ks probably = over 200000ks easily lol i'd really get it checked out ... Link to comment https://www.sau.com.au/forums/topic/74938-getting-my-new-r33-soon-15000-from-dealer-what-a-deal/#findComment-1375469 Share on other sites More sharing options...
noise Posted May 26, 2005 Share Posted May 26, 2005 series one r33's are the ugliest skylines ever made. Link to comment https://www.sau.com.au/forums/topic/74938-getting-my-new-r33-soon-15000-from-dealer-what-a-deal/#findComment-1375497 Share on other sites More sharing options...
grigor Posted May 26, 2005 Share Posted May 26, 2005 If your import shop is worth a pinch, they will know that car's history, especially if it's from a yard. Ask them before you hand over the cash. Link to comment https://www.sau.com.au/forums/topic/74938-getting-my-new-r33-soon-15000-from-dealer-what-a-deal/#findComment-1375562 Share on other sites More sharing options...
Mr R32 M-Spec Posted May 26, 2005 Share Posted May 26, 2005 nice find man, atleast your mum knows what a skyline is, she mistook my GTR for my bro's 180sx driving down the st. mark Link to comment https://www.sau.com.au/forums/topic/74938-getting-my-new-r33-soon-15000-from-dealer-what-a-deal/#findComment-1375575 Share on other sites More sharing options...
psybic Posted May 26, 2005 Share Posted May 26, 2005 nice find man, atleast your mum knows what a skyline is, she mistook my GTR for my bro's 180sx driving down the st.mark Thats gotta hurt. I reckon 15k from a dealer is an awesome price... gotta wonder how much he paid... :headspin: Link to comment https://www.sau.com.au/forums/topic/74938-getting-my-new-r33-soon-15000-from-dealer-what-a-deal/#findComment-1375728 Share on other sites More sharing options...
Munna Posted May 26, 2005 Share Posted May 26, 2005 series one r33's are the ugliest skylines ever made. thats your opinion and I think its a load of :bs!: Link to comment https://www.sau.com.au/forums/topic/74938-getting-my-new-r33-soon-15000-from-dealer-what-a-deal/#findComment-1375742 Share on other sites More sharing options...
NJR 34GTT Posted May 26, 2005 Share Posted May 26, 2005 Please make sure you get a compression test done before handing over your dollars! Link to comment https://www.sau.com.au/forums/topic/74938-getting-my-new-r33-soon-15000-from-dealer-what-a-deal/#findComment-1375789 Share on other sites More sharing options...
GTST_R32Dreamcar Posted May 27, 2005 Share Posted May 27, 2005 just a question like 2 or 3 ppl said get a compression test done is this a thing thats notorious for all skylines or just the 33?? how can u tell if it needs a compression test done or if it has a lack of compression? Link to comment https://www.sau.com.au/forums/topic/74938-getting-my-new-r33-soon-15000-from-dealer-what-a-deal/#findComment-1376161 Share on other sites More sharing options...
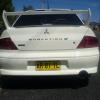
GTST_R32Dreamcar Posted May 27, 2005 Share Posted May 27, 2005 ohh yeah any pics of it yet? Link to comment https://www.sau.com.au/forums/topic/74938-getting-my-new-r33-soon-15000-from-dealer-what-a-deal/#findComment-1376164 Share on other sites More sharing options...
scottman Posted May 27, 2005 Author Share Posted May 27, 2005 he payed 10 k i hear on a trade in on a new ford guy just wanted to piss the car off i will get it checked then they spead 1k fixing little shit i am getting it checked Link to comment https://www.sau.com.au/forums/topic/74938-getting-my-new-r33-soon-15000-from-dealer-what-a-deal/#findComment-1376270 Share on other sites More sharing options...
siksII Posted May 27, 2005 Share Posted May 27, 2005 just a question like 2 or 3 ppl said get a compression test done is this a thing thats notorious for all skylines or just the 33?? how can u tell if it needs a compression test done or if it has a lack of compression? compression testing will show if there is something wrong with the engine, like damage or excessive wear, if a compression test comes out bad its best to do a leakdown test which will show exactly where the problem is. any car you buy should have a compression test done for peace of mind. especially if its a turbo or hi performance car. Link to comment https://www.sau.com.au/forums/topic/74938-getting-my-new-r33-soon-15000-from-dealer-what-a-deal/#findComment-1376278 Share on other sites More sharing options...
Babylon Posted May 27, 2005 Share Posted May 27, 2005 series one r33's are the ugliest skylines ever made. Keep your negative feed back to yourself, this guy is happy he has found his skyline don’t knock him down! scottman! make sure you also do rev check, and a Nissan fast check! Link to comment https://www.sau.com.au/forums/topic/74938-getting-my-new-r33-soon-15000-from-dealer-what-a-deal/#findComment-1376284 Share on other sites More sharing options...
scottman Posted May 27, 2005 Author Share Posted May 27, 2005 yea i booked it in for a test on Monday for the compression test and over all test thats guys Link to comment https://www.sau.com.au/forums/topic/74938-getting-my-new-r33-soon-15000-from-dealer-what-a-deal/#findComment-1376591 Share on other sites More sharing options...
scottman Posted May 27, 2005 Author Share Posted May 27, 2005 ain't paying for it till it gets a ok with the test Link to comment https://www.sau.com.au/forums/topic/74938-getting-my-new-r33-soon-15000-from-dealer-what-a-deal/#findComment-1376592 Share on other sites More sharing options...


Recommended Posts
Create an account or sign in to comment
You need to be a member in order to leave a comment
Create an account
Sign up for a new account in our community. It's easy!
Register a new accountSign in
Already have an account? Sign in here.
Sign In Now