Jump to content
SAU Community

$150 to person who fixes my leak between manifold and turbo


Recommended Posts

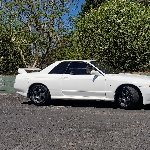
I have a R33 gts-t s2 skyline.

I had a look at the engine a few min ago and found ive got an exhaust leak at the flange between the engine manifold and the turbo.

I previously thought i wasn't getting full boost which was wrong. There is a distinct smell of exhaust fumes entering the car so I wont be going on long trips.

Joviant on the Northern Beaches will charge me for 6 hours labour at $80 per hour and about $100 for parts. Another local exhaust place wouldn't touch my car because its a turbo.

Can someone recommend a place to take it to because I can't afford $500.

I'd be happy getting one of the forum members to work on my car because i'm not confident in doing it myself. I'll purchase the parts needed.

$150 to someone that is willing to fix my skyline located in Sydney (northern beaches).

I'll throw in a carton if wanted but I havent drunk since my 21st so it will be a lonely drink.

Let me know if anyone is interested.

Mark

first thing I would do is check that the bolts are all tight, though they should be 'cos they'r supposed to be locked. Then I would be looking at just replacing the gasket and seeing if that worked, it probably will, about 2 hours all up I would think + cost of a manifold to turbo gasket.

if its the exhaust gasket between the turbo & manifold i replaced it on my gf's s14 a couple of weeks ago! was $45 for the gasket plus took me like ALL day but i'm a slow worker plus no need to rush it my gf's paying me (hehehe) in favours! o and a mate helped me for about an hour which is when i got most of the work done! i didn't even pull the turbo all the way off, just down far enough to get the old bits of gasket off and the new one on! just make sure none off the old gasket drop into the exhaust housing when doing it! and use anti seize, i used molykote 1000 when putting all the nuts & bolts back on! i broke one of the heat sheild bolts trying to undo it!

Today I went to talk to Richard from PR Technology (near the post office) but they were all shut and didnt have any notice in the window indicating when they will reopen.

I also tried ringing the place I bought the car from but they don't seem to be around either.

Why do things go wrong when everyone is on holidays and its the first time you really need your car. grrr.

I blame Murphy - him and his laws.

Mark

There was a white van there when myself and a friend went down. The garage doors were closed, and feeling the front of the van the engine seemed cold indicating that it had not been run recently. We went there between 9:30am and about 10:30am.

Maybe he popped in later in the day :)

Seems like a place that specialise in Porches, does he do work on your skyline?

Mark

I've recently changed a turbo that I have never done before.

Then I had to put the origional back on again.

All up putting a turbo on and putting every thing back together took me 2hrs.

The first time it took a whole day to remove and re-install

Here's a quick run down on how to replace the gasket.

Remove the cross over intake pipe.

move the ic piping so that it doesn't get in the way.

this should take no more than 30mins now you can't see anything above the turbo.

Get a big flat head screw driver and bend the tabs straight that lock the nuts that attach to the manifold.

Grab a 1/2" sized ring spanner and remove all the nuts.

Use a hammer and tap it with another ring spanner forced up against the ring spanner on the nut when removing the lower bolts.

This wont have to be done if you have good quality ring spanners like i.e Sidchrome as they are relatively thin around the edges and will slide all the way on to the bolt not hitting the exhaust housing.

Chepo's will hit the edge of the exhaust housing and cause you to curse and possibly round off the nut.

Now simply pull the turbo out away from the manifold. There should be enough flex in the exhaust. You may have to loosen off the Bov return bolt that holds it firm which is next to the Intake crossover pipe to get enough flex without having to remove the afm.

Slide the new gasket ($37 from Nissan) in and do up the nuts, then slap all the rest back on and off you go.

If the leak is between the manifold and head you will need a new gasket about $100 as i only recently got one. You will also probably break a few studs when you go to take it off. Once you have got the manifold off i would recomment replacing all of the exhaust manifold studs as you wont wont to do this all again later, they only cost $2 each so there is another $24.

Would recomend taking the turbo off and replacing the gaskets for that as well. Don get these from nissan just go to any turbo place.

Will probably take you a day to do if you dont have lots of experience.

Clint,

When you say any turbo place, where do you mean..

I dropped in to Motor mates and they said its not listed for a VL 3ltr and to go Genuine or Motor Traders.

I Autobarn Sell the turbo to manifold gasket for $30 but they didn't have any at the time i needed one.

i had the same problem with mine but worse it was the manifold to head gasket

i would not recommend doing this unless you have the neccassary tools because if the bolt snaps inside the head as 4 of mine did you need to drill into the bolt and use a set of easy outs to extract it

easy to do if its cyl 3 or 4 but if the bolts fron 1,2,5 or 6 go your going to need a right angle drill cos its a tight fit ti get in there

beleive me i did this about 4 months ago

to check for where the leak is look for exhaust residue around the gaskets this will tell you where its comming from

or when engine is cold( so you dont burn your hand)

feel around for exhaust blowing out as you rev the engine a bit

good luck

if you want ill have a look at it for you and see if we can find the leak

5 hrs to put the thing back on when it took 2 hrs to take off?!?!

Putting it back on is easier and quicker.

One trick is to fit the wastegate once the turbo is bolted and also fit the oil drain pipe once the turbo is bolted on.

Then it slips in there no problems, I had trouble with the oil drain pipe causing a restriction to movement when trying to slide it on the dump pipe then the manifold.

Originally posted by Clint32

i would recomment replacing all of the exhaust manifold studs as you wont wont to do this all again later, they only cost $2 each so there is another $24.

Sorry to Hijack...

Where can I find replacement studs? What are the (stud) measurements i should be chasing (also on a RB20DET ) ?

Thanks,

46n2

Create an account or sign in to comment

You need to be a member in order to leave a comment

Create an account

Sign up for a new account in our community. It's easy!

Register a new account

Sign in

Already have an account? Sign in here.

Sign In Now


  • Similar Content

  • Latest Posts

    • OK, next the shroud needs to come off and there are a couple of tricks. Firstly, there is a loom from near the passenger side headlight to the fans, coolant temp sensor etc and there is no plug to undo.  In my case I was OK to leave the shroud on top of the engine so I just undid the passenger side fan plug and about 10 of the clips which gave enough free wire to put it aside. The fan plugs were super tight, the trick I used was a small falt screwdriver to push down on the release tab, then a larger flat screwdriver to lever the plug out of the fan unit....be careful with how much force you apply! If you need to remove the shroud altogether for some reason you will have to deal with all the plugs (tight) and clips (brittle)....good luck. I removed all of the clips and replaced them with cable ties that I will just cut next time. Also, in the Red Sport / 400R at least, the intake heat exchanger reservoir hose is bolted to the shroud in 2 places with 10mm headed bolts; so remove them (the hose stays in the car; no need to undo it at the t fittings down at the radiator lower mount. Once you've dealt with the HX hose and the wiring loom, there are 3x 10mm headed self tappers holding the top of the shroud to the radiator; remove those.   The shroud then lifts out of the bottom mounts where it sits on the radiator, up and onto the engine out of the way. Simples
    • Ok, disregard my “rate them” comment, sorry for my unrealistic input
    • OK, now we are ready to get started. You need to remove the air boxes on each side for clearance. The cover is straightforward, undo the clips on the top and lift the front cover out of the rest of the housing. If it is tight you can remove the air filters first. The rear section of the airbox is trickier. On each side you need to remove the Air flow meter wiring which is held to the airbox with a clip; you need to get behind the clip on 2 sides if you want to remove it without breaking it - unclip the harder side and pull on the clip with medium force, then unclip the easier side and it should pop out The airbox is held onto the intake hose with a spring clamp; you need to get a flat bladed screwdriver behind the spring on both sides and pop them outwards. When you have got them in the right unclipped place they will stay there and the airbox slips out pretty freely. Put a rag in the intake to prevent anything getting dropped in there, and also to prevent you seeing that the turbo seal is leaking oil (as they do). Then. The top of the radiator is held by a steel plate, it is secured by 2x10mm and 2x12mm headed bolts . Remove them and remove the plate Also grab the bushings that hold the radiator to the plate on each side so they are not lost!
    • Next, remove the upper and lower radiator hoses, both are held with a spring clamp. While you are under there, tackle the Auto Trans cooler lines.  Again both are held on with spring clamps, and as mentioned above you should cap them on the radiator side with an 8mm cap, and on the car side loop them with a length of 8mm pipe - this will stop you losing a dangerous amount of AT fluid during the rest of the job If you've been meaning to add a sender for AT trans temp, this is a great time to do it; put a sender fitting into the passenger side line as that is the inlet to the cooler/radiator.
    • Next you need to remove the intake duct (as with pretty much every job on these cars), it is a series of clips you gently remove with a flat bladed screwdriver. They do get brittle with time and can break, and I have not found a decent quality aftermarket one that fits (they are all too soft or flimsy and don't last either) but the nissan ones are a couple of bucks each (ouch).  Once the clips are off (either 8 or 10, I didn't check) you lift the intake duct out and will see the reservoirs Undo the line into the radiator side cap (some bent needle nosed piers are awesome for spring clamps) and then remove the 4x 10m nuts that hold both in place.  I didn't get these pics, but remove the line under the radiator reservoir (spring clamp again) then remove that reservoir. Then you can get at the intake reservoir, same thing, spring clamp underneath then remove it. BTW This is a great time to put in a larger (+70%) combined reservoir that AMS makes..... https://www.amsperformance.com/product/q50-q60-red-alpha-coolant-expansion-tank/ They also make an Infiniti branded and part# version if that is your thing
×
×
  • Create New...