

Announcements
-
Similar Content
-
-
Latest Posts
-

-
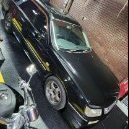
 Jax Tyres Smithfeild Ive gone there a few time, well for tyres. on my 3rd visit I spoke to the dude and told how i just got slugged for rotors, brakes ect. His reply was golden; have you read whats on the front of the building. Never forgot it. before picture, good friend got all these goodies installed. Well time to study, servicing, maintenance all before this weekend driving lesson.
 -
 Hello, first of, I’ve looked at many threads on this code but none have helped me, if you know one that will help me feel free to post a link. Now to my problem. Recently I was driving and noticed the check engine light came on. I went home and did the test to see what code it gave. I got the 21 code but everything seems fine with the car, no misfire, idle is good, acceleration is the same as when I bought it. I mean no signs of obvious failure. If no misfire is happening I can rule out the coil packs right? Which is about 98% of posts saying it is. If anyone has had this happen and found the issues let me know please. No other lights are on. The car WAS due for an oil change. I since then changed it so idk if that triggers code 21. Either way it hasn’t turned off.
 -
 Your both right, it may hold a bit longer then. Soon I need to change the synchros, should I fit the billet plate while I'm at it? Or just a waste of money?
 -
By AnimalGarage · Posted
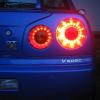
Some of the east coast US Stagea got together this past weekend at Lime Rock Park in CT for Grid Life Circuit Legends. This is probably my favorite pic of the shoot with @Morgan.Mundahl on IG. Hope we get more stags out next year! i think I spotted 5 other than my own at the event.
-


Recommended Posts
Create an account or sign in to comment
You need to be a member in order to leave a comment
Create an account
Sign up for a new account in our community. It's easy!
Register a new accountSign in
Already have an account? Sign in here.
Sign In Now