
Announcements
-
Similar Content
-
-
Latest Posts
-
 OK, so regardless of whether you did Step 1 - Spill Step 2 - Trans pan removal Step 3 - TCM removal we are on to the clean and refill. First, have a good look at the oil pan. While you might see dirty oil and some carbony build up (I did), what you don't want to see is any metal particles on the magnets, or sparkles in the oil (thankfully not). Give it all a good clean, particularly the magnets, and put the new gasket on if you have one (or, just cross your fingers)
 -
One other thing to mention from my car before we reassemble and refill. Per that earlier diagram, There should be 2x B length (40mm) and 6x C length (54mm). So I had incorrectly removed one extra bolt, which I assume was 40mm, but even so I have 4x B and 5x C. Either, the factory made an assembly error (very unlikely), or someone had been in there before me. I vote for the latter because the TCM part number doesn't match my build date, I suspect the TCM was changed under warranty. This indeed led to much unbolting, rebolting, checking, measuring and swearing under the car.... In the end I left out 1x B bolt and put in a 54mm M6 bolt I already had to make sure it was all correct
-
A couple of notes about the TCM. Firstly, it is integrated into the valve body. If you need to replace the TCM for any reason you are following the procedure above The seppos say these fail all the time. I haven't seen or heard of one on here or locally, but that doesn't mean it can't happen. Finally, Ecutek are now offering tuning for the 7 speed TCM. It is basically like ECU tuning in that you have to buy a license for the computer, and then known parameters can be reset. This is all very new and at the moment they are focussing on more aggressive gear holding in sports or sports+ mode, 2 gear launches for drag racing etc. It doesn't seem to affect shift speed like you can on some transmissions. Importantly for me, by having controllable shift points you can now raise the shift point as well as the ECU rev limit, together allowing it to rev a little higher when that is useful. In manual mode, my car shifts up automatically regardless of what I do which is good (because I don't have to worry about it) but bad (because I can't choose to rev a little higher when convenient). TCMs can only be tuned from late 2016 onwards, and mine is apparently not one of those although the car build date was August 2016 (presumably a batch of ADM cars were done together, so this will probably be the situation for most ADM cars). No idea about JDM cars, and I'm looking into importing a later model valve body I can swap in. This is the top of my TCM A couple of numbers but no part number. Amayama can't find my specific car but it does say the following for Asia-RHD (interestingly, all out of stock....): So it looks like programable TCM are probably post September 2018 for "Asia RHD". When I read my part number out from Ecutek it was 31705-75X6D which did not match Amayama for my build date (Aug-2016)
-
OK, Step 3, if you need to remove the valve body, either to replace it, the TCM, or to do a more complete drain. First, you need to disconnect the TCM input wires, they are about half way up the transmission on the drivers side. One plug and the wires are out of the way, but there is also a spring clip that stops the socket from sliding back into the transmission. On my car the spring clip was easy to get, but the socket was really stuck in the o-ring of the transmission housing and took some.....persuasion. You can see both the plug to remove (first) and the spring clip (second) in this pic Incidentally, right next to the plug, you can see where the casting has allowance for a dispstick/filler which Nissan decided not to provide. there is a cap held on with a 6mm head bolt that you can remove to overfill it (AMS recommend a 1.5l overfill). Final step before the big mess, remove the speed sensor that is clipped to the valve body at the rear of the box. Then removal of the Valve Body. For this the USDM Q50 workshop manual has a critical diagram: There are a billion bolts visible. Almost all of them do not need to be removed, just the 14 shown on the diagram. Even so, I both removed one extra, and didn't check which length bolt came from which location (more on that later....). Again it is worth undoing the 4 corners first, but leaving them a couple of turns in to hold the unit up....gravity is not your friend here and trans oil will be going everywhere. Once the corners are loose but still in remove all the other 10 bolts, then hold the valve body up with 1 hand while removing the final 4. Then, everything just comes free easily, or like in my case you start swearing because that plug is stuck in the casing. Done, the valve body and TCM are out
-
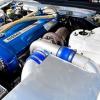
OK, so if you are either going for the bigger fluid change or are changing the valve body which includes the Transmission Control Module (TCM), first you should have both a new gasket 31397-1XJ0A and a torque wrench that can work down to 8Nm (very low, probably a 1/4 drive one). You can probably get by without either, but I really didn't want to pull it all apart together due to a leak. First, you now need that big oil pan. The transmission pan is 450 long x 350 wide, and it will probably leak on all sides, so get ready for a mess. There are 24x 6mm headed bolts holding the pan on. I undid the 2 rear corners, then screwed those bolts back in a couple of turns to let the pan go low at that end, then removed all the middle bolts on each side. Then, undo the front corner bolts slowly while holding the pan up, and 80% of the fluid will head out the rear. From there, remove the remaining bolts and the pan is off. You can see it is still dripping oil absolutely everywhere...it dripped all night.... I got another couple of litres when I removed the pan, and then another few when I removed the valve body - all up another 4l on top of the 3 already dropped in step 1.
-


Recommended Posts
Create an account or sign in to comment
You need to be a member in order to leave a comment
Create an account
Sign up for a new account in our community. It's easy!
Register a new accountSign in
Already have an account? Sign in here.
Sign In Now